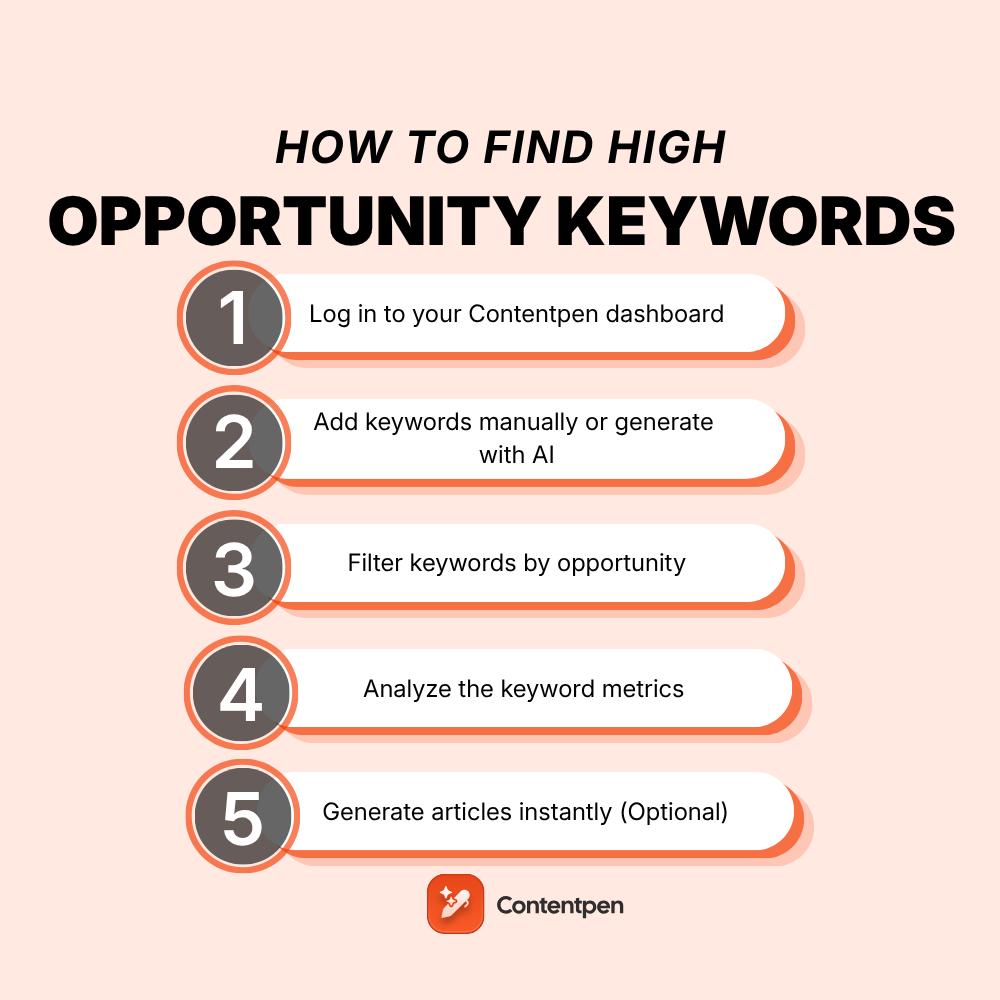
Category: Product guides and updates

Discover detailed product guides, reviews, and tutorials to make informed choices and get the most out of your favorite tools.

  • How to find high opportunity keywords in Contentpen?

    How to find high opportunity keywords in Contentpen?

    If you’re creating content that ranks, converts, and stands out, finding the right keywords is half the battle. In Contentpen, spotting high opportunity keywords, those with good traffic potential and low competition, is a breeze if you know where to look.

    Here’s a step-by-step guide to help you uncover keywords that bring results without too much hassle.

    Step 01: Log in to your Contentpen dashboard

    Once you’re logged in, go to the “Keywords” tab in the left-hand menu.
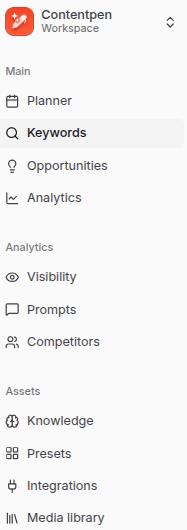
    Contentpen keyword option selection from the main menu.

    Step 02: Add keywords manually or generate with AI

    After that, you’ll be taken to a new window where you will be given three options.

    You can either:

    • Add keywords manually or import from CSV through Semrush, Ahrefs, or any other SEO tool. You can also use AI-generated keywords if you want.
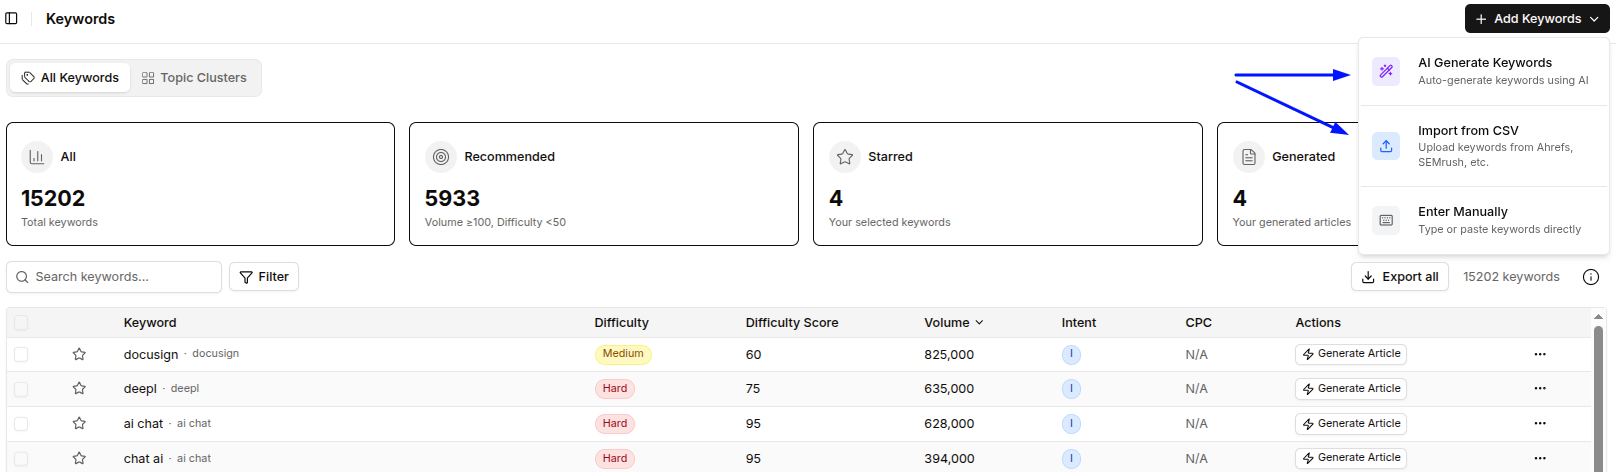
    Keyword selection main menu - Contentpen.ai.
    • If you choose ‘AI Generated Keywords’, you’ll be required to select or deselect your existing content pillars. The tool will also allow you to add a new content pillar if one doesn’t exist, and the option to change the number of keywords received per topic.
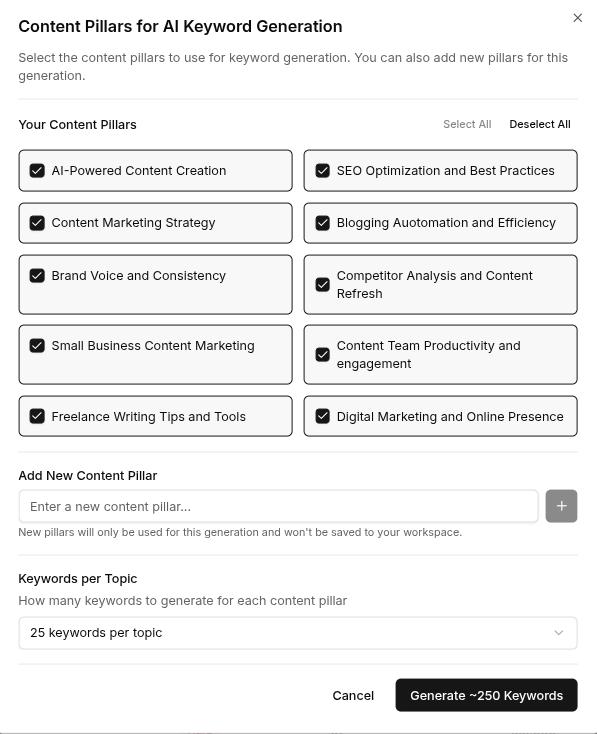
    AI added keyword screen - Contentpen.ai.
    • If you choose the manual option, type each keyword and press Enter. Repeat this process until all keywords are added. Duplicates will be ignored by the system.
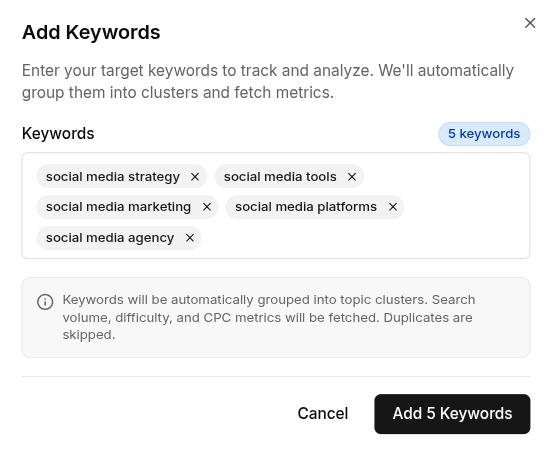
    Manually add keywords - Contentpen.ai.

    Also read: How to use Contentpen presets to save time and write faster?

    Step 03: Filter keywords by opportunity

    After entering your keywords, you’ll see four filter cards at the top of the page:

    • All
    • Recommended
    • Starred
    • Generated

    From these cards, choose the ‘Recommended’ card to filter your list for keywords with high volume, high cost-per-click (CPC), and lower difficulty.
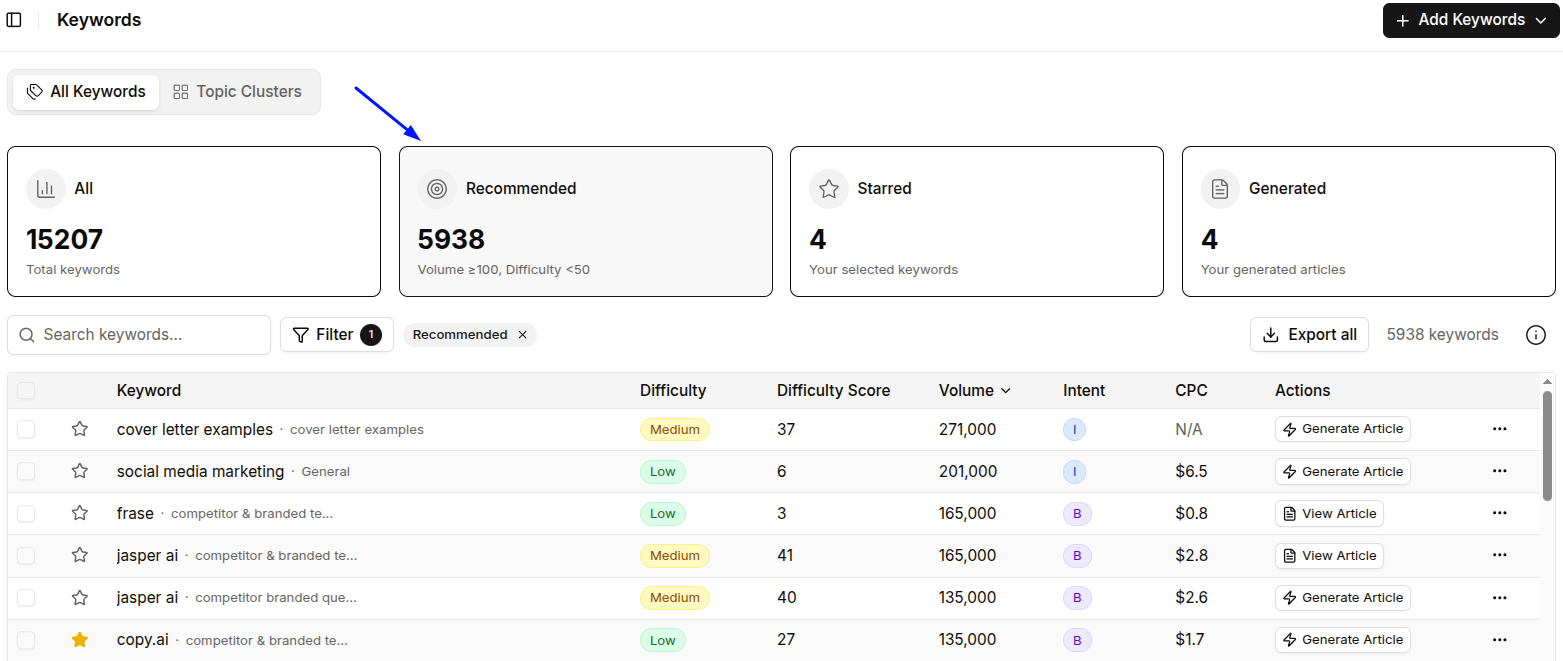
    Contentpen keywords main menu with 'Recommended' filter.

    Step 04: Analyze the keyword metrics

    Each keyword will show useful data such as:

    • Difficulty, Difficulty Score, Volume, Intent, CPC, and Action options. These help you choose the keywords with the best ranking potential.

    Step 05: Generate articles instantly (Optional)

    Once you’ve narrowed down a high-opportunity keyword, click on “Generate article” to start creating content right away. 
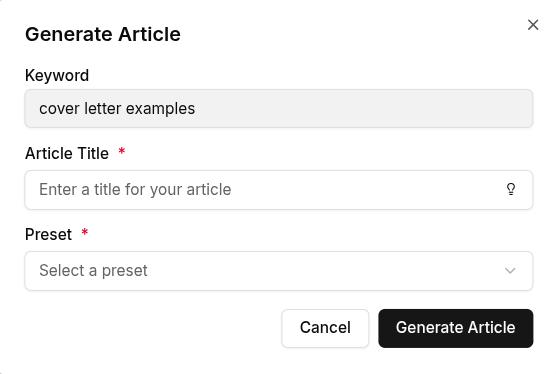
    Article generation window - Contentpen.ai.

    On this screen, enter the article title, or use integrated AI to suggest an SEO-optimized topic. Then, select your content preset, and you’ll get your complete article in a few minutes. No switching tabs or tools, Contentpen handles it all in one place.

    Also read: How to create a blog in less than 10 minutes using content presets.

    Benefits of using high-opportunity keywords for your content

    Here are the top benefits of using high-opportunity keywords for your content:

    1. Faster rankings with less competition

    High-opportunity keywords typically have lower competition, meaning fewer websites are actively targeting them. This allows your content to rank higher in search engine results more quickly, especially if your website is relatively new or doesn’t have a high domain authority. 

    Instead of struggling to outrank established competitors on broad, high-difficulty keywords, you can focus on terms where you have a realistic chance of appearing on the first page.

    2. More targeted and qualified traffic

    High-opportunity keywords often align with specific search intent. Users searching for them usually have a clear idea of what they’re looking for, whether it’s information, a solution, or a product. 

    By targeting these terms, you’re more likely to attract visitors who are genuinely interested in your content, product, or service, resulting in higher engagement and conversion rates.

    3. Higher return on content investment

    Creating content requires time, research, and resources. High-opportunity keywords enable more value from that investment. 

    Automated keyword research

    Work on keywords worth writing for

    Get search terms with real ranking potential, not just high volume.

    Try Keyword Research for FREE
    AI SEO Interface

    Since these keywords are easier to rank for and still offer decent traffic potential, you can achieve meaningful SEO results without a large budget or a long wait. This is especially beneficial for small businesses, startups, and agencies aiming for efficiency.

    4. Smarter content planning and topic selection

    Focusing on high-opportunity keywords allows you to build a content strategy around real search gaps in your niche. You’re not just creating random content, you’re addressing actual queries that aren’t yet fully answered by competitors.

    This not only improves your chances of ranking but also positions your brand as a valuable and helpful resource in your industry.

    5. Data-driven decision-making

    High-opportunity keywords are identified through clear SEO metrics such as search volume, keyword difficulty, CPC, and user intent. 

    This means you’re making informed decisions based on actual data, not just assumptions. It ensures that the topics you target have both demand and potential, reducing the risk of wasting time on content that won’t perform.

    Final words

    High-opportunity keywords equal faster rankings, more traffic, and better results. With Contentpen’s keyword research tools, you’re not guessing; you’re building content around real data and real potential.

    So before you write, let our AI SEO writer guide you to the keywords that help you establish topical authority and presence online.

    From outline to publish-ready content that fills them

    check

    Structured

    check

    Consistent

    check

    SEO-aligned

    check

    Fast

    Generate Outlines FREE
    AI SEO Interface

    Frequently asked questions

    What are high-opportunity keywords in Contentpen?

    High-opportunity keywords are search terms with a good balance of low competition and high traffic potential. These keywords are easier to rank for and more likely to bring targeted traffic to your content.

    Can I use Contentpen’s keyword research tool without any keyword ideas?

    Yes! Contentpen offers an AI-generated keyword feature. Simply enter a broad topic or niche, and the tool will suggest relevant, high-opportunity keywords for you.

    How accurate is the keyword data in Contentpen?

    Very accurate! Contentpen provides keyword metrics like difficulty score, search volume, CPC, and intent, powered by reliable data sources to help you make informed decisions.

    What’s the difference between high-volume and high-opportunity keywords?

    High-volume keywords have a large number of searches but may also be highly competitive. High-opportunity keywords strike a better balance by offering decent volume with lower competition, making them ideal for quicker ranking.
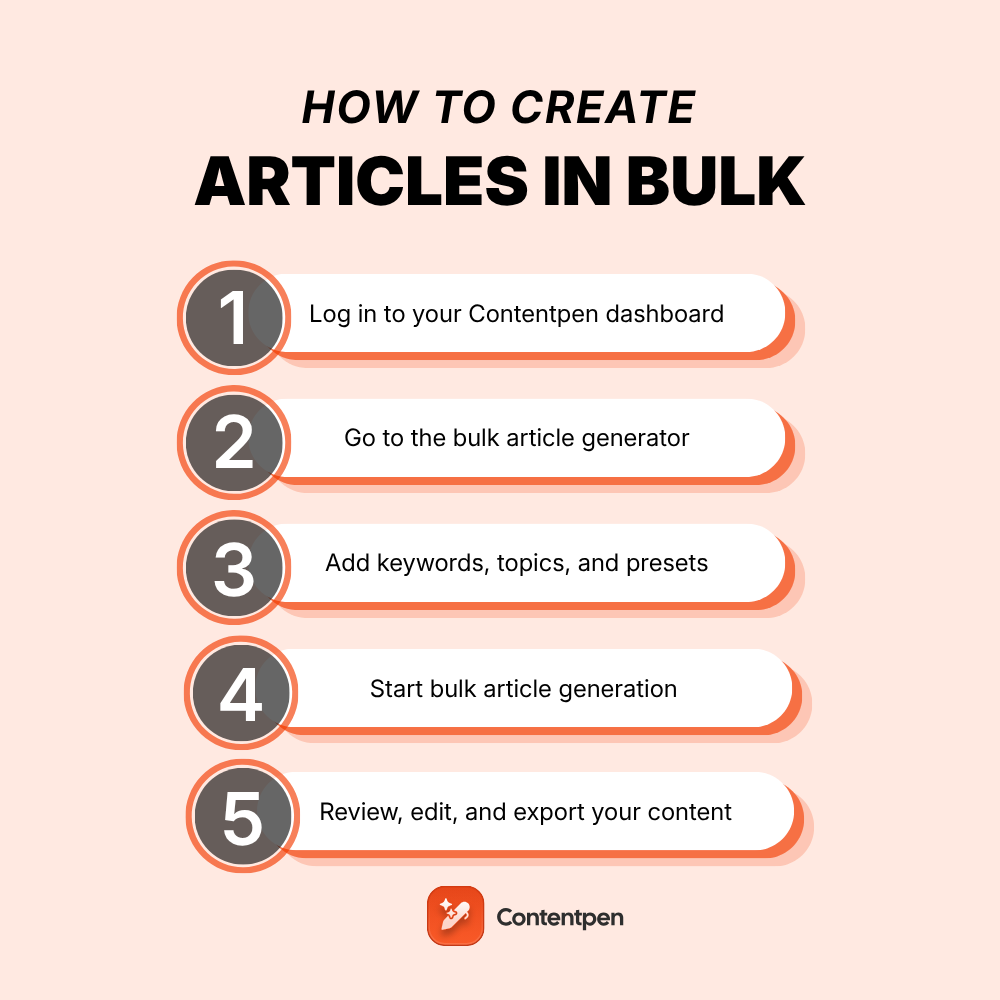
  • How to create articles in bulk using Contentpen?

    How to create articles in bulk using Contentpen?

    Writing articles one by one can slow you down, especially if you’re managing multiple content projects, clients, or websites. 

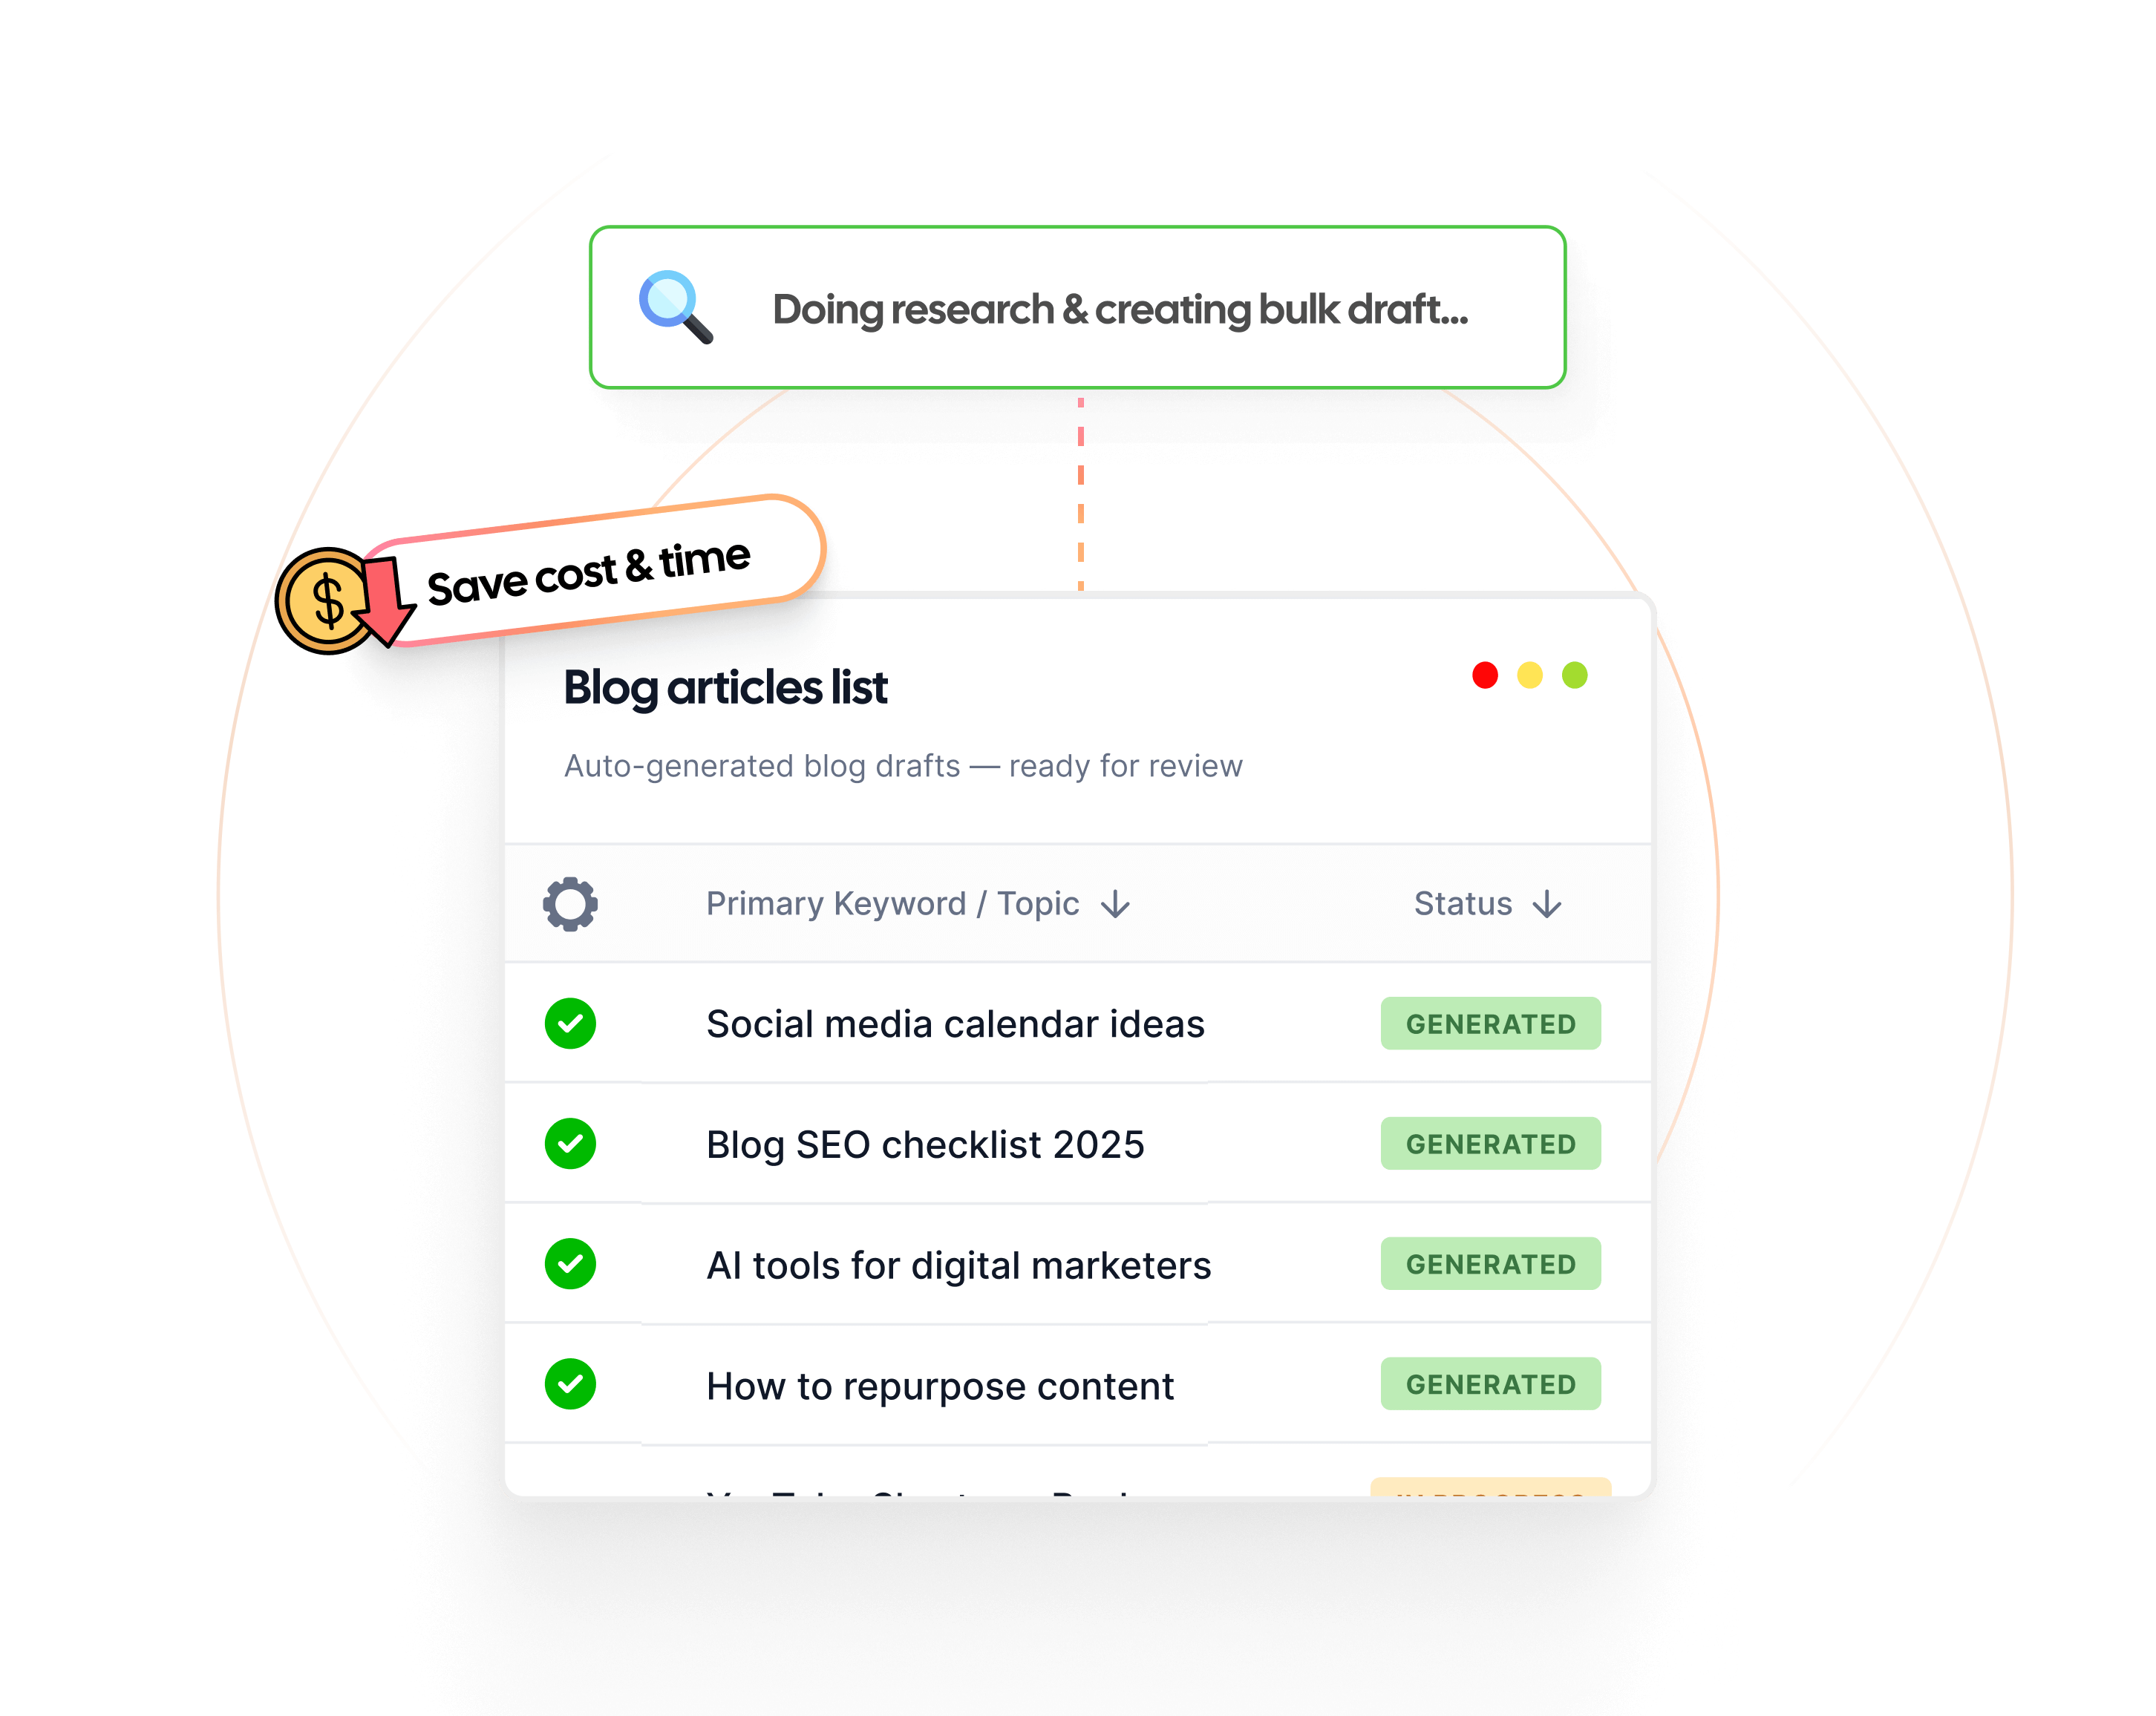
    That’s where Contentpen’s bulk article generation feature comes in. It allows you to create dozens of articles using presets and keywords in just a few clicks, saving you hours of manual work. 

    Whether you’re building a niche blog network or preparing content for the entire month, our AI writing tool simplifies the entire content workflow.

    In this guide, we’ll walk you through each step of creating articles in bulk using Contentpen and share tips to make the most out of this feature.

    Step 01: Log in to your Contentpen dashboard

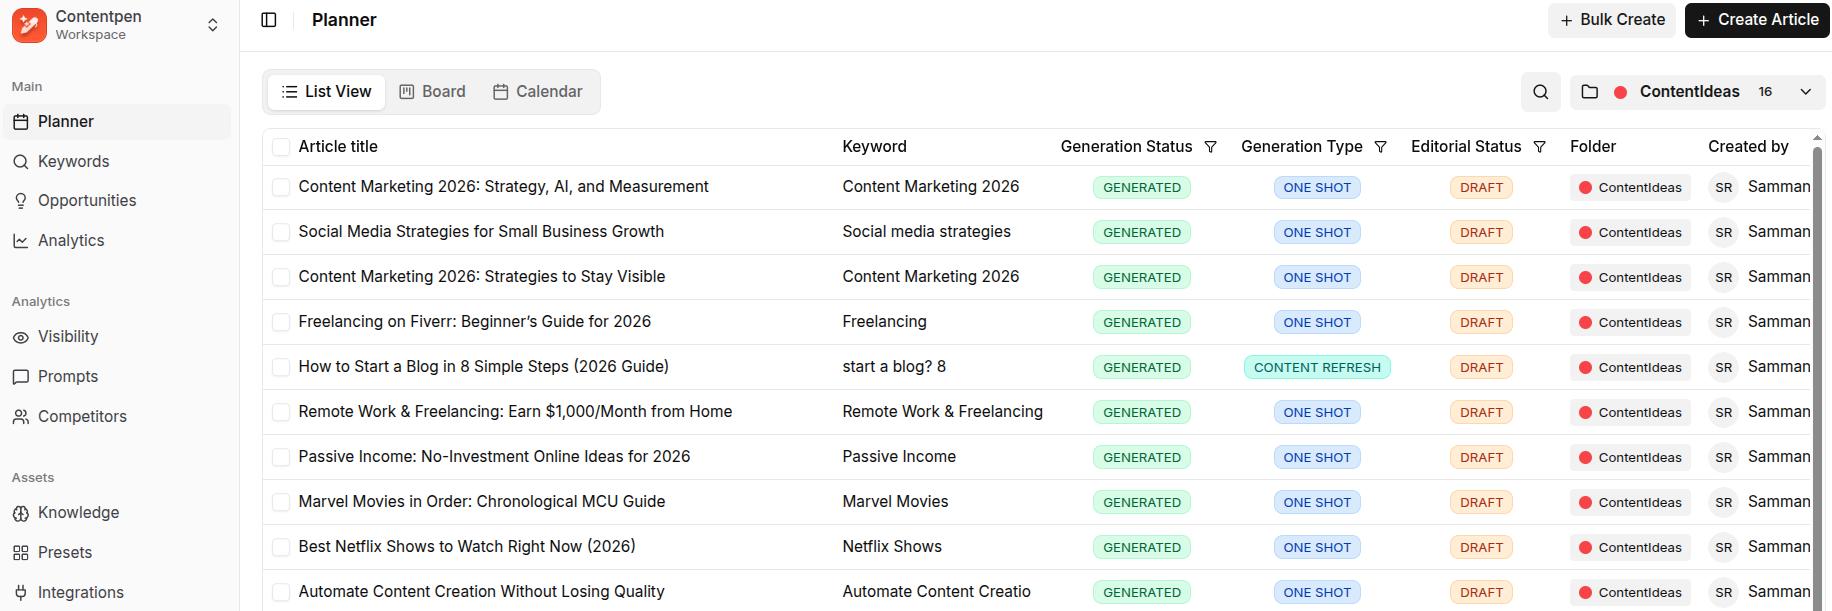
    Start by logging in to your Contentpen account. If you don’t have one, you can sign up in seconds. Once inside, head to the main ‘Planner’ dashboard.

    Contentpen main dashboard.

    Step 02: Go to the bulk article generator

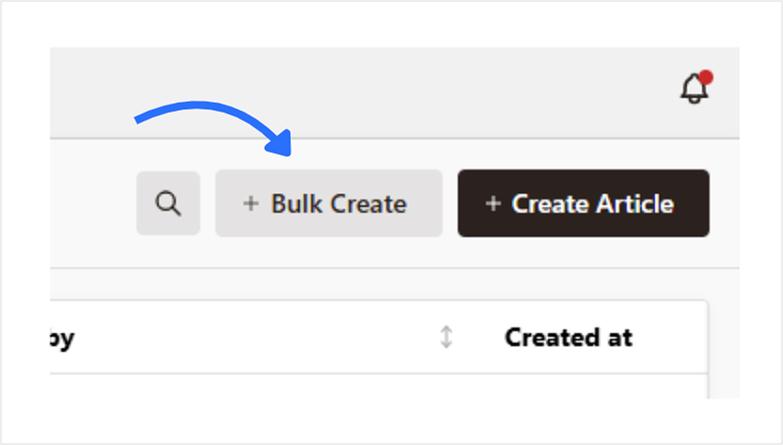
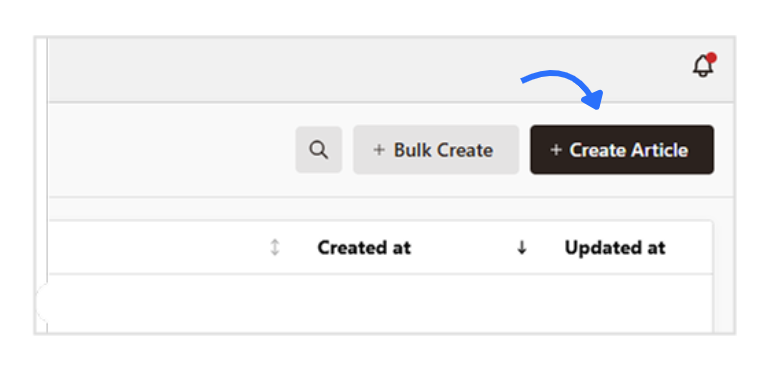
    On the dashboard, look for the option labeled “Bulk Create.” This feature is designed specifically for creating multiple articles in one go.

    Bulk create button beside the 'Create Article' button in Contentpen.ai.

    Step 03: Add keywords, topics, and presets

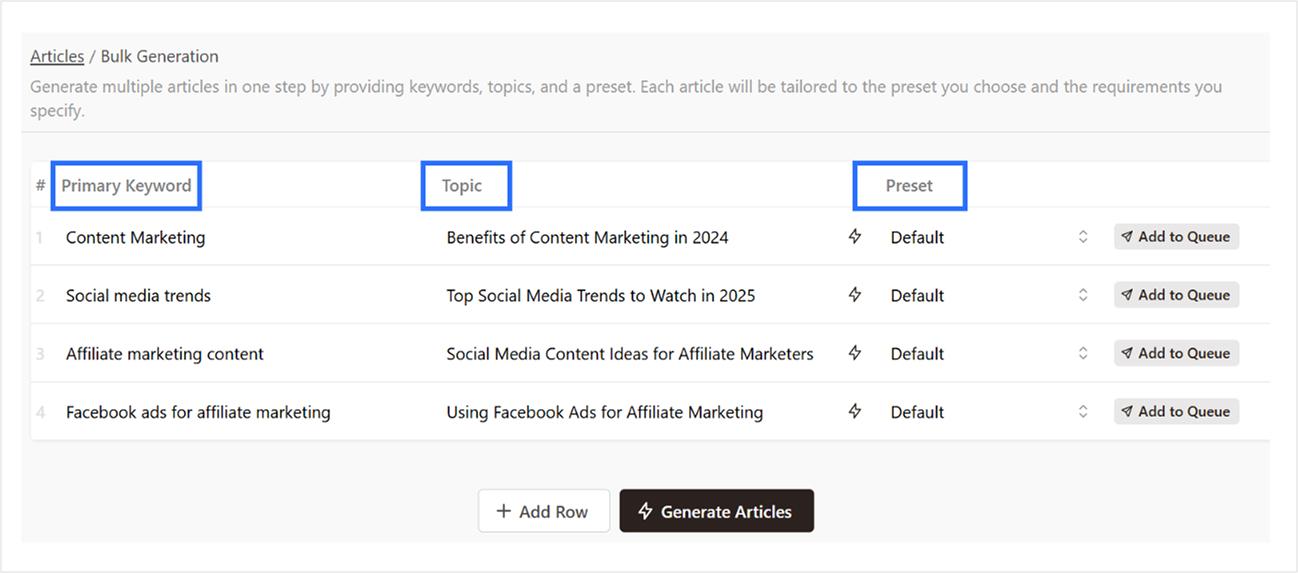
    To create articles in bulk:

    • Add a primary keyword
    • Enter your topic
    • Choose a preset if you’ve set one (or just stick with the default template)
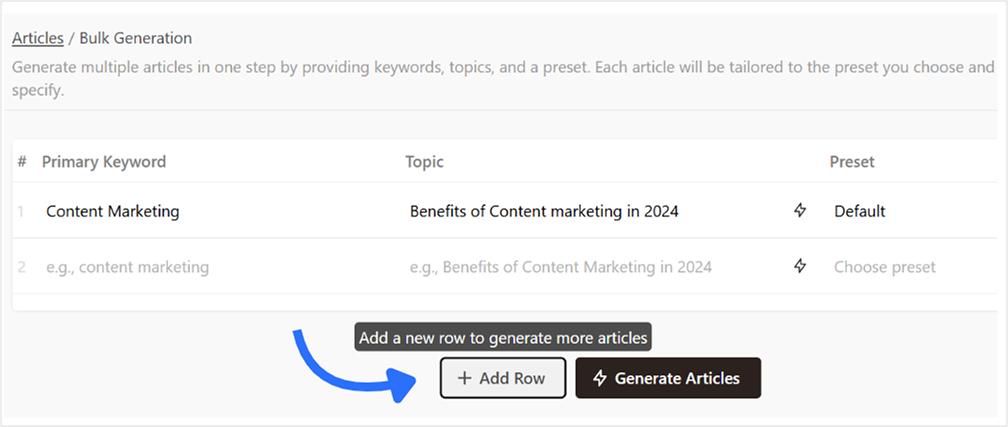
    Bulk content creation setup: add keywords, topics, and presets.

    To add a row, just click on “Add Row”.

    Add a row of content for bulk creation - Contentpen.ai.

    💡 Tip: Want to generate a topic based on a keyword? Just hit the button next to the topic field, and it will auto-suggest one for you.

    Also read: How to write an article using Contentpen?

    Step 04: Start bulk article generation

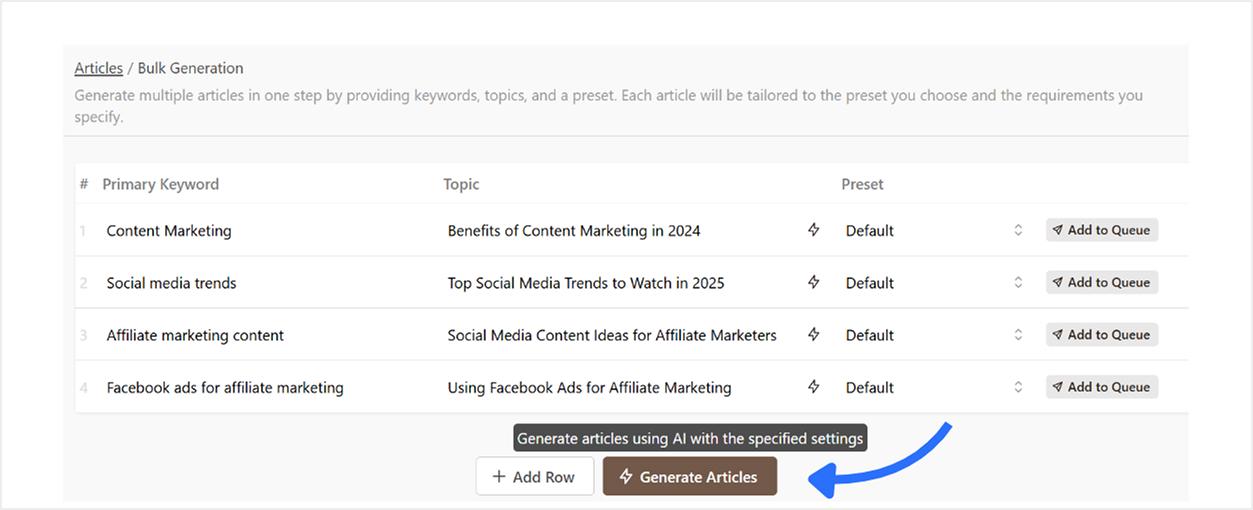
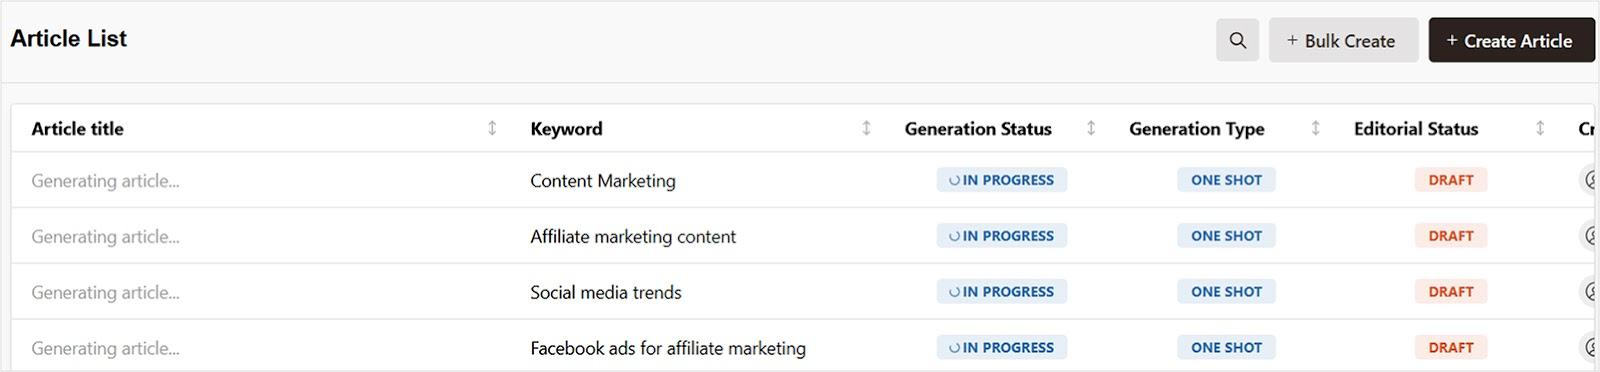
    Once your rows are ready, click the “Generate Articles” button. Contentpen will begin generating content based on the inputs you’ve provided. You’ll see real-time status updates on your content planner dashboard.

    Click on 'Generate Articles' button to create content in bulk using Contentpen.ai.

    Step 05: Review, edit, and export your content

    Head back to your dashboard and wait for the generation process to complete.

    Article generation in process, as seen through Contentpen dashboard.

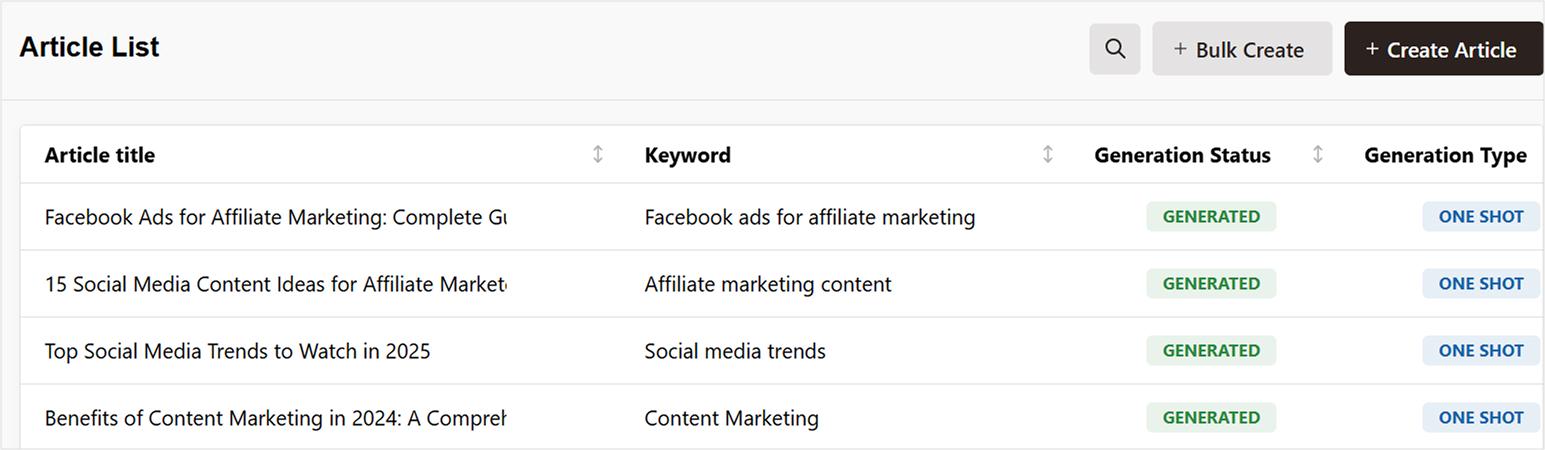
    Once all articles are generated, you can:

    • Preview each article inside Contentpen’s editor to make quick edits or refresh an existing article for better SERP rankings and AI visibility.
    Bulk articles created - Contentpen.ai.

    After reviewing your articles, you can:

    • Share the article link for a peer consultation.
    • Collaborate with team members by assigning the content for editing or reviewing.
    • Download as .html, .md, or .docx (Google Docs format).
    • Publish directly to WordPress, Wix, Webflow, Ghost, or Shopify (if connected).

    Also read: How to connect your WordPress with Contentpen?

    Final thoughts

    If you’re tired of creating content one piece at a time, use Contentpen’s bulk article generator to go from a list of keywords to a full content calendar in minutes.

    The tool is perfect for content marketers, bloggers, and agencies, giving them more time to focus on strategy, distribution, and growth.

    Create rank worthy content at scale

    check

    Faster

    check

    Consistent

    check

    SEO-ready

    check

    Efficient

    Try Bulk Content Creation
    AI SEO Interface

    Frequently asked questions

    How many articles can I generate at once?

    It depends on your Contentpen plan. With the starter plan, you can generate up to 10 articles at a time. The premium plan allows 30 bulk articles, while the agency plan can generate up to 100 articles at once.

    Can I use the same template for all articles?

    Yes, presets allow you to apply the same formatting, tone, structure, and style to all articles in a single bulk content creation session.

    Does the tool generate unique articles for each keyword/topic?

    Yes, our AI blog writer generates unique content for each article based on the keyword and topic you enter. No duplication across content unless you input repetitive data or parameters.

    Can I reuse the same keyword in multiple rows?

    Yes, you can use the same keyword for different topics if you’re targeting variations of the same niche.

    Can I bulk publish to WordPress or other CMS platforms directly?

    Yes, if your WordPress or any other CMS site is connected to Contentpen, you can publish articles in bulk directly from your dashboard.

  • How to refresh an existing article in Contentpen?

    How to refresh an existing article in Contentpen?

    How to refresh an existing article in Contentpen?

    Content doesn’t just need to be created; it needs to stay relevant, accurate, and engaging. That’s why Contentpen’s article refresh feature is so important for bloggers, marketers, and SEO professionals alike.

    Whether you’re updating outdated stats, improving SEO, or giving your piece a modern twist, Contentpen makes refreshing articles quick and simple.

    In this guide, we’ll walk you through step-by-step instructions on how to refresh an existing article in Contentpen. We will also see how you can update a published piece for better SERP rankings and AI visibility.

    So, let’s get started.

    Why refresh an existing article?

    Before diving in, let’s quickly understand the value of refreshing content:

    • Boost SEO performance – Google loves fresh content.
    • Update outdated information – Stats, trends, and tools change.
    • Improve readability and structure – Content evolves as user expectations shift.
    • Optimize for conversions – Refresh your CTAs or align with new campaign goals.

    Instead of writing from scratch, Contentpen allows you to breathe new life into existing content with minimal effort.

    Also read: What is content automation: Key benefits, tools and tips

    Step-by-step approach to refreshing an article in Contentpen

    Below are the steps needed to convert your existing draft into a powerful piece.

    Step 01: Start from the dashboard

    Log in to your Contentpen account. Once you’re inside, you’ll land directly on the main dashboard.

    Contentpen main dashboard.

    From here, click the “Create Article” button in the top right corner. 

    Create article button - Contentpen.ai.

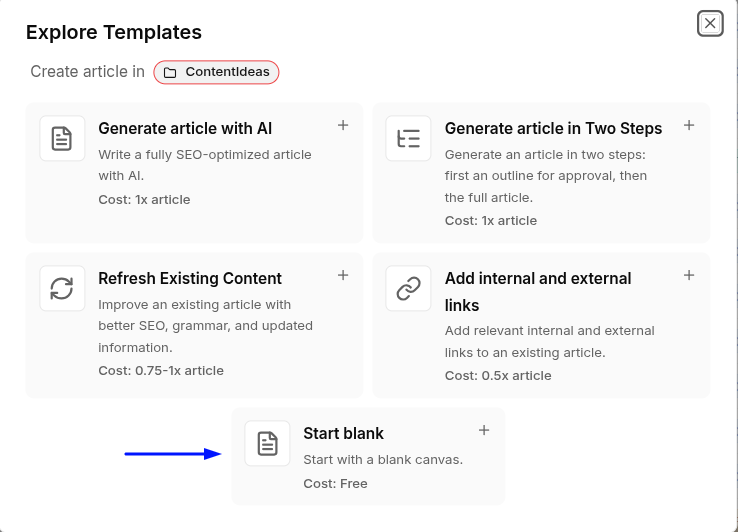
    A pop-up will appear with five options. Select “Start Blank” for now.

    Five content templates in Contentpen.ai.

    You can also click the ‘Refresh Existing Content’ template to do this process. In that case, you’ll enter the already-published blog’s live URL and refresh it using the content settings.

    Related Read: How to write an article using Contentpen.

    Step 02: Add your content

    Moving on with the blank template, you’ll now have an empty canvas to work with. Here, paste the text of the article you want to refresh.

    Existing content pasted in Contentpen.ai for a refresh.

    Important: Analyze the existing content

    Before you start making edits, take a moment to read through the entire article. Ask yourself the following questions:

    • Is the content still relevant?
    • Does it have outdated information?
    • Are there any broken links or missed internal linking opportunities?
    • Can you add any new insights, case studies, or recent trends?

    Having a clear picture of what needs updating will guide your editing process.

    Step 03: Click on “Ask AI”

    Once your content is added, it’s time to start the refresh process.

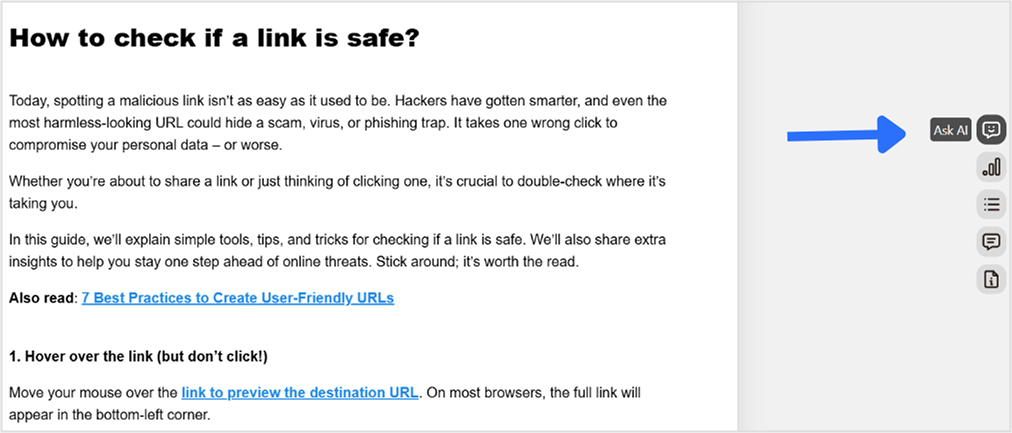
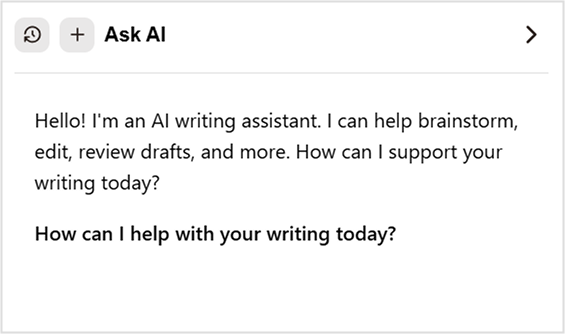
    On the right-hand menu, you’ll see the “Ask AI” option. Click on it, and the Contentpen AI bot will appear.

    Ask AI option in the sidebar.

    Once the bot opens up, start asking it what to do with the content in simple, plain language. Talk to it like you would to a human assistant.

    Ask AI - Contentpen's integrated AI writing and SEO optimization assistant.

    Tip: Use tools like Contentpen’s SEO scoring assistant to check keyword optimization for your title and meta description.

    Step 04: Give instructions to the Contentpen AI bot

    You can give the AI bot specific instructions for what you want to improve. Some example prompts include:

    • “Rewrite [X] section for better content flow and fluency.”
    • Adjust the tone to fit a younger audience (20–30 years old).”
    • “Add a comparison table for [X] and [Y] quantities, highlighting common similarities and differences between the two.”

    If nothing works, you can simply say: “Update this content based on the latest data and SEO trends,” and the tool will start its operation.

    Prompt added to Ask AI.

    Bonus tip: Rewrite specific paragraphs, sentences, or change the tone for clarity. If a paragraph feels awkward or unclear, Contentpen can help rephrase it more readably.

    The AI can also modify the tone of specific sections to match your brand voice, whether you want it to be more casual, formal, or persuasive.

    Step 05: Enjoy your updated content

    Once the AI processes your request, you’ll receive a refreshed version of your article. Review it, make any necessary manual tweaks, and you’ll be good to go.

    Once you’re happy with the updates, hit the “Publish” button. 

    Contentpen will automatically save and publish the refreshed article to your preferred CMS platform, such as Ghost, WordPress, Wix, Webflow, and Shopify. You can also choose to schedule the content for a later time if preferred.

    Plan once.
    Publish consistently.

    check

    Scheduled

    check

    Organized

    check

    Predictable

    check

    Scalable

    Schedule Your Content
    AI SEO Interface

    What if your article is already published through Contentpen?

    Let’s say you want to update a previously published piece in Contentpen. Here’s how you can do that with ease:

    1. Log in to your Contentpen account – If you haven’t already, sign in.
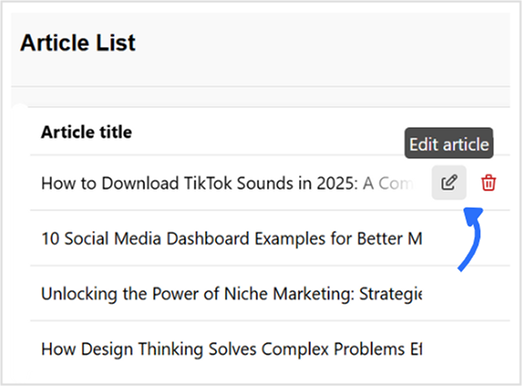
    2. Navigate to your dashboard – You’ll see a list of all your saved or published articles.
    3. Locate your article – Click the “Edit” button next to the article you want to refresh. This will open the content editor, where you can make all necessary updates.
    Edit article option in Contentpen.ai.

    Things to check when refreshing a published article 

    Once you are in the edit window, you can make a lot of changes to your already existing blog. You can:

    1. Add internal and external links

    Ensure your article includes valuable internal links to related posts and credible external sources to boost SEO and user engagement.

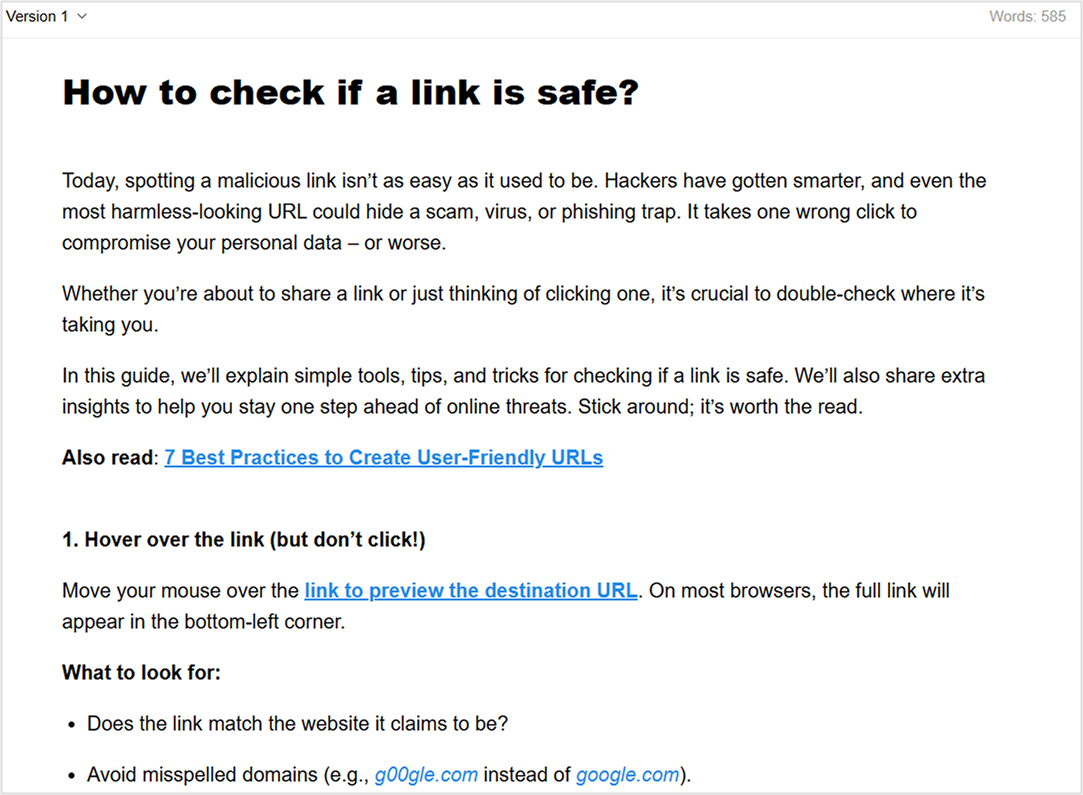
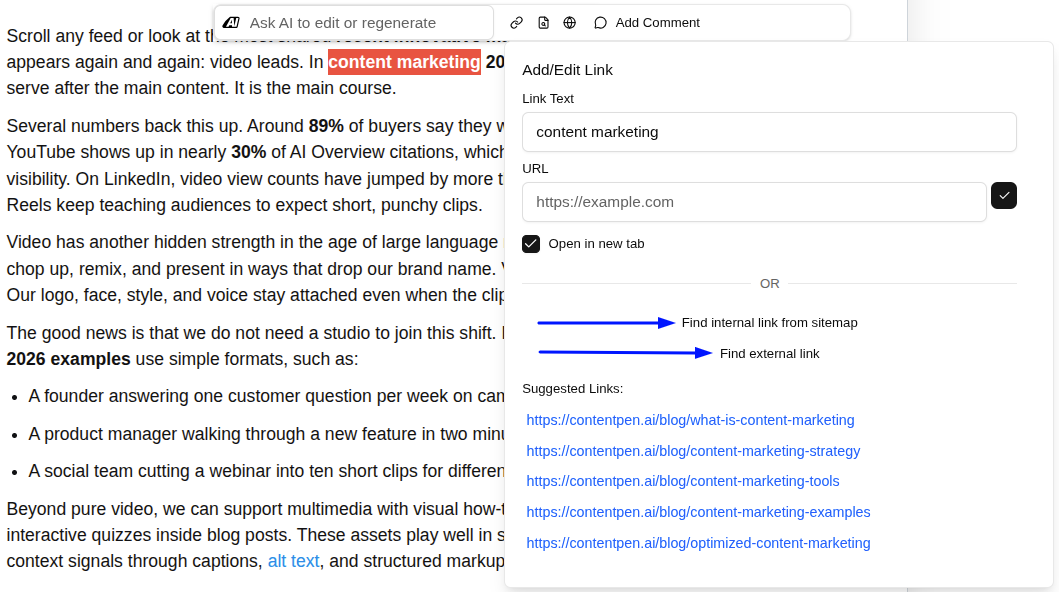
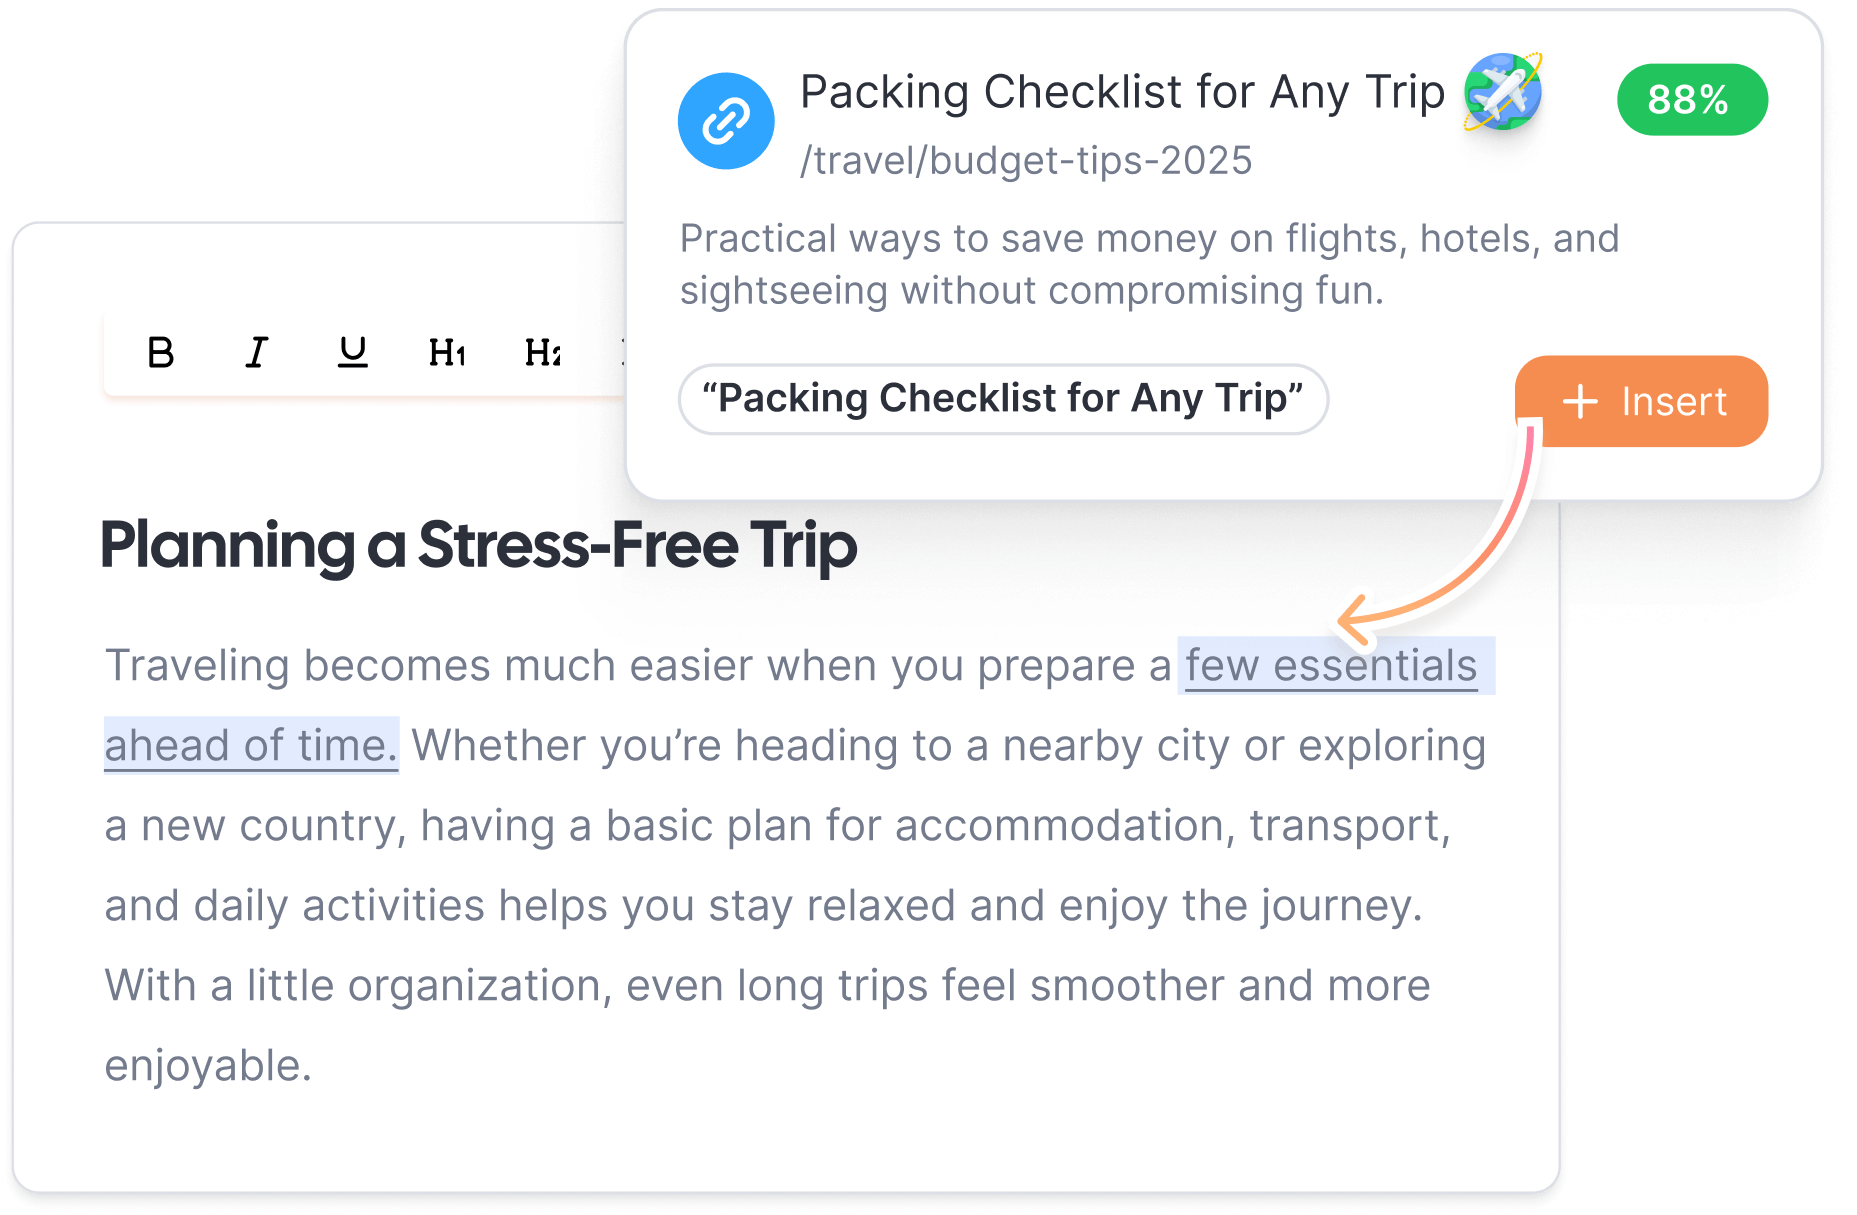
    Contentpen allows you to automate internal and external links. All you have to do is select an anchor text and click the ‘Add/Edit link’ option. Once the window opens, decide which type of link you want to place.

    If you click on ‘Find internal link from sitemap,’ you can establish effective internal linking by simply choosing any of the suggested options.

    Automating internal and external linking - Contentpen.ai.

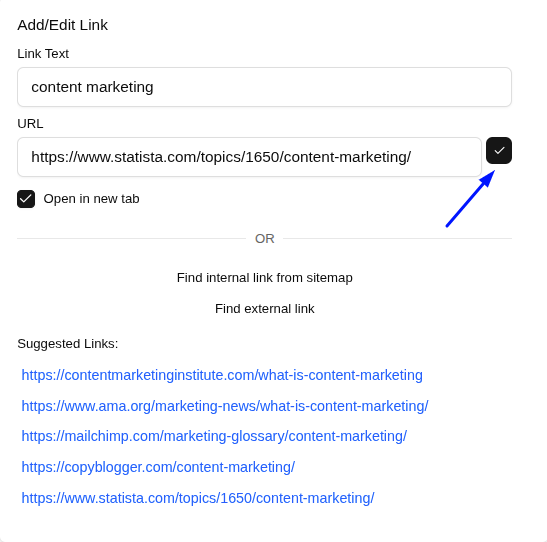
    If you choose ‘Find external linking,’ the tool will scan the most credible sources online for your topic or niche and provide its suggestions. Click on the ‘tick’ icon next to the URL text field to place the link.

    Placing internal and external links in the content.
    1. Update visuals

    Refreshing your article? Don’t forget about the visuals:

    • Replace outdated images with fresh ones by clicking the image and using the ‘Replace Image’ option in Contentpen.
    Replace image and visuals in Contentpen.ai.

    Contentpen’s built-in media library will open up, where you can generate images with AI or browse and use any existing visuals for your content.

    • You can also optimize image sizes for better load times.
    • Edit alt text for SEO directly in the tool by clicking the ‘pencil’ icon.

    Contentpen also allows you to easily integrate any custom-created visuals and infographics to enhance the engagement and aesthetics of the content.

    1. Check your CTAs

    Make sure your calls to action are still relevant to your current goals or campaigns. If that’s not the case, you can make use of the ‘Ask AI’ assistant again to polish your CTAs for better conversions.

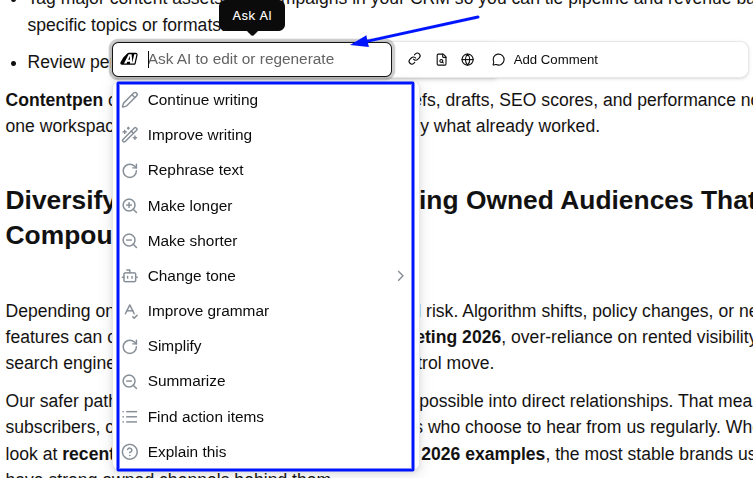
    Highlight the content you want edited, and a pop-up will appear. Here, you can see the Ask AI assistant window.

    Click on the empty text field to expand some common text editing options.

    In-line text editing options - Contentpen.ai.

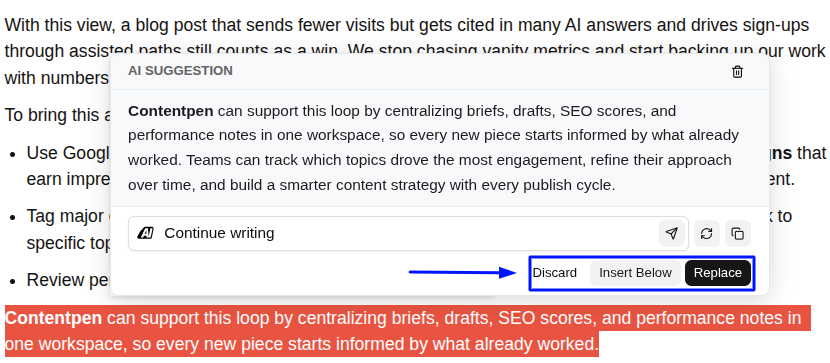
    Choose any existing options to rewrite your existing CTA. For example, if we click on ‘Continue Writing’ and press enter, the AI will start its processing and show us the exact content that needs to be added to improve content flow.

    Further options to 'Discard', 'Insert Below' or 'Replace' the current text with the new one.

    Now, you can either ‘Discard’ the AI suggestion, or you can select ‘Insert Below’ to add the new content along with the existing one. You can also ‘Replace’ to completely erase the previous version and use the recently generated CTA instead.

    1. Check formatting

    Ensure headings, lists, and spacing look clean and consistent.

    Contentpen’s powerful text editor provides you with complete freedom to change formatting. You can modify your headings, from H1 to H4, introduce bullet points, numbered lists, and also add any tables, quotes, and code snippets you like.

    1. Test links and image visibility

    Click through all internal and external links and confirm all pages load properly. Check the images and their alt texts before publishing the updated content again.

    Final thoughts

    Refreshing your existing articles with our AI writing tool is an effective way to ensure your content remains relevant, valuable, and optimized for both search engines and readers. 

    By following these steps, you can quickly and easily update your content, improve SEO, and maintain a high-quality blog. Make it a regular practice to refresh older articles to keep them competitive and engaging.

    Frequently asked questions

    Can I refresh an article without starting from scratch in Contentpen?

    Yes! Contentpen allows you to paste and edit your existing article directly. You can update content, change tone, improve SEO, add internal and external links, and update images, without starting from scratch.

    Will Contentpen keep my original formatting during the refresh?

    Yes. Contentpen maintains your formatting, but it’s always a good idea to review headings, lists, and spacing in the preview before publishing the refreshed version.

    How can I make sure my refreshed content is SEO-friendly?

    Use the built-in SEO score in Contentpen and check your keywords, meta tags, and headings. You can also instruct the AI to optimize your article based on the latest SEO trends to improve your SERP ranking.
    Can Contentpen help rewrite just certain paragraphs or sentences?

    Absolutely. You can highlight specific sections and ask the AI to rephrase them for clarity, adjust tone, or improve readability, without changing the rest of your content.

  • How to automate internal and external linking using Contentpen

    How to automate internal and external linking using Contentpen

    Effective internal and external linking is essential for SEO, guiding users through your website and building content authority. 

    Proper links help search engines understand your site structure and direct readers to related content. While manual linking works for smaller sites, it becomes time-consuming and error-prone as your content grows.

    Automation streamlines this process by scanning your site and inserting valuable links without manual effort, saving time and ensuring consistency.

    Wondering how much time manual linking costs you?

    By the end of this guide, you’ll see how Contentpen makes internal and external linking simple and scalable, whether you’re a small business owner, content manager, or SEO specialist.

    So, let’s get started.

    Why automate internal and external linking?

    Manual link management quickly becomes overwhelming as your content volume increases. When you handle links on a case-by-case basis, inconsistencies inevitably emerge, with some pages receiving too many links while others remain underlinked or completely disconnected. 

    This uneven approach not only wastes precious time but also creates an imbalanced site structure that confuses both users and search engines.

    Manual linking creates several challenges as your content grows:

    • Time-consuming process that diverts resources from content creation.
    • Inconsistent implementation leading to an unbalanced site structure.
    • Difficulty in maintaining links as content volume increases.
    • Higher risk of missing linking opportunities.
    • Challenges in identifying the most valuable linking connections.

    Automated linking eliminates these challenges by systematically scanning your entire website for linking opportunities and inserting links based on predefined rules and contextual relevance.

    Take a look at the table below, where all of this information is summarized, telling you why exactly it is a good idea to automate internal and external linking with Contentpen.

    Manual linkingAutomated linking with Contentpen
    A slow process that needs constant attention.Saves hours of work through intelligent automation
    Inconsistent implementation across contentEnsures a uniform linking strategy site-wide
    Links are often added based on convenience rather than strategyStrategic link placement based on relevance and SEO value
    Difficult to scale as the content library growsEffortlessly scales with expanding content libraries
    Prone to human error and oversightSystematically identifies all potential linking opportunities
    Requires ongoing manual review to maintainSelf-maintains with minimal oversight required

    The benefits extend beyond mere time savings. Automated linking creates a balanced link profile that clearly signals site relevance and authority to search engines, driving improved search visibility and organic traffic.

    Linking automation also prevents broken links, orphaned pages, and thin content areas while strengthening your overall site architecture.

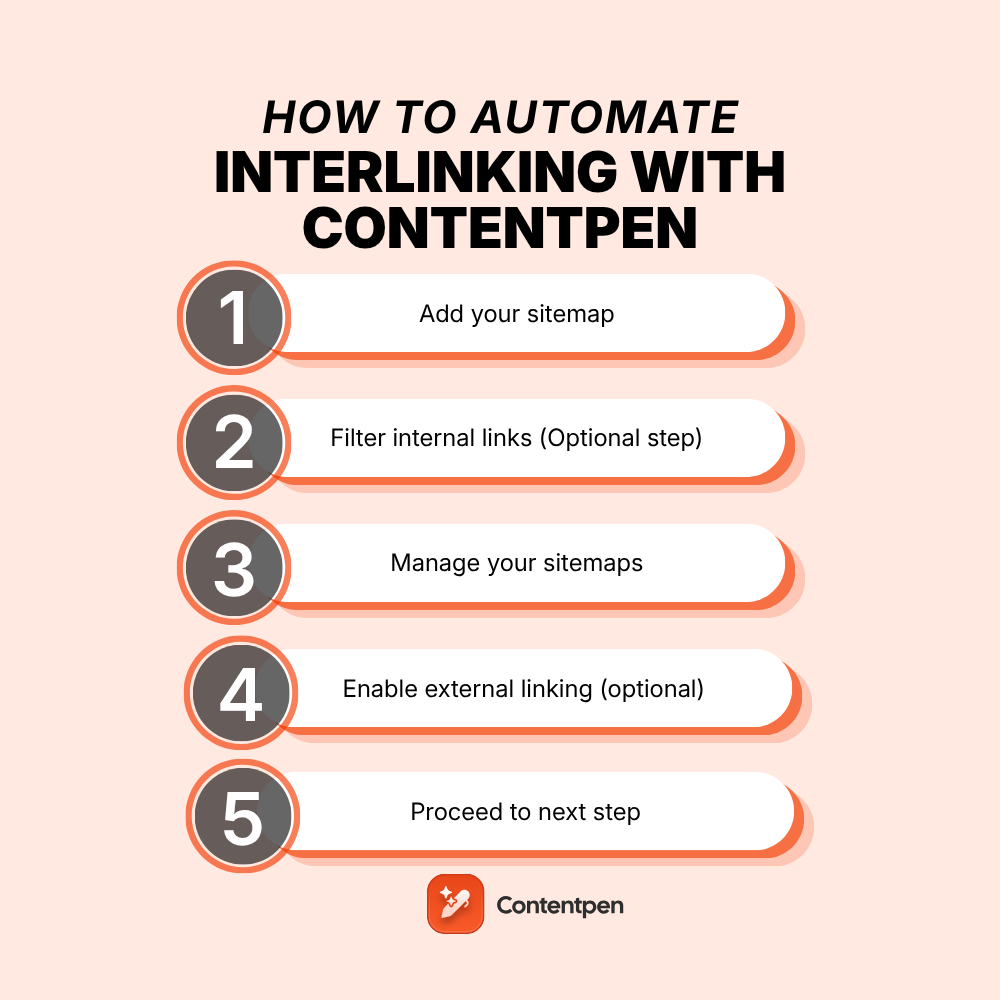
    Getting started: Automating linking with Contentpen

    Automating linking with Contentpen is simple and integrates easily into your content workflow:

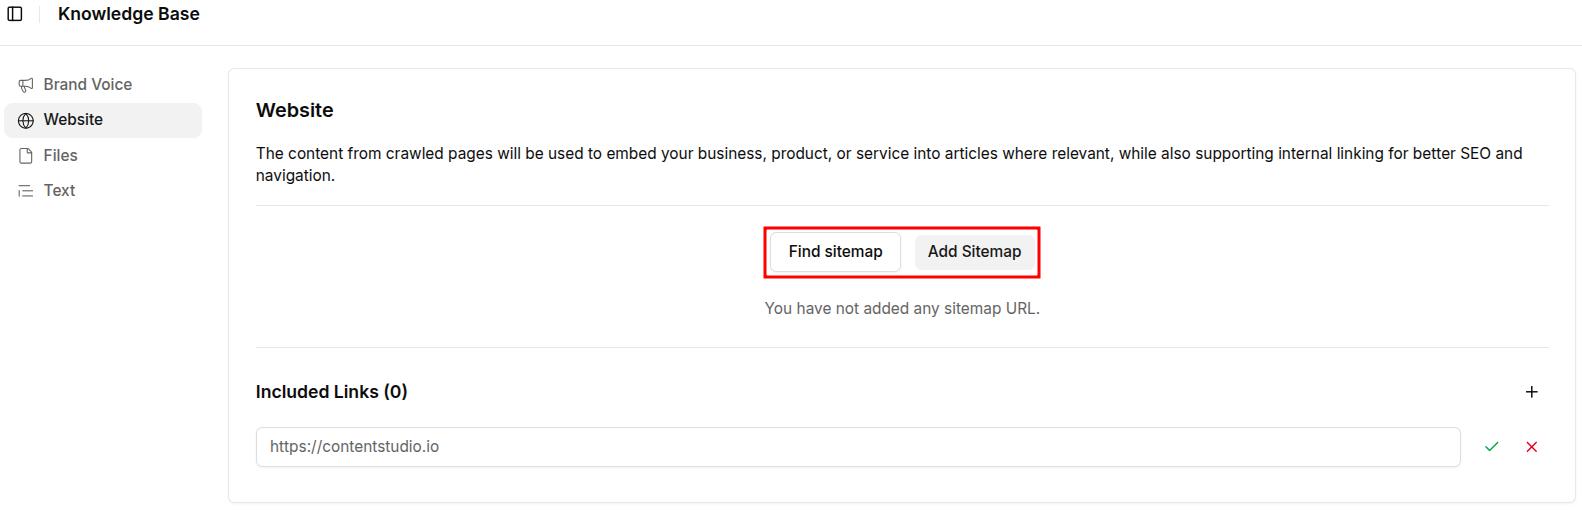
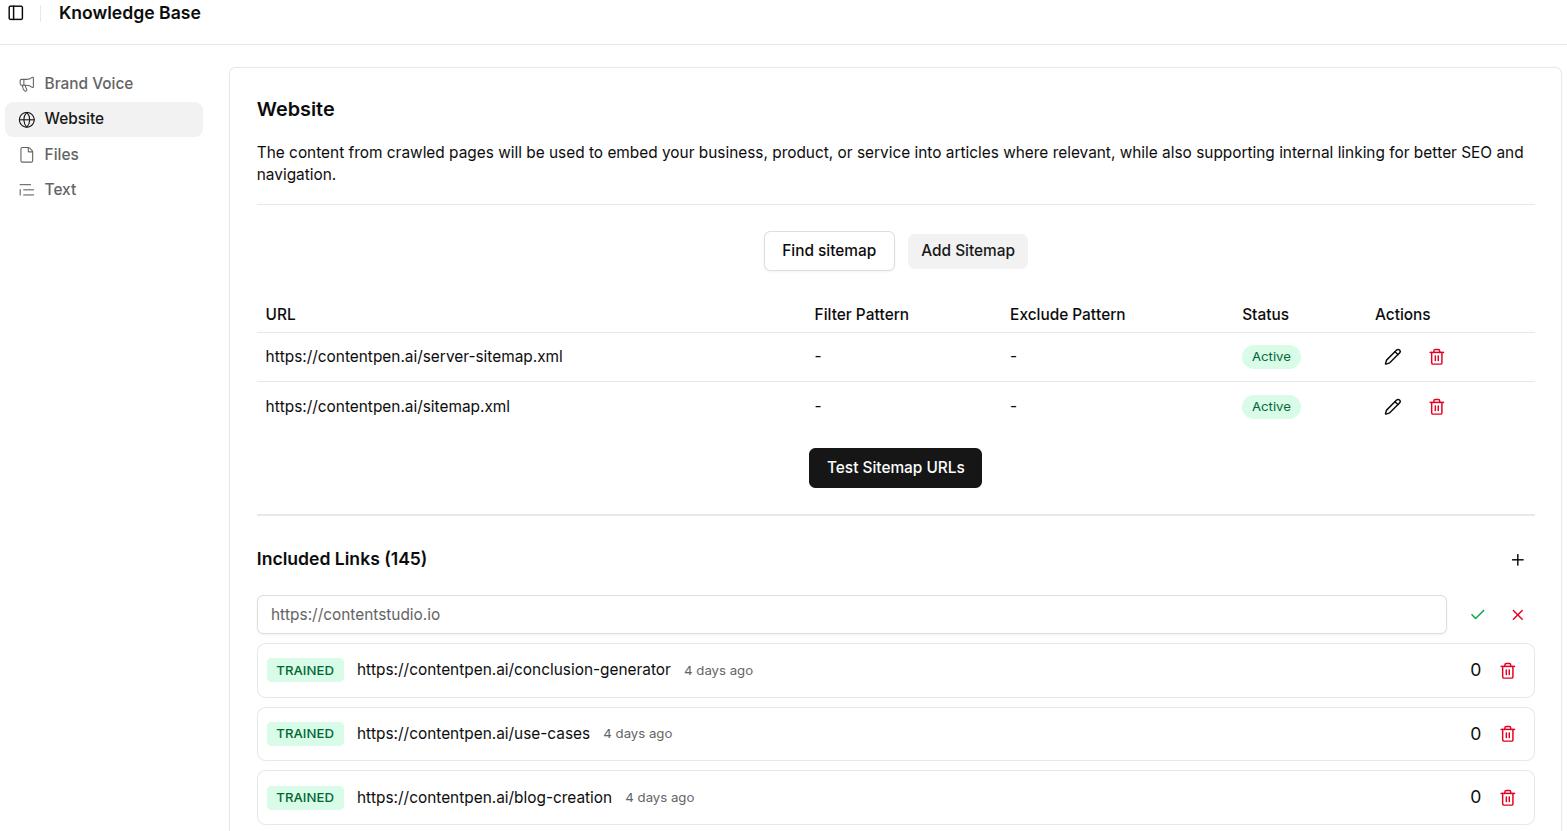
    Start by logging in to your Contentpen account. From the dashboard, you’ll see a menu on the left. From there, go to Knowledge -> Website

    Here, you’ll spot the “Find Sitemap” and “Add sitemap” options. Click on ‘Find Sitemap’ for now and proceed with the next steps.

    Screenshot showing the sitemap screen inside Contentpen.

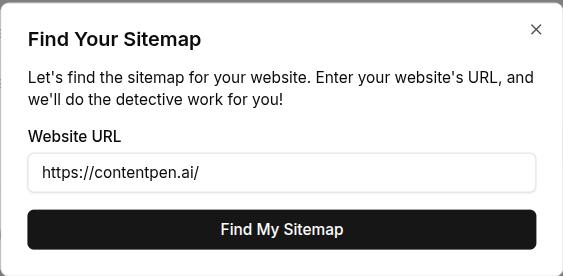
    Step 01: Find your sitemap

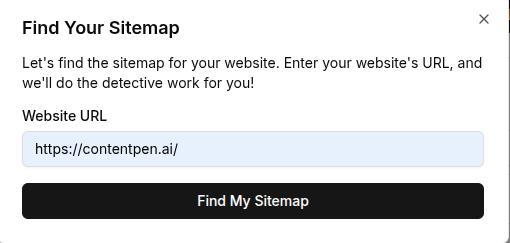
    If you don’t know your sitemap, Contentpen will help you find it using its built-in system. Simply add your domain and click on the ‘Find My Sitemap’ button to proceed.

    Finding sitemap screen - Contentpen.ai.

    Step 02: Add your sitemap

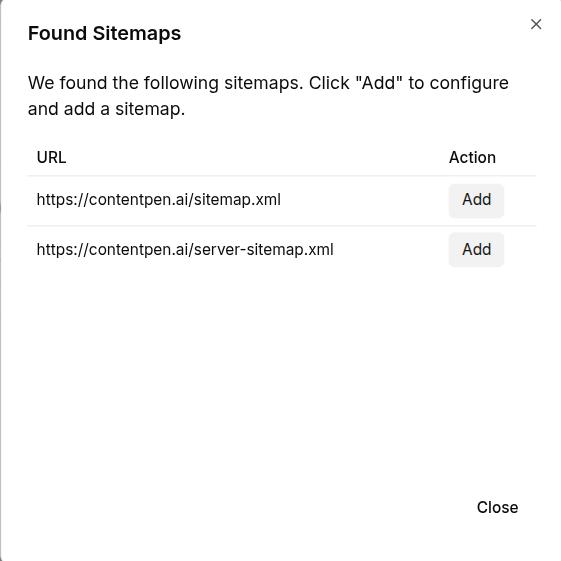
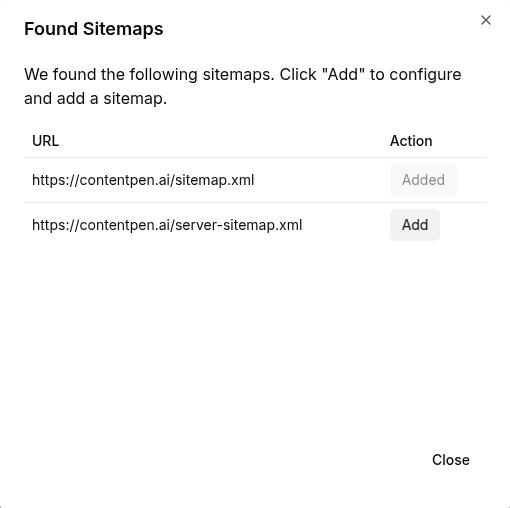
    Once our SEO platform detects your sitemap, it will display it in the following manner:

    Sitemap found for your domain - Contentpen.ai.

    Click on the ‘Add’ button to include your sitemap(s), which will make Contentpen ready to automate internal and external linking for your content.

    Step 03: Filter internal links (optional)

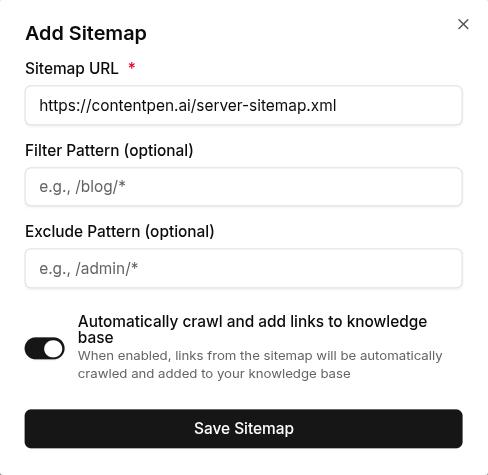
    After adding your sitemap, use Contentpen’s filtering options to exclude specific internal links you don’t want inserted. This helps you maintain control over your link strategy by avoiding redundant or low-priority pages, such as ‘Thank you’, ‘checkout screens’, or others.

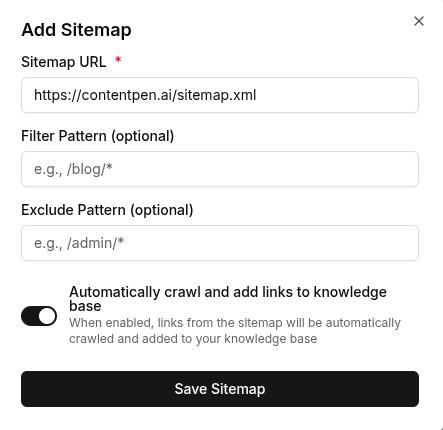
    Adding a sitemap in Contentpen.

    Once you are done with adding a filtering or exclusion pattern, keep the ‘Automatically crawl and add links to knowledge base’ slider on and hit the ‘Save Sitemap’ button to proceed.

    Step 04: Manage your sitemaps

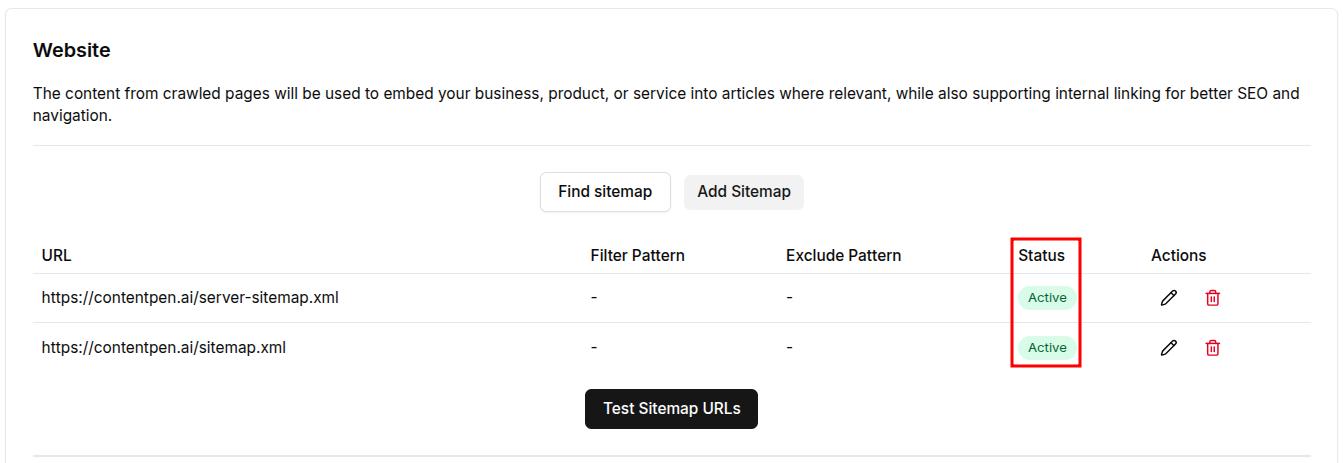
    After a bit of processing, your sitemap(s) will appear with a status indicator as shown below. 

    Screenshot showing the status of sitemaps added in Contentpen.ai.

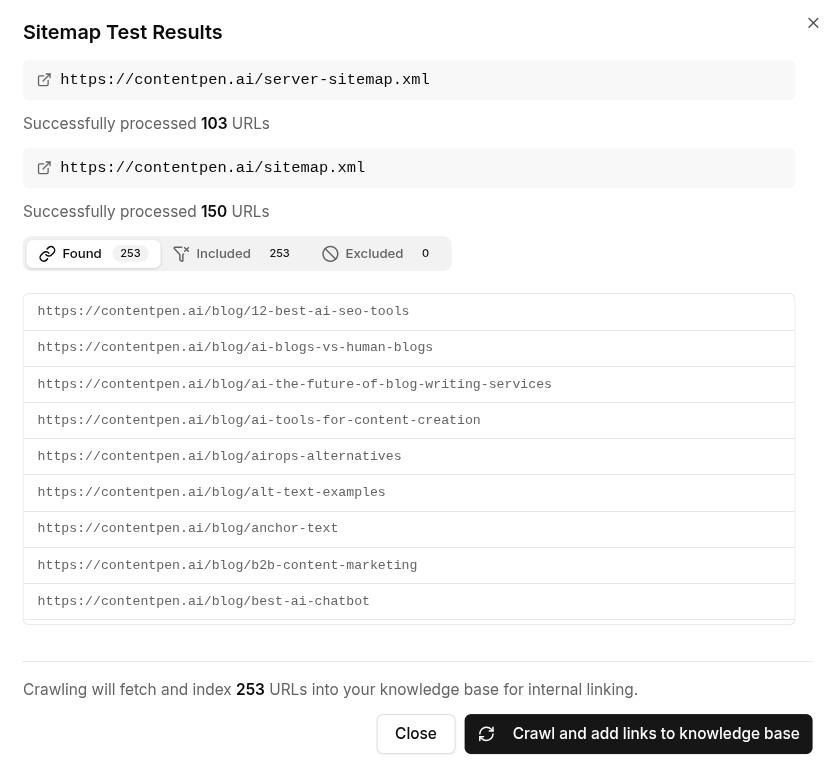
    Now you can test your sitemap URLs to check if all the internal pages are getting accessed properly.

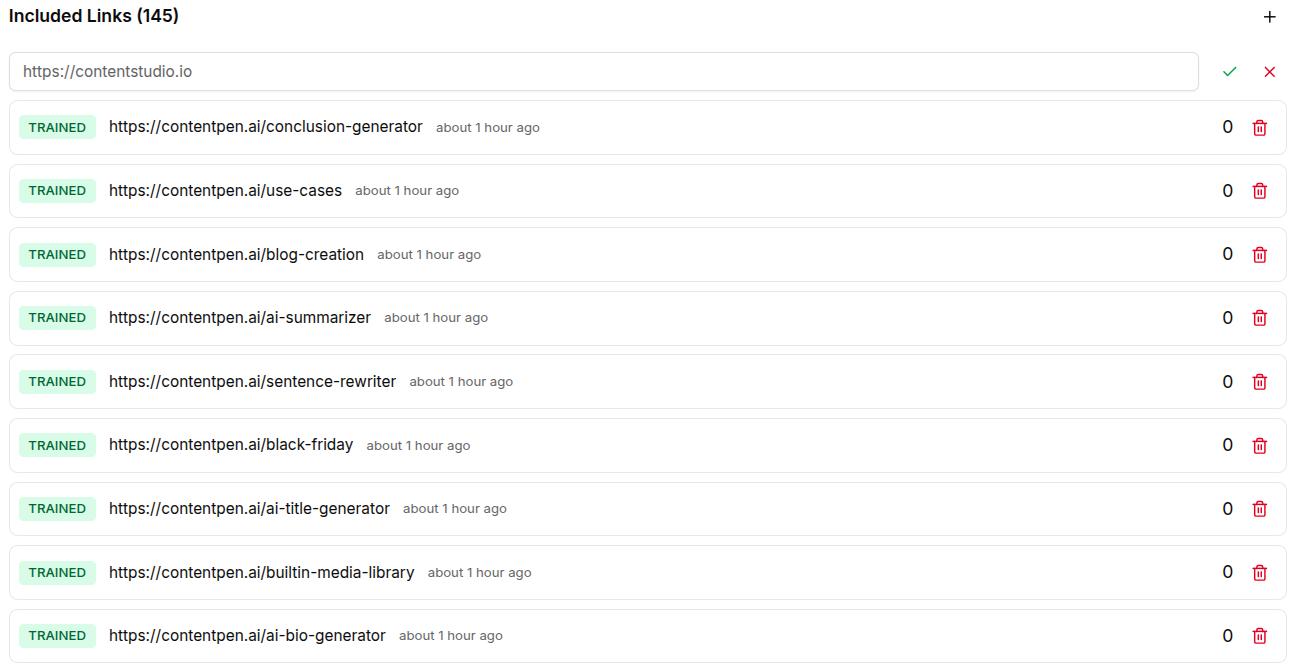
    Sitemap adds internal links to the knowledge base - Contentpen.ai.

    You can also edit/remove page entries as needed from the ‘Sitemap Test Results’ screen to ensure smooth internal linking in content.

    A screen showing all the included links inside your Contentpen workspace.

    Step 05: Enable external linking

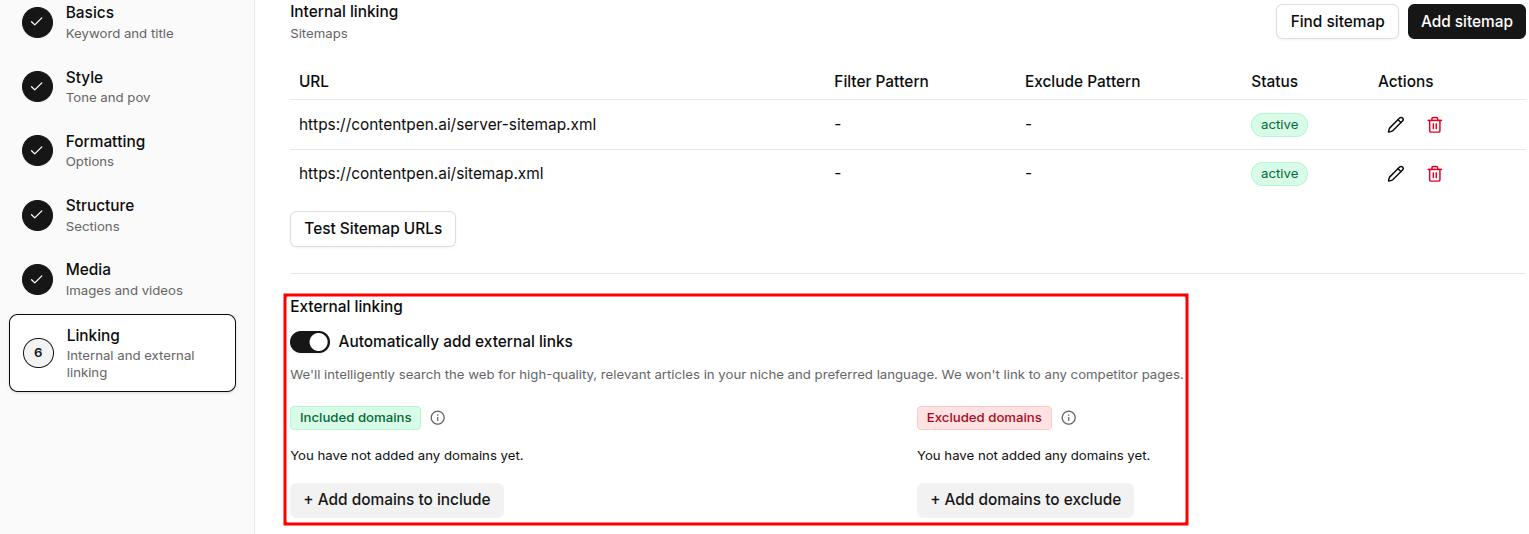
    After you’re done setting up internal linking, go to ‘Create Article – > Content Template -> Linking’ settings. Turn on the external linking slider if you want Contentpen to automatically insert relevant external links. 

    The tool will automatically find and place high-quality external sources in your content based on your niche and language preferences.

    External linking options in Contentpen turned on.

    Pro tip: Specify which domains you want to include or exclude from external links. This keeps your content free from competitor links and ensures only trusted sources are used, such as .edu domains or high-authority sites in your industry.

    Step 06: Test your links

    Click ‘Next’ to move forward and create an article in Contentpen. 

    Related read: How to write an article using Contentpen.

    Finally, test all the internal and external links created by the tool by clicking them to see if they function properly.

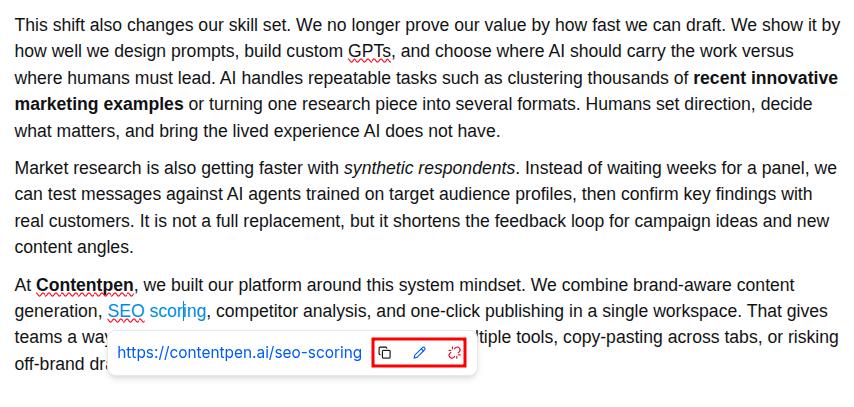
    Article generated by Contentpen with automated internal and external links.

    You can use our content editing tools to remove, edit, or copy a link to your clipboard to use it elsewhere in the content.

    Improve SEO with automated linking that fills them

    check

    Adds context-aware internal and external links automatically

    check

    Uses relevant anchor text to improve SEO and content flow

    Try Auto-Interlinking
    AI SEO Interface

    Final thoughts

    Automating internal and external linking is no longer a luxury; it’s a necessity. As content grows, manual linking becomes unmanageable and inconsistent.

    Contentpen solves this with intelligent automation, offering sitemap integration, contextual link suggestions, and customizable presets to keep your site structure strategic and user-friendly.

    With Contentpen by your side, you can rank on Google, as you get better crawlability, improved authority flow, and smoother user journeys, without the manual effort. It lets you focus on creating valuable content while ensuring every page is meaningfully connected.

    Frequently asked questions

    Does automated linking work for websites with multiple languages?

    Yes. Contentpen automates internal and external links for non-English websites. It supports 50+ languages, so you’ll never have to face any trouble with automatic linking.
    How many internal links does Contentpen insert per article?

    There’s no limit to how many internal links Contentpen inserts in an article. It places links based only on the context of the content.

    Can I prioritize certain pages to receive more internal links?

    Yes. The tool provides a ‘Custom Instructions’ setting while creating or refreshing a piece of content. Here, you can write directly to the AI to prioritize more internal links for a cornerstone content or a pillar page.

    Will automated linking hurt my content’s readability?

    No. Contentpen is designed to preserve the natural reading flow. It places links contextually and intelligently on anchor texts, ensuring that the reader experience remains seamless and engaging.

    Can I automate linking for content I publish outside of Contentpen?

    Yes. Our tool provides the option for you to refresh your existing content by using the‘add internal and external links’ template.

  • How to set up brand knowledge in Contentpen: 05 simple steps

    How to set up brand knowledge in Contentpen: 05 simple steps

    Creating high-quality content consistently is one of the biggest challenges modern brands face, especially when working with multiple writers or relying on AI assistance.

    That’s where the brand knowledge feature in Contentpen comes in. It allows you to define your brand’s identity, voice, target audience, and strategic messaging, all in one place, so every piece of content reflects your unique positioning.

    Whether you’re a B2B SaaS company, digital marketing agency, or content manager running multiple campaigns, aligning your content with your brand identity helps build trust, improve conversions, and save time. 

    In this guide, you’ll learn how to build brand knowledge in Contentpen using its four key components: brand voice, website, files, and text snippets. Each step ensures the AI writes in your voice, for your audience, with content that supports your marketing and business goals.

    So, let’s get started.

    What is brand knowledge in Contentpen?

    Brand knowledge in Contentpen is a foundational feature that trains the AI to understand your brand’s identity, voice, audience, and messaging framework. 

    Instead of starting from scratch every time you generate content, you can preload essential brand information, so Contentpen consistently produces accurate, on-brand outputs.

    The brand knowledge setup consists of four integrated components:

    • Brand voice: Define the basics of your brand: name, about, ideal customer profile (ICP), and a unique selling proposition (USP). There are also options to add author persona, target audience, brand voice, competitors, and your content pillars.
    • Website: Add your sitemap so Contentpen can automatically crawl and understand your site structure. This improves both the accuracy of content references and the quality of internal linking.
    • Files: Upload internal documents such as brand guidelines, product decks, or past content that reflect your voice and messaging.
    • Text snippets: Create reusable blocks of copy (e.g., product descriptions, taglines, value props) to maintain consistency across assets.

    This central system acts as your brand’s memory inside Contentpen, making it easier to scale content creation while preserving voice, relevance, and messaging clarity.

    Write content that’s built to rank, not just read

    Create search-optimized blogs aligned with SEO and GEO signals, so your content performs well across search and AI-driven discovery.

    Try SEO Blogging FREE
    AI SEO Interface

    Why aligning content with your brand identity matters

    Customers’ interaction with your content shapes how they perceive your brand. If your messaging, tone, or positioning is inconsistent, it creates confusion, weakens trust, and reduces the likelihood of engagement or conversion.

    Aligning content with your brand identity ensures that every blog post reflects your unique voice and values, regardless of who is writing in your team.

    Here’s why it matters:

    • Consistency builds trust: When your tone, vocabulary, and message stay consistent across channels, it reinforces brand recognition and credibility.
    • Saves editing time: Writers and marketers spend less time reworking AI-generated content because it already sounds “on-brand” from the first draft.
    • Improves content performance: Clear, targeted messaging resonates better with the intended audience, resulting in higher engagement, lower bounce rates, and improved conversions.
    • Supports SEO and internal linking: A clearly defined brand voice and page structure help the AI generate SEO-aligned content with proper internal links, driving more organic traffic to key pages.

    By configuring brand knowledge in Contentpen, you’re improving content creation and turning it into a strategic asset that accurately and consistently reflects your brand.

    From outline to publish-ready content that fills them

    check

    Structured

    check

    Consistent

    check

    SEO-aligned

    check

    Fast

    Generate Outlines FREE
    AI SEO Interface

    How to build brand knowledge in Contentpen?

    Setting up brand knowledge in Contentpen is a one-time configuration that enables the AI to fully understand and replicate your brand’s identity, but it must be regulated regularly.

    Follow these five steps to complete your setup:

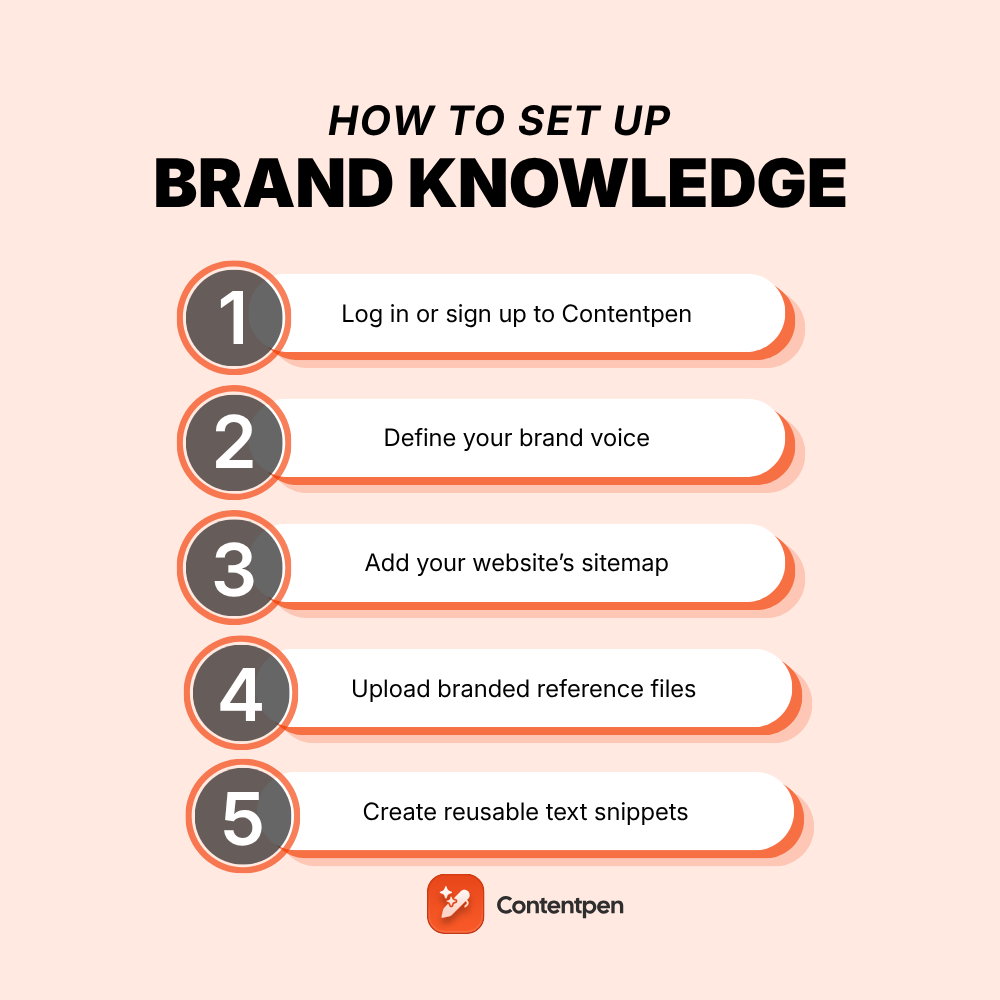
    Step 1: Log in or sign up to Contentpen

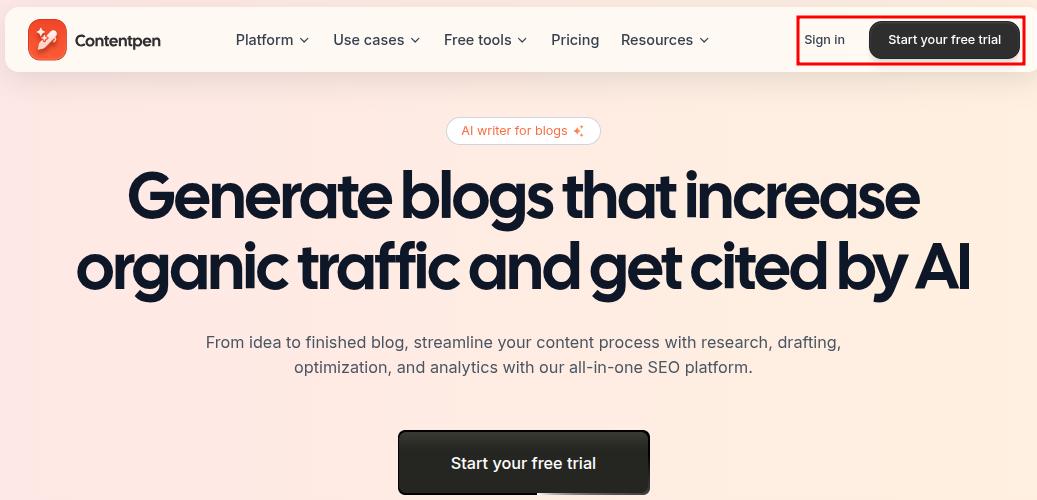
    To begin, go to our AI writing assistant app and log in to your workspace. If you don’t have an account yet, click ‘Start your free trial’ and create one.

    Contentpen main landing page showing the 'Sign-in' and 'Start your free trial' buttons.

    Once you’re inside, navigate to the Knowledge tab from the left-hand sidebar. This is where you’ll manage all components of your brand knowledge setup.

    Also read: How to set up your Contentpen workspace?

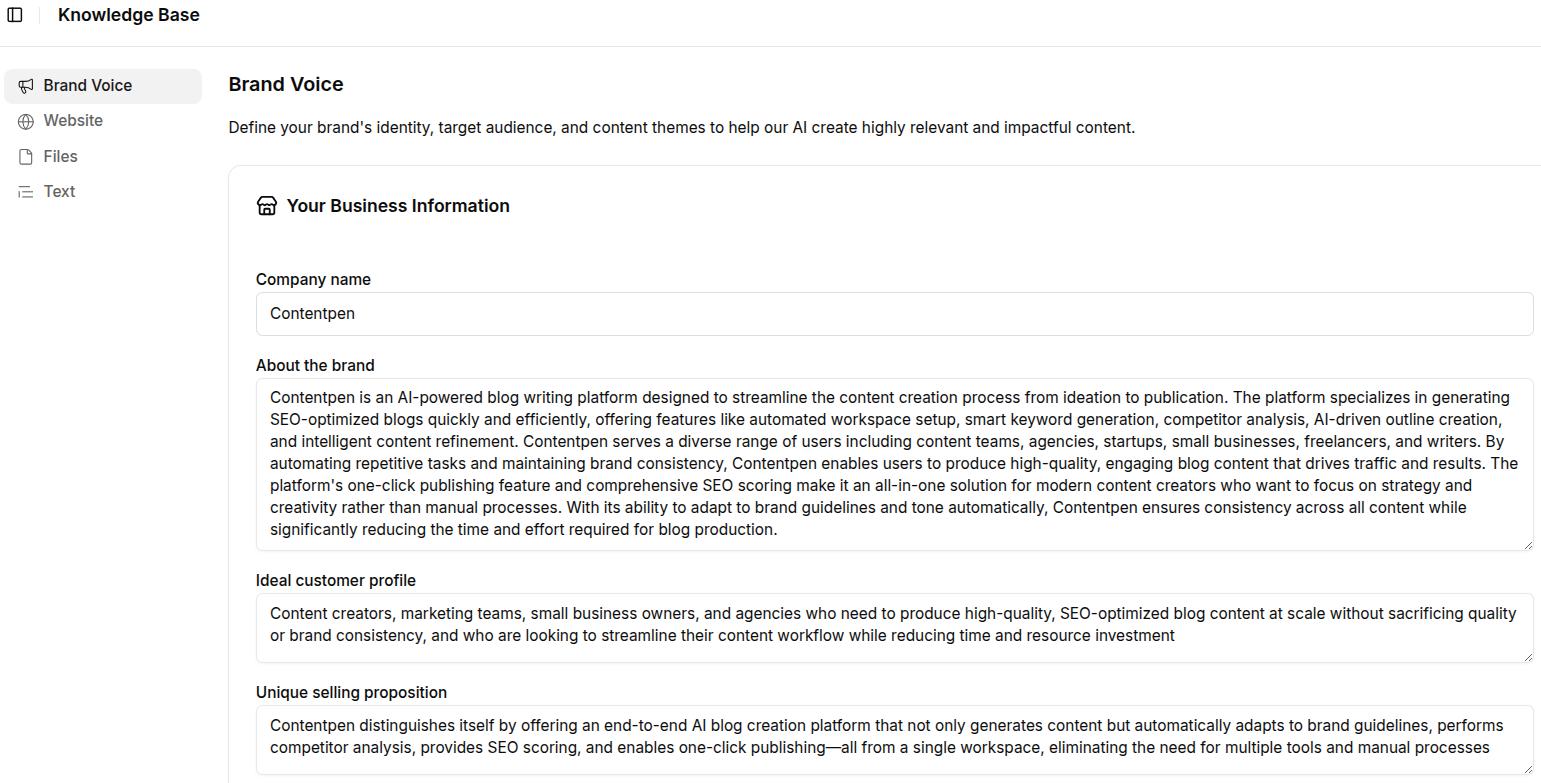
    Step 2: Define your brand voice

    Navigate to Knowledge → Brand Voice.

    Fill out the following fields:

    • About the brand: Describe what your company does, your core offering, and brand values.
    • Ideal customer profile: Identify who your target users are, include roles (e.g., marketing managers, founders), industries, and their key pain points.
    • Unique selling proposition (USP): Clearly explain what sets your product or service apart from competitors.
    Screenshot showing brand voice settings in Knowledge Base inside Contentpen.

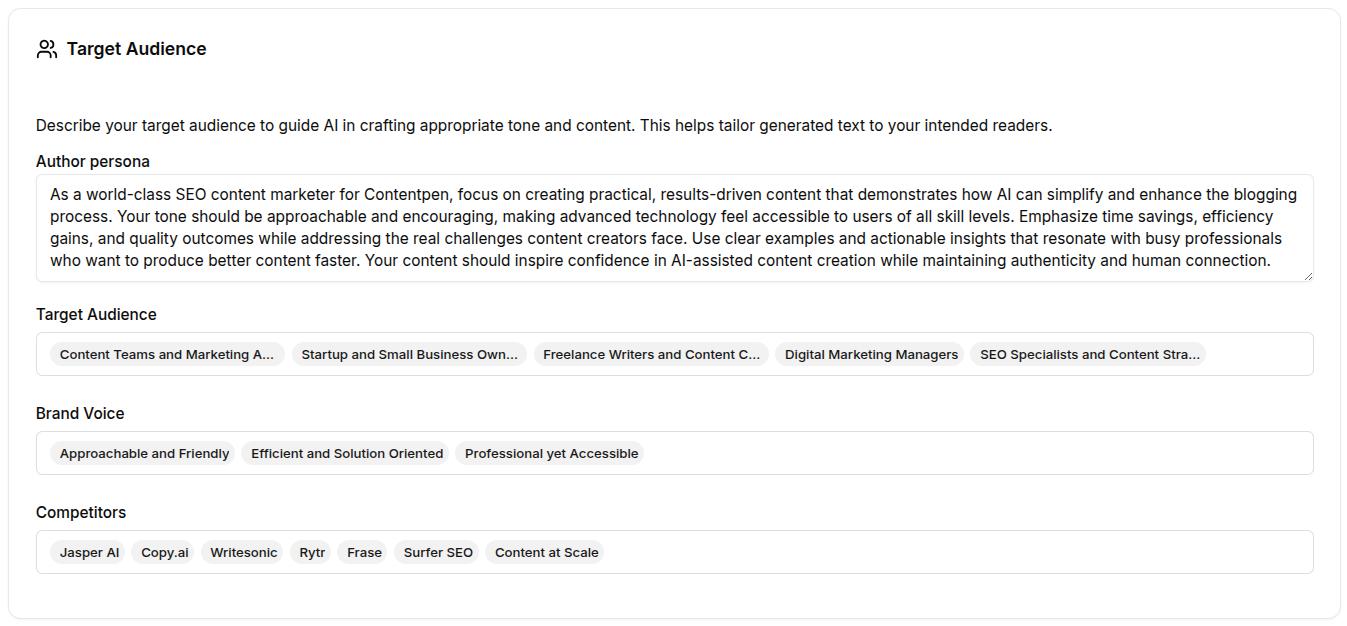
    Still within the brand voice section:

    • Define your author persona: What kind of character is narrating your brand content? Specify their tone, confidence level, and point of view.
    • Add relevant Target Audience Tags (e.g., growth marketers, SaaS product leads, early-stage founders).
    • Select brand voice tags such as “Professional but approachable,” “Clear and straightforward,” or “Helpful and solution-focused.”
    • List competitors to help the AI differentiate your tone and messaging.
    Brand voice settings continued: Author persona, target audience, and competitors shown.

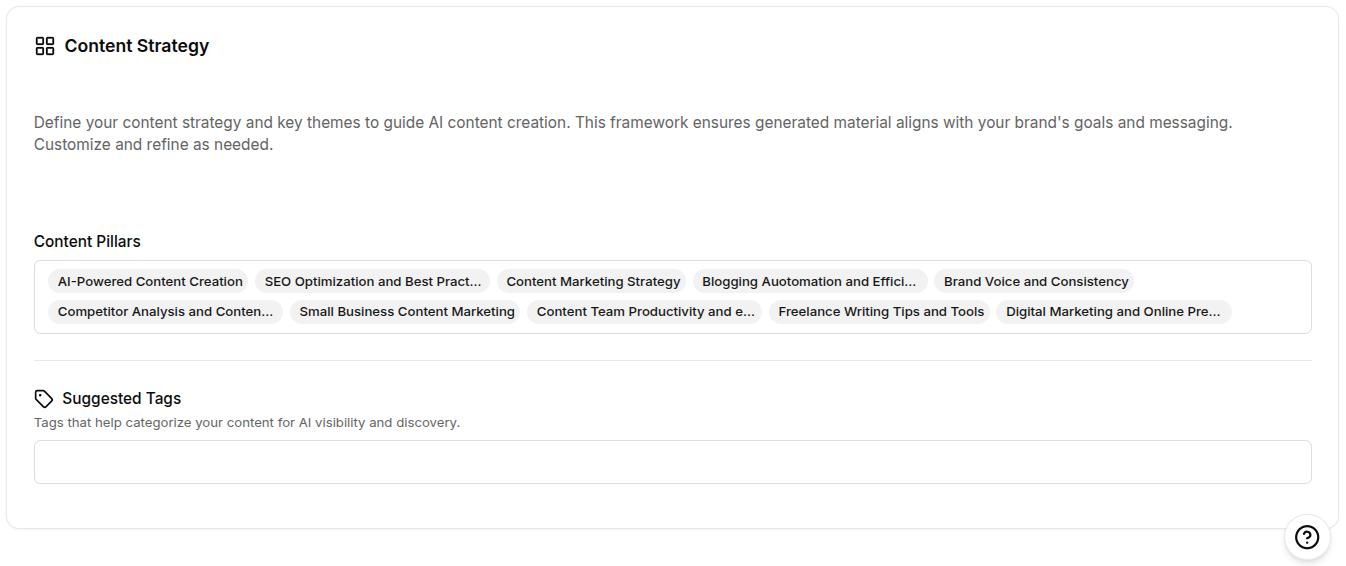
    Then, establish content strategy pillars to guide AI-generated content topics. For example:

    • SEO and analytics
    • Content marketing
    • SaaS growth
    • AI in marketing
    Brand voice settings continued: Content strategy settings showing content pillar and suggested tags.

    These details train the AI to create content that’s relevant, audience-specific, and in line with your brand’s positioning.
    Step 3: Add your website’s sitemap

    Navigate to Knowledge → Website.
    Click Add Sitemap or use the Find Sitemap option for automatic detection. Once added:

    • Review the pages pulled from your sitemap.
    • Use the Exclude Pattern feature to omit irrelevant sections (e.g., /blog/* or /careers).
    • Click Test Sitemap URLs to confirm everything is properly indexed.
    Knowledge-base, website settings showing sitemap added for Contentpen.

    Why it matters: The sitemap enables the AI to reference your actual site content for accuracy and SEO.

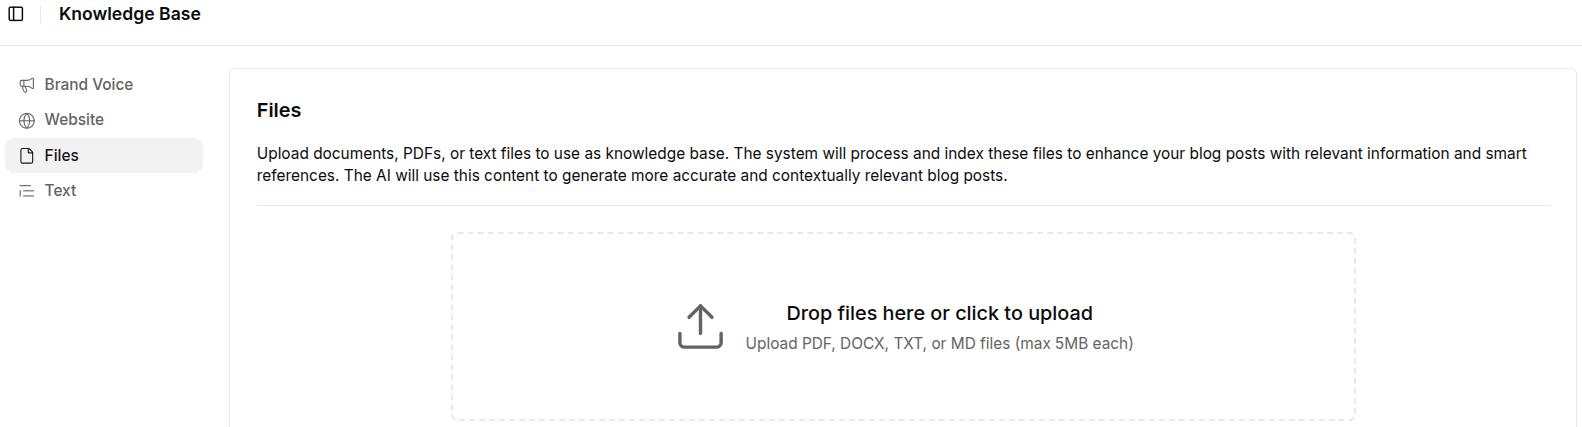
    Step 4: Upload branded reference files

    Go to Knowledge → Files.

    Upload content-rich documents like:

    • Brand guidelines
    • Product brochures or one-pagers
    • Internal messaging frameworks
    • Tone-of-voice documentation

    Supported formats: PDF, DOCX, DOC, TXT, and MD files (each under 5MB)

    Files settings to update brand knowledge in Contentpen.

    These files provide the AI with real examples of your brand’s language, structure, and positioning, improving the contextual quality of content generation.

    Step 5: Create reusable text snippets

    Go to Knowledge → Text.

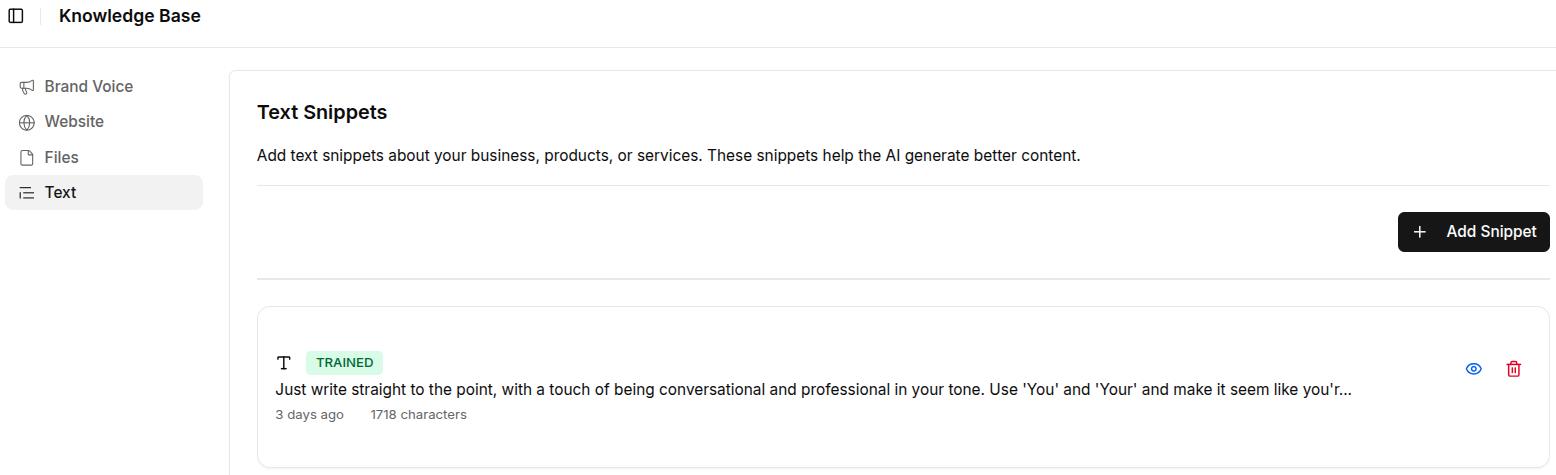
    Click + Add Snippet and input short, reusable pieces of copy (up to 5000 characters) such as:

    • Product descriptions
    • Taglines or slogans
    • Boilerplate value props
    • CTA templates
    Screenshot showing dummy text snippet added to improve Contentpen's performance.

    Snippets are particularly useful for ensuring consistent messaging across blog intros, feature highlights, meta descriptions, or social captions.

    Also read: How to use Contentpen presets to save time and write faster.

    Best practices to manage your brand knowledge setup

    Once your brand knowledge is set up in Contentpen, keeping it updated and aligned with your evolving strategy is key to ensuring long-term content quality and consistency. Here are a few best practices to follow:

    1. Update your inputs regularly

    • Refresh your Brand Voice inputs whenever your positioning, messaging, or target audience changes.
    • Add new customer segments or content themes as your business grows or pivots.
    • Keep your author persona aligned with any shifts in tone (e.g., moving from formal to conversational).

    2. Replace outdated content sources

    • Revisit the “Files” section every few months to remove or replace outdated assets.
    • Upload the latest product one-pagers, feature documents, or revised brand guidelines to reflect current messaging.

    3. Expand your text snippet library

    • Add new snippets as you develop fresh CTAs, headlines, or copy frameworks.
    • Monitor frequently reused language in your campaigns and standardize it inside the Text section.

    4. Monitor AI-generated content for alignment

    • Review the tone, vocabulary, and message of AI-generated outputs to ensure they match your expectations.
    • Provide feedback internally or refine Brand Knowledge inputs when outputs don’t align with the brand identity.

    5. Collaborate across teams

    • Work with marketing, product, and leadership teams to capture a complete and accurate brand voice.
    • Centralize feedback from stakeholders and reflect it in the Brand Knowledge configuration.

    Final thoughts

    Brand Knowledge in Contentpen is more than a configuration panel; it’s the foundation for producing AI-assisted content that actually sounds like your brand. 

    By taking the time to define your tone, clarify your audience, upload key documents, and set strategic messaging pillars, you’re giving the AI everything it needs to write with confidence and clarity.

    As your business evolves, updating your Brand Knowledge inputs keeps your content aligned, relevant, and strategically on point. 

    If you’re serious about building a brand that resonates across every channel, Brand Knowledge is not just helpful; it’s essential.

    Frequently asked questions

    What is brand knowledge in Contentpen?

    Brand knowledge is a core feature in Contentpen that allows you to preload your brand’s identity, tone, audience, and messaging strategy. This helps the AI generate consistent, on-brand content across all formats.

    Can I use brand knowledge for multiple brands or clients?

    Currently, brand knowledge is designed to align AI output with one brand at a time. If you manage content for multiple brands, you’ll need to configure and switch between workspaces manually.

    What kind of files should I upload to the Files section?

    Upload any document that reflects your brand’s voice, tone, and positioning. This includes brand guidelines, product brochures, messaging frameworks, internal training docs, and approved blog samples.

    How often should I update my brand knowledge inputs?

    Update your brand knowledge setup whenever there are changes in product features, brand messaging, target audience, and website structure. Review it at least quarterly to ensure all data remains current.

  • How to use Contentpen presets to save time and write faster

    How to use Contentpen presets to save time and write faster

    If you’re writing blog posts regularly, you already know how much effort goes into just getting started. It’s tedious. It’s inconsistent. And it eats up more time than the actual writing.

    Now imagine you could skip all of that with one click.

    That’s what presets in Contentpen are for. They help you save your ideal article setup, including voice, structure, formatting, and linking settings, so you never have to start from scratch again.

    Whether you’re blogging manually or already using our AI writer, this guide will show you how presets cut hours from your blogging workflow and help you publish faster.

    So, let’s get started.

    What are presets in Contentpen?

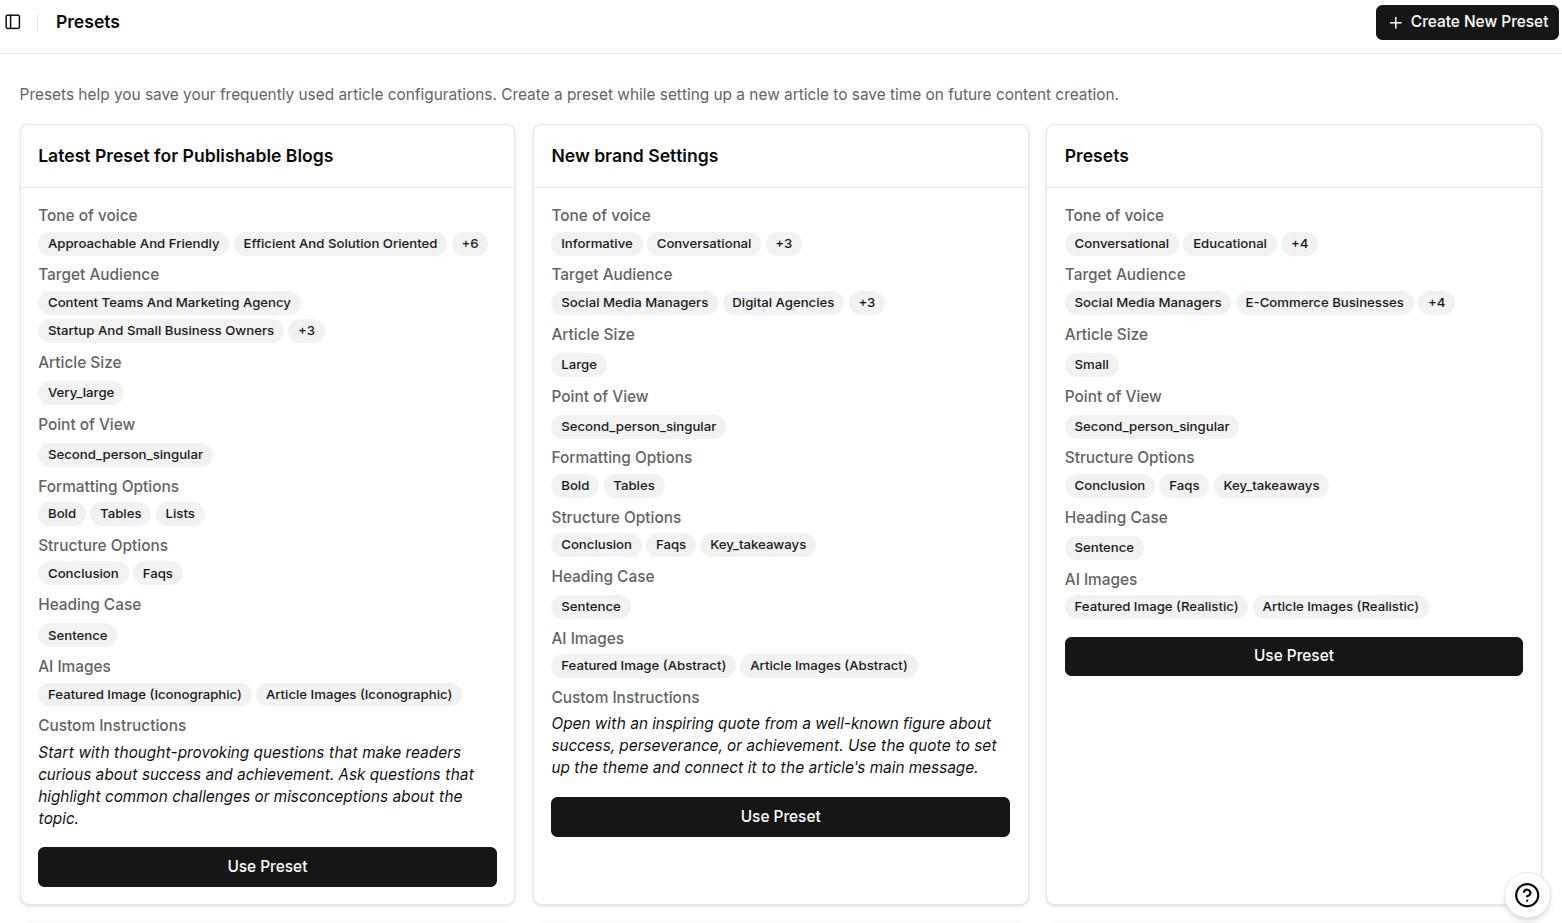
    Screenshot showing some pre-made content presets inside Contentpen.

    Presets are reusable content blueprints that let you predefine exactly how your articles should be written and structured inside Contentpen.

    Think of them as your saved writing formula. Instead of selecting the same tone, adjusting formatting, picking section types, or setting up internal links every time, you define it once and apply it instantly to any new article.

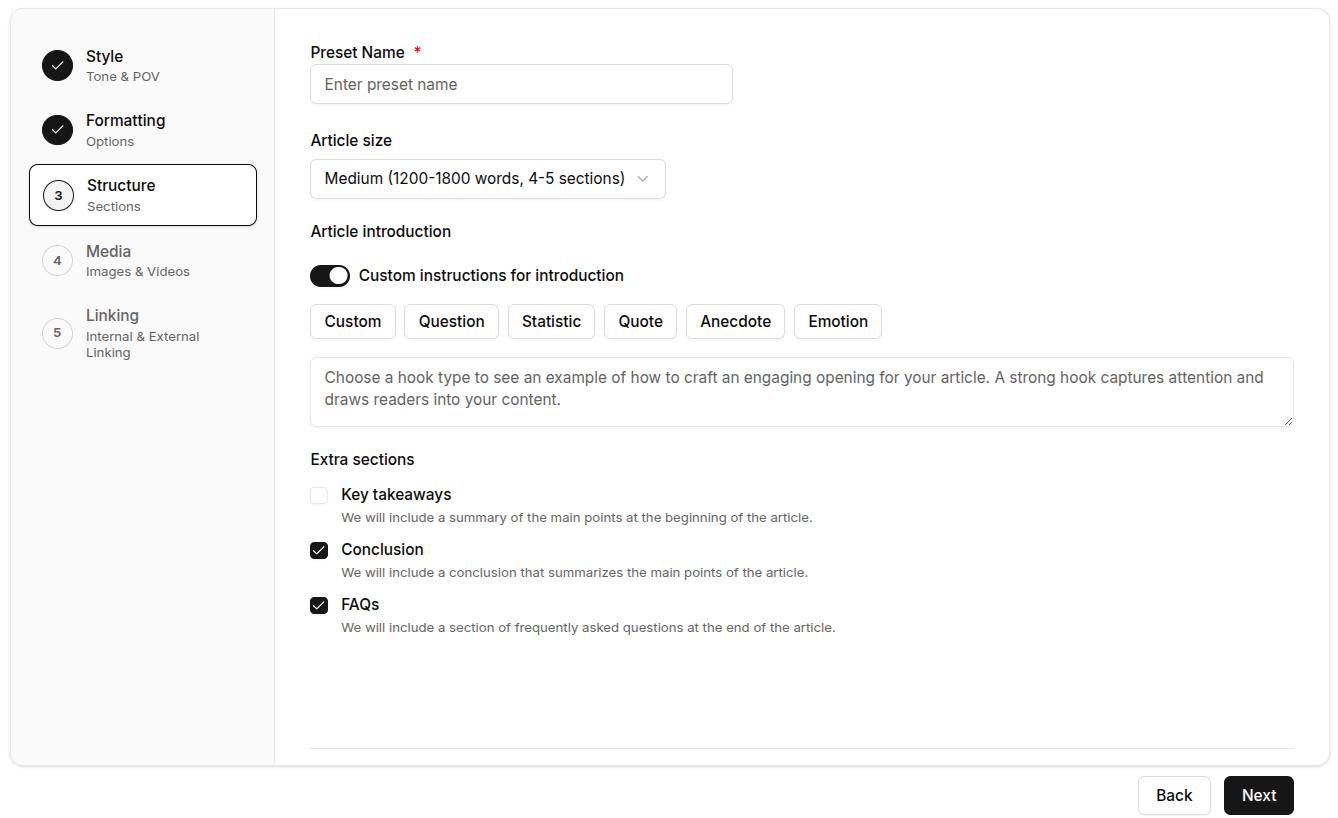
    Each preset includes the following 5 options and subcategories:

    #1: Style:

    • Language and target country
    • Tone of voice
    • Target audience and POV (point of view)

    #2: Formatting:

    • Preferred formatting (bold, italics, tables, quotes, and lists)
    • Heading letter case

    #3: Structure:

    • Article size
    • Introduction style
    • Extra sections (key takeaways, conclusion, and FAQs)

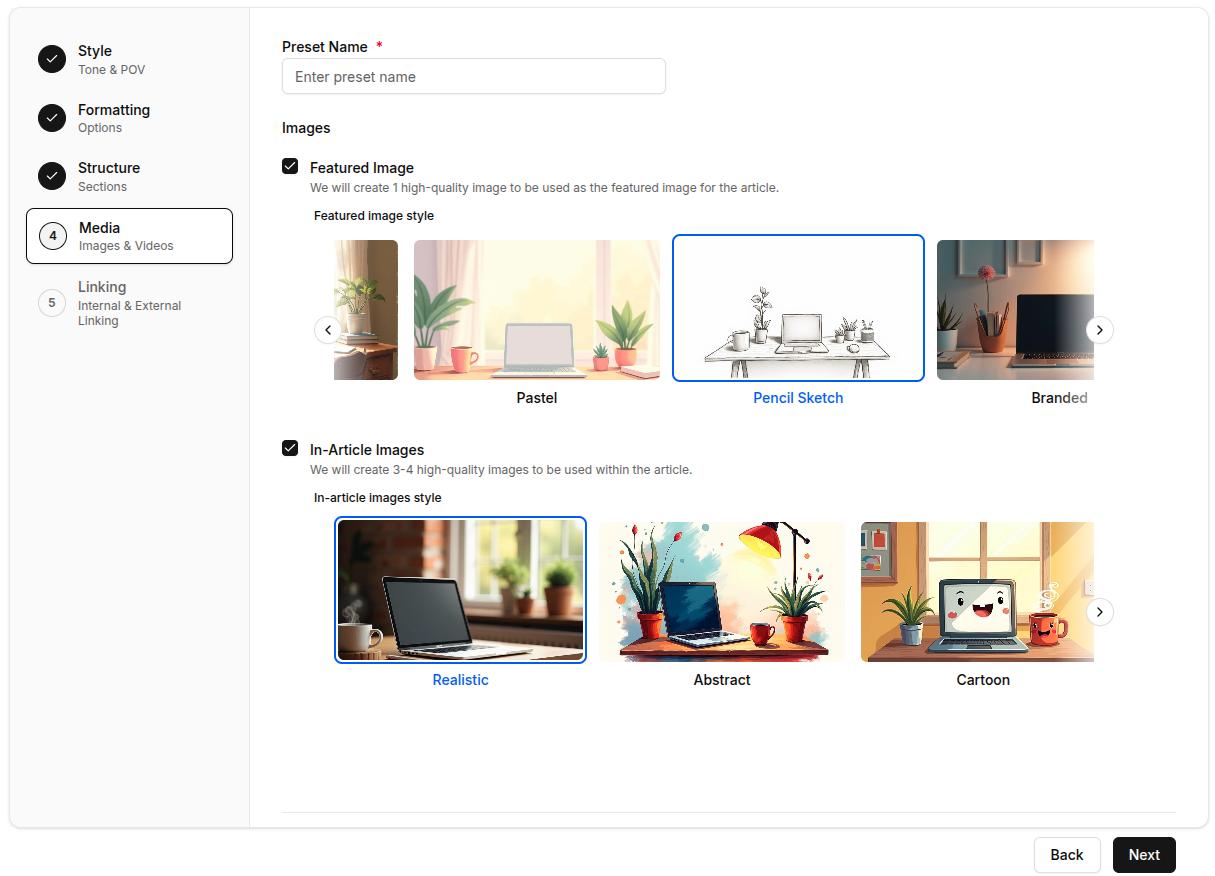
    #4: Media:

    • Featured image styles
    • In-article image styles

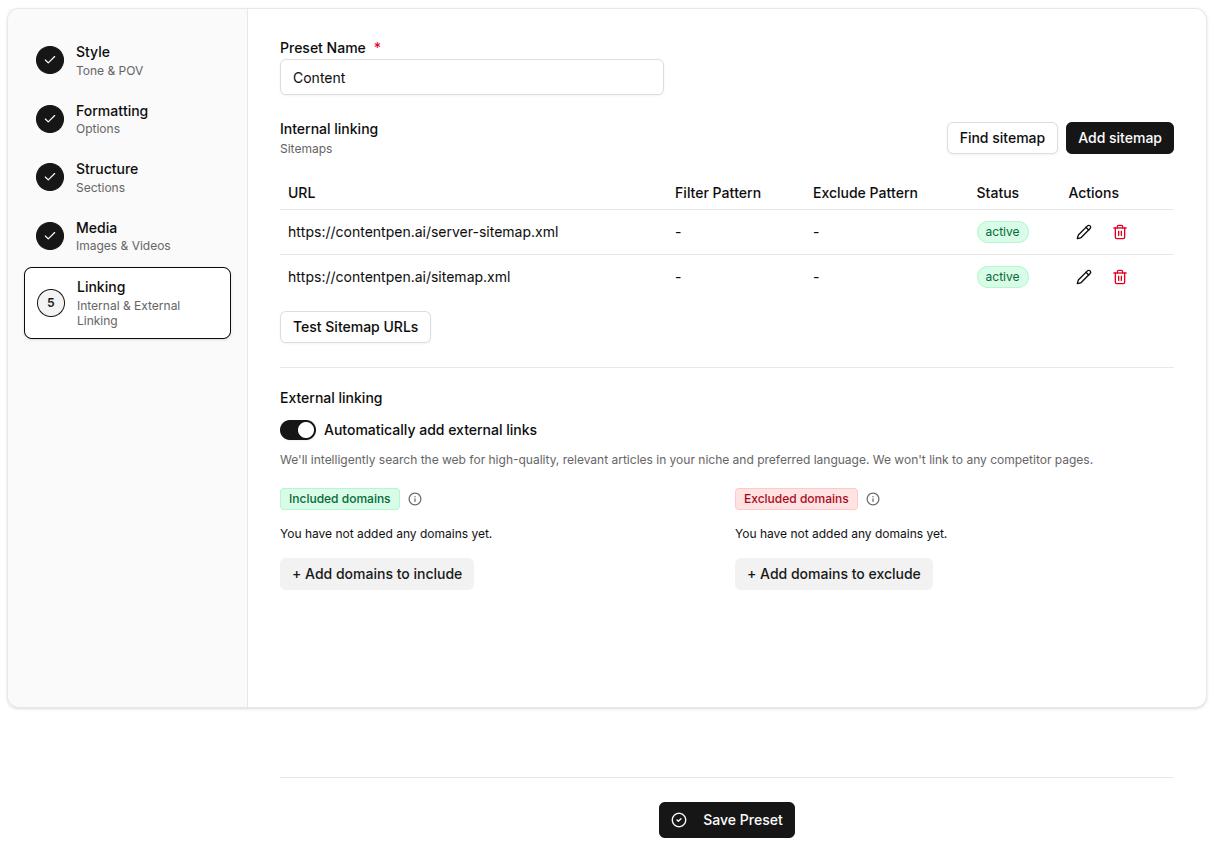
    #5: Linking:

    • Internal linking rules using your sitemap
    • External linking preferences (include or exclude specific domains)

    Once set, you or your team can apply a preset with a single click, so every blog starts with your exact preferences already in place.

    Why Contentpen presets matter for your blogging workflow

    If you’re still doing everything manually and trying to keep every post consistent, you’re spending hours on tasks that can be automated.

    Contentpen presets eliminate that friction. The feature turns your best practices into repeatable systems. Here’s how:

    • Save time: Stop redoing the same setup for every article.
    • Ensure consistency: Every article follows the same tone, structure, and standards, whether you or a team member writes it.
    • Scale without stress: As your content volume grows, presets make it easy to maintain quality at speed.
    • Reduce manual errors: Never forget a formatting rule, section type, or linking guideline again.
    • Reclaim your creative energy: With the busywork handled, you can focus on your content strategy.

    This is the feature that makes switching from legacy tools to Contentpen worth it.

    Write content that’s built to rank, not just read

    Create search-optimized blogs aligned with SEO and GEO signals, so your content performs well across search and AI-driven discovery.

    Try SEO Blogging FREE
    AI SEO Interface

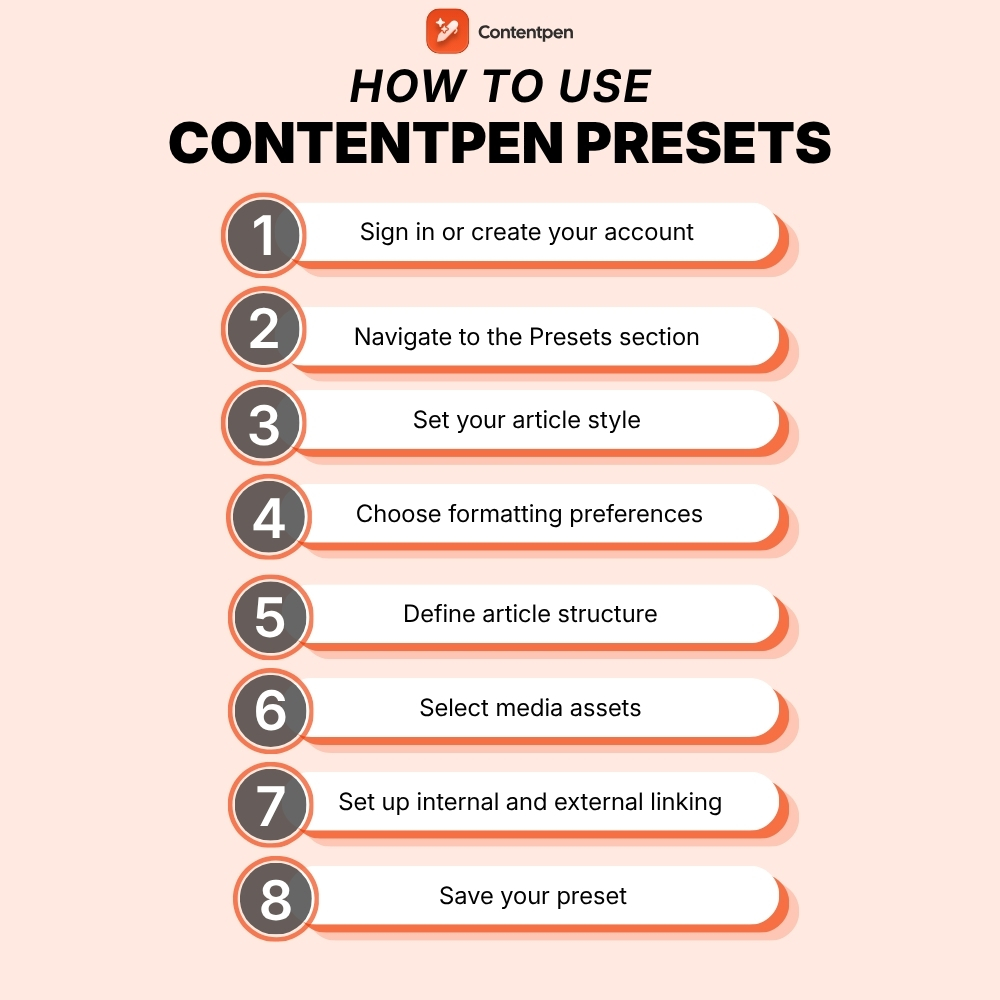
    How to use Contentpen presets: 8 simple steps

    Follow these easy steps to create a content preset inside Contentpen that fits your writing style, structure, and content goals.

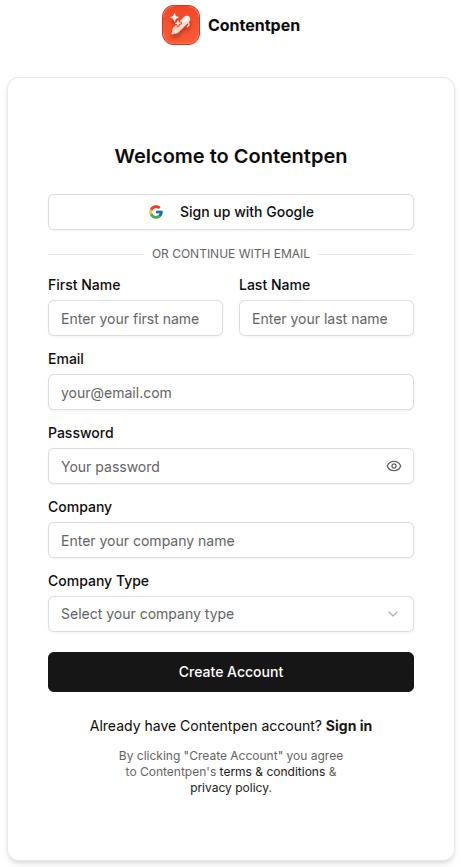
    1. Sign in or create your account

    To get started, log in to your Contentpen account. 

    Sign up screen - Contentpen.ai.

    If you’re new, sign up and start your free 7-day trial. Presets are available to all users and can be created as soon as you access your Contentpen workspace.

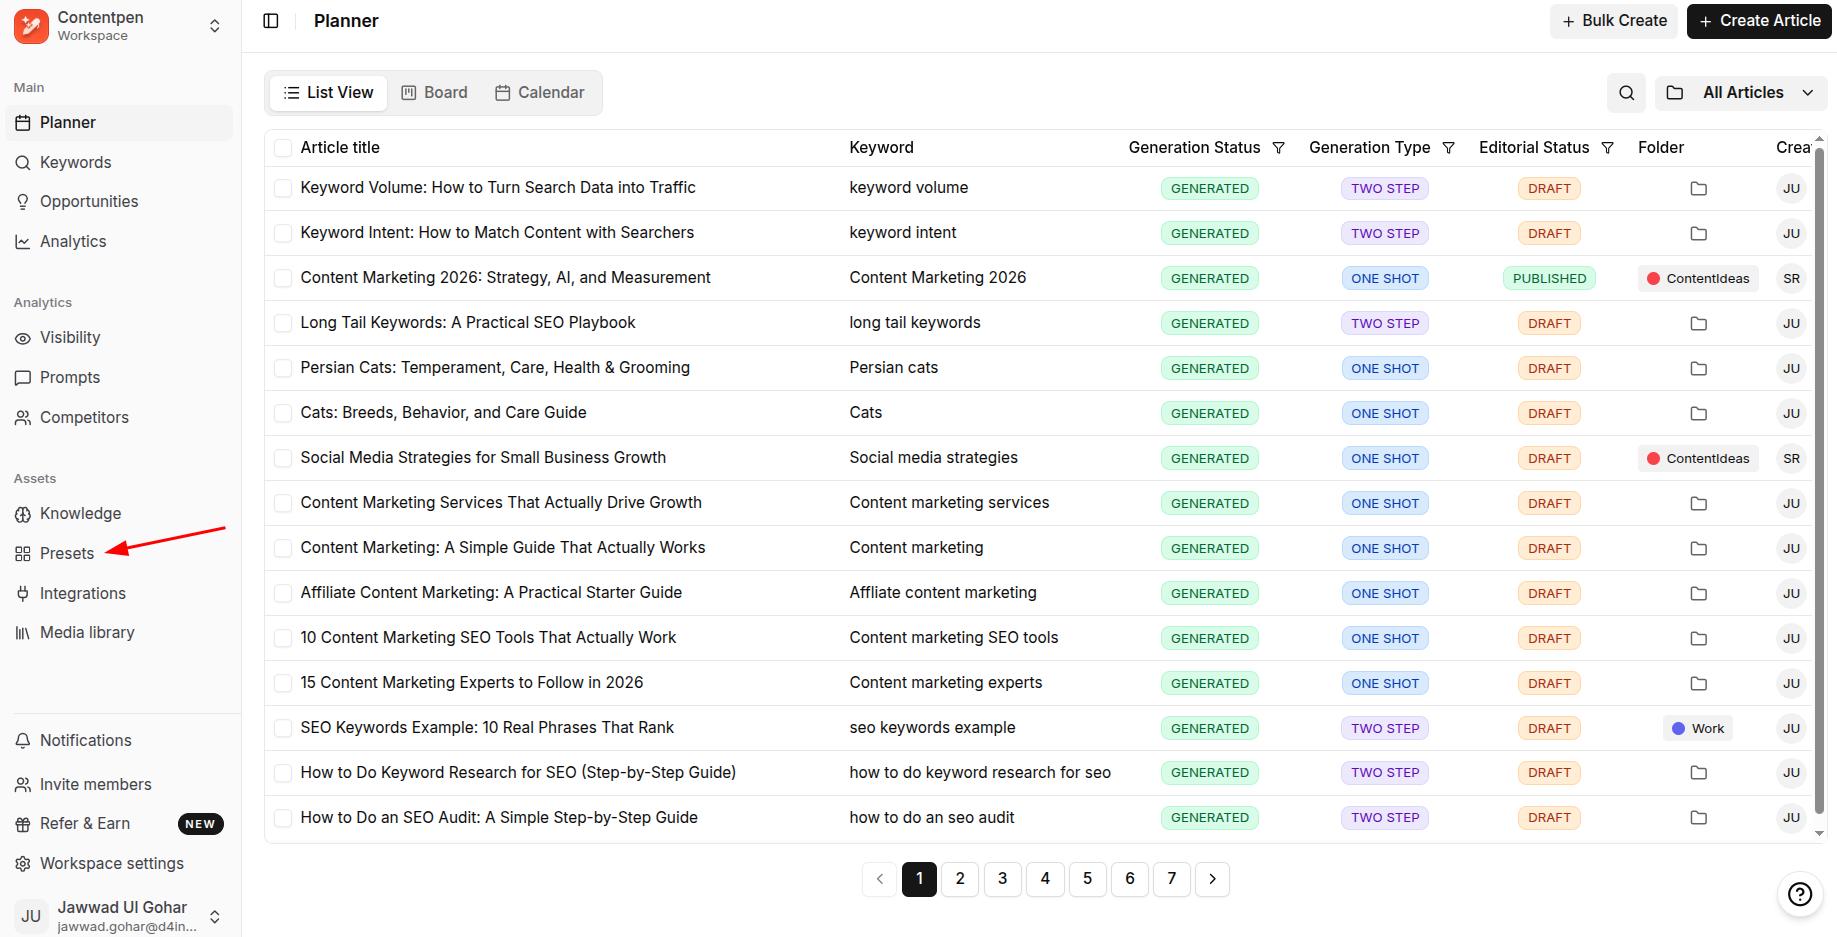
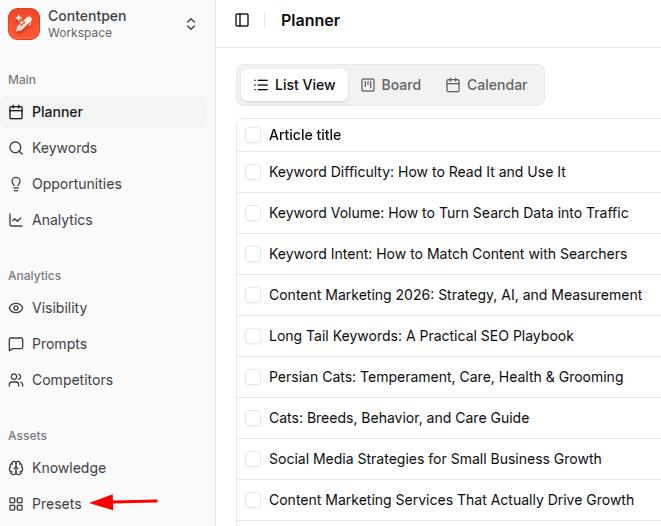
    Screenshot showing 'Presets' option under 'Assets' in the main Contentpen workspace.

    Once you are in the main dashboard, go to Presets.

    2. Create a new content preset

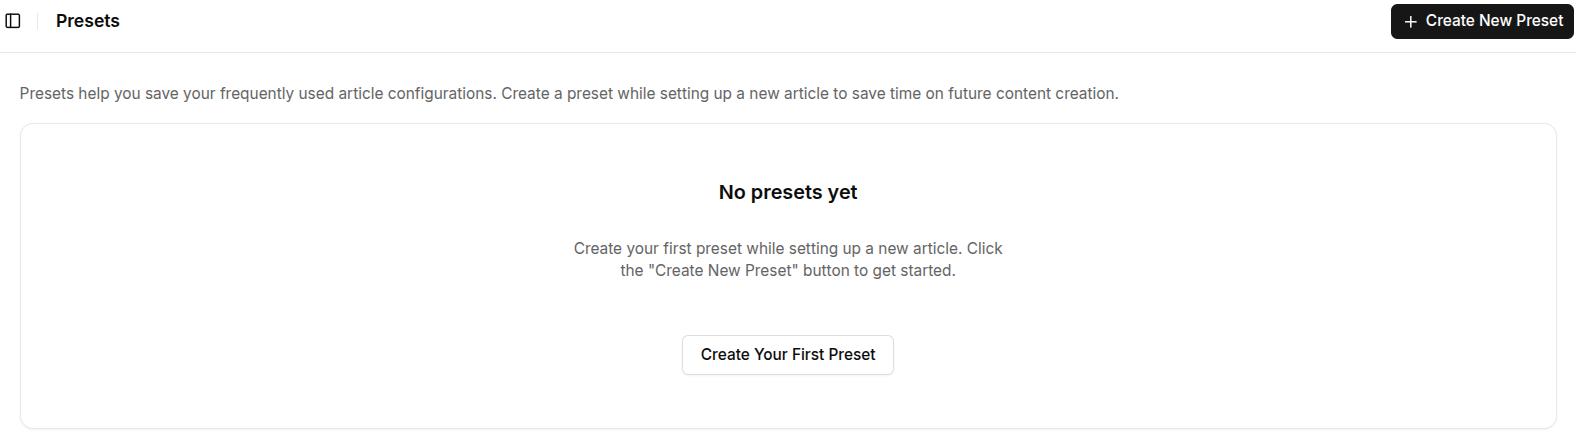
    Click Create New Preset to begin setting yours up.

    Creating a new Contentpen preset.

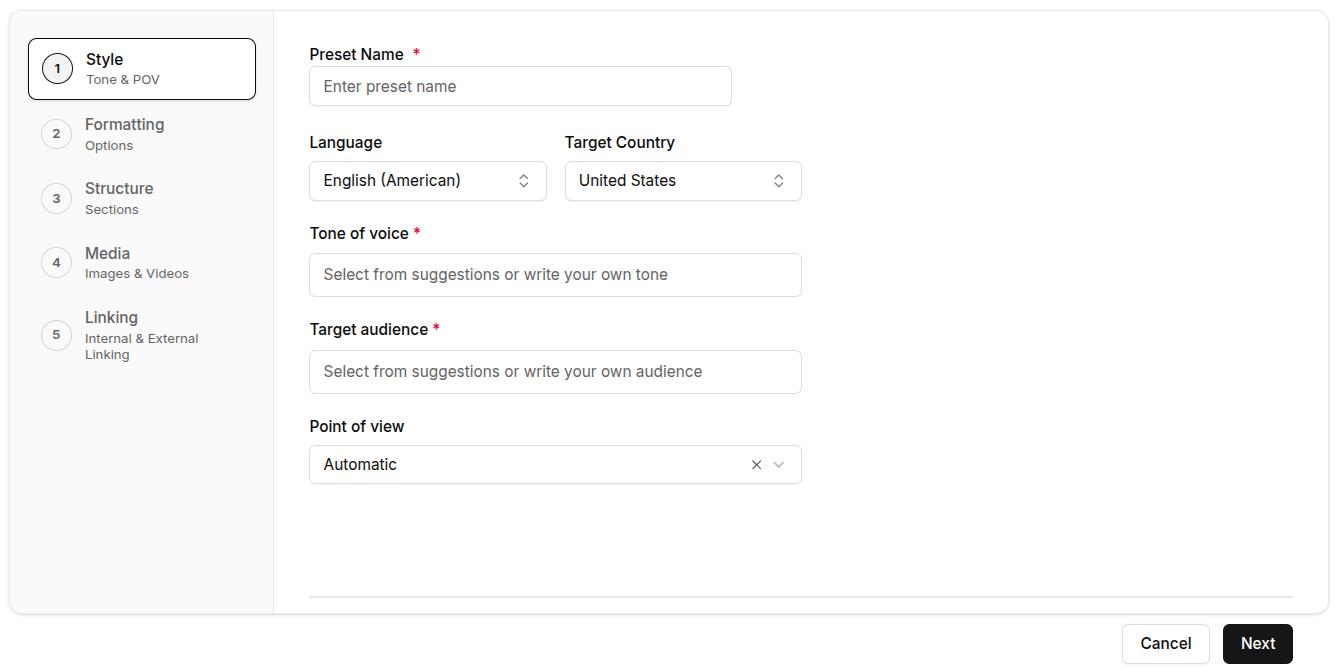
    3. Set your article style

    In this step, you’ll define how your content should sound, the tone, audience, and point of view. These settings help ensure that every article reflects your brand voice and connects with the right readers.

    • Preset name: Enter a preset name that you can easily remember and refer to later on.
    • Language and target country: Contentpen now supports more than 50 global languages. After selecting a language, choose your target country (this option is set to the United States by default).
    • Tone of voice: Choose from predefined options like professional, conversational, formal, authoritative, educational, casual, and others. 
    • Target audience: Select the type of reader you’re writing for, such as marketers, founders, agency owners, startups, enterprises, etc.
    • Point of view: Choose first person singular (I/me/my), first person plural (We/us/our), second singular (You/your), or second person plural (You all/your). You can also let this option be on ‘Automatic’ to let Contentpen decide your POV automatically.
    Article style settings, including language, target country, tone of voice, target audience, and POV.

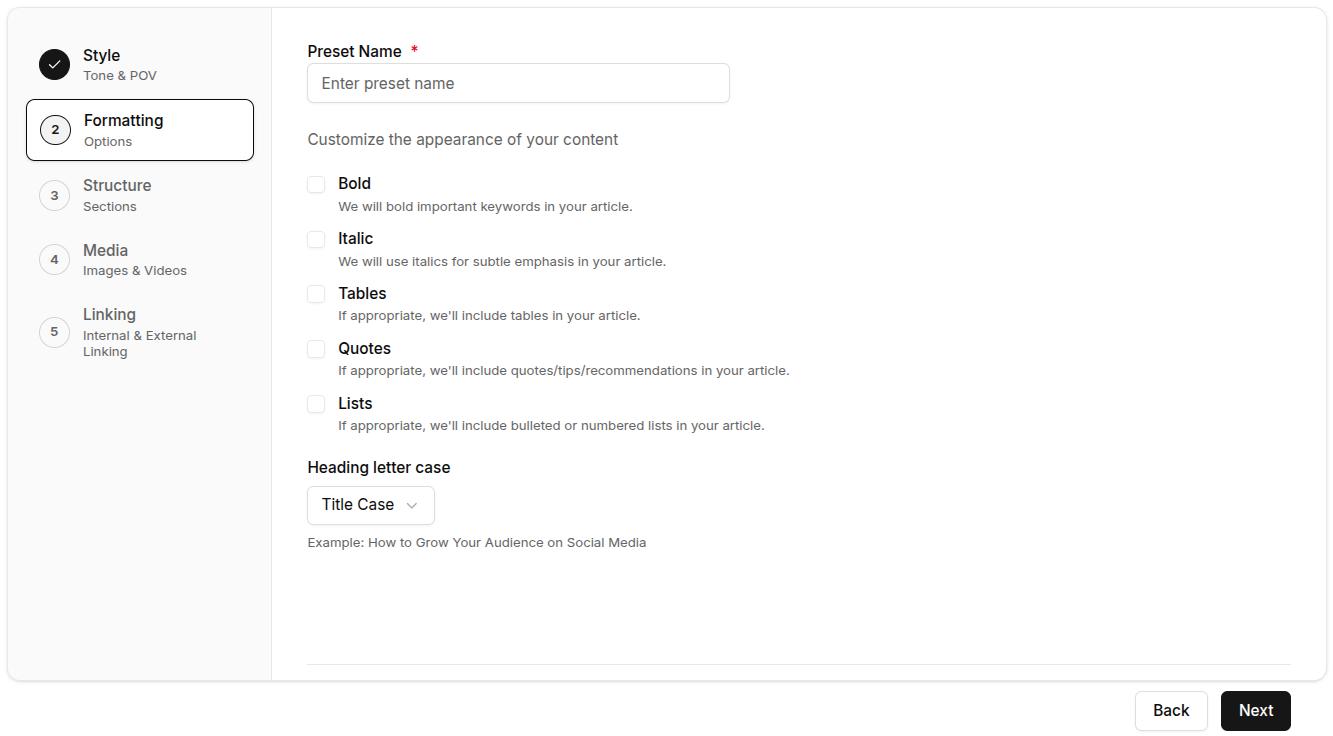
    4. Choose formatting preferences

    Next, decide how your content should appear visually. These formatting rules help standardize your content and reduce post-editing work.

    Toggle on or off the following elements:

    • Bold: Automatically bold key phrases for emphasis
    • Italic: Subtly change the appearance of certain ideas
    • Tables: Display structured data clearly
    • Quotes: Include callouts or tips
    • Lists: Use bullet points or numbers where needed

    You can also choose your heading capitalization: Title Case, sentence case, lowercase, or unchanged (recommended for non-English users).

    Formatting options for content preset, including appearance options and heading letter case.

    5. Define article structure

    Now, outline how your blogs should be built, from length to extra sections and intro hooks.

    Article size: Select from:

    • Small (800-1200 words, 3–4 sections)
    • Medium (1200–1800 words, 4–5 sections)
    • Large (1800–2500 words, 5–7 sections)
    • Very Large (2500–3500 words, 7–10 sections)

    Custom introduction (optional): Choose how your articles should begin. Click on this slider to reveal options, including:

    • Custom
    • Question
    • Statistic
    • Quote
    • Anecdote
    • Emotional opener

    Optional sections: Enable or disable these:

    • Key Takeaways (blog summary at the top)
    • Conclusion
    • FAQs
    Screenshot showing content structure settings, including article size, introduction style, and extra sections.

    6. Select media assets

    On this step, choose the type of images you want generated for your blog. You can select from the following options:

    • 1 featured image
    • 3 – 4 high-quality in-article images
    Media options inside Contentpen preset for featured and in-article images.

    You can create images in 12 different styles: Realistic, Abstract, Cartoon, Flat Design, Iconographic, Minimalist, Oil Painting, Pastel, Pencil Sketch, Branded, Vintage, and Watercolor.

    This ensures every article is pre-structured the way you want and visually appealing to enhance audience engagement.

    7. Set up internal and external linking

    Good linking boosts SEO and increases dwell time for your platforms. Here’s how you can automate it inside your content preset:

    Internal linking:

    • Add/Find Sitemap: Manually paste your sitemap URL or use the ‘Find Sitemap’ feature to let Contentpen discover your website links.
    • Edit Sitemap: Click the pencil icon next to your added sitemap to edit it. Include only blog pages (e.g., /blog/*) and exclude non-content paths (e.g., /admin/). Then enable ‘Automatically crawl and add links to knowledge base’ and click update.
    • Test Sitemap URLs: Once you’re done adding the sitemap, you can click the ‘Test Sitemap’ button to verify it.

    Also read: How to add a sitemap in Contentpen?

    External linking:

    • Auto-linking toggle: Automatically add external links to trusted sources in your niche.
    • Included domains: Whitelist reliable sources you’d like linked in articles.
    • Excluded domains: Prevent links to competitors or irrelevant sites by adding their domains in the excluded section.
    Internal and external linking options for the Contentpen preset.

    8. Save your preset

    Once everything is configured, click Save Preset.

    It will now appear in your Presets list and can be instantly applied to any future article, so your content creation starts with all the right settings, every time.

    Final thoughts

    Presets in Contentpen aren’t just a convenience; they’re a content creation advantage. By eliminating repetitive setup tasks, ensuring brand consistency, and speeding up your workflow, presets help you publish more high-quality content in less time.

    Content presets take the guesswork out of every new article, so you can write with focus and publish with confidence. This feature makes our tool useful for freelancers looking to streamline their process or agencies aiming for scale.

    Write better blogs in less time, without sacrificing quality.

    Let AI handle structure, clarity, and flow while you stay in control of the message.

    Try AI blog writing
    AI SEO Interface

    Frequently asked questions

    Can I create multiple presets for different content types?

    Yes, you can create as many presets as you need. For example, one for SEO how-to guides, another for founder blogs, and a separate one for product announcements, each with its own tone, length, and structure.

    Can I edit or update a preset after I’ve created it?

    Yes, you can go back to any saved preset, make changes, and update it to match your evolving content needs. You can also duplicate a preset to create a variation without starting over.

    Do I need to use a preset every time I create an article?

    No, using a preset is optional. If you prefer to customize settings manually for a specific post, you can skip the preset and configure everything on the spot. Presets are there to speed things up when you need them.

    How do presets help with brand consistency?

    Presets standardize tone, structure, and formatting across every article, so whether you’re writing solo or with a team, your content always looks and sounds on-brand.

    Is using presets better than writing manually in Google Docs or a CMS?

    Yes, significantly. Manual workflows often involve repeating setup steps, copying old formats, and manually linking. Contentpen presets eliminate that repetition, reduce human error, and streamline your writing process, so you can focus on creating content, not configuring it.

  • How to rewrite a paragraph using AI?

    How to rewrite a paragraph using AI?

    Rewriting content is a super important part of the writing process; it helps you fine-tune your tone, make things easier to understand, and keep your readers hooked.    

    But doing it manually can be time-consuming and often overwhelming, especially when you’re short on time or creativity. That’s where AI tools come in handy.

    AI-powered writing assistants help you rewrite paragraphs quickly while maintaining the original meaning. 

    One such easy-to-use tool is Contentpen,

    An ultimate AI blog generator that combines deep research with your brand’s voice to craft high-impact, SEO-optimized articles that outperform your competition.

    Let’s walk through how you can use Contentpen to rewrite a paragraph in just a few clicks.

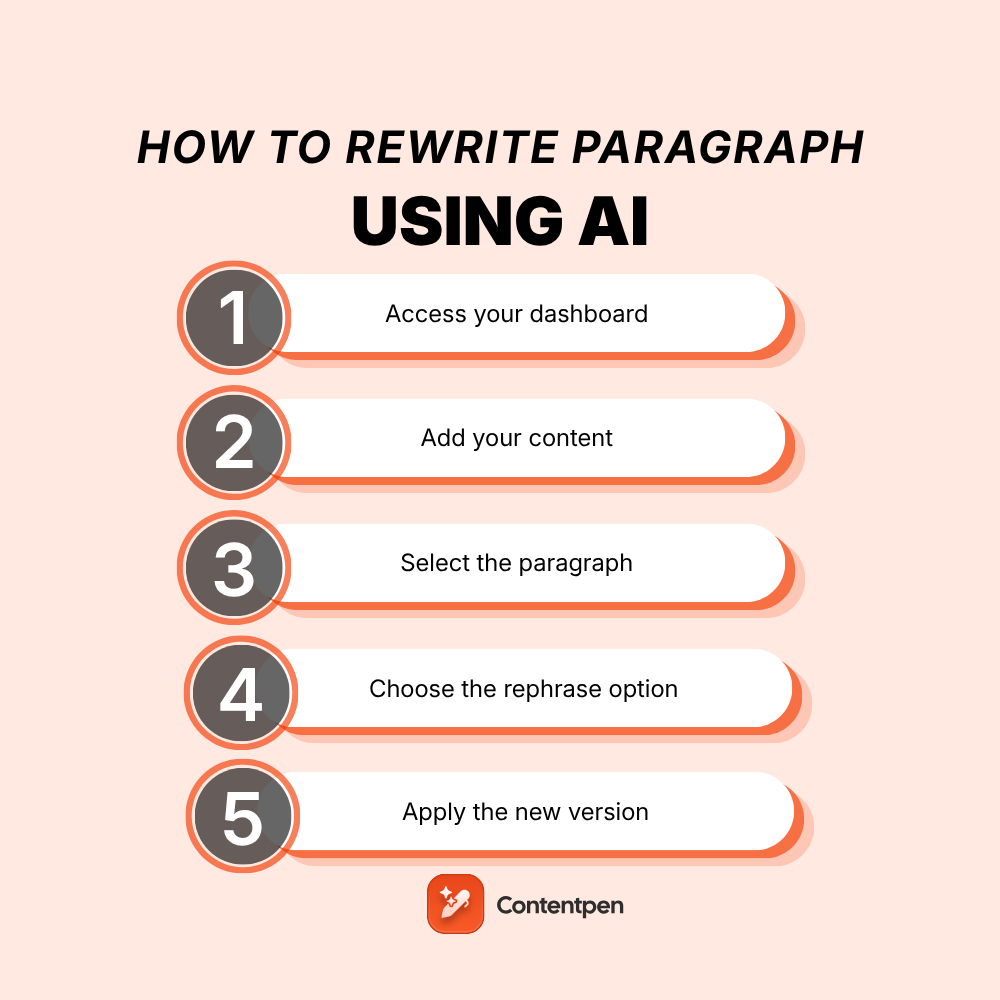
    Step 01: Access your dashboard

    • Go to your Contentpen dashboard and click on “Create Article”
    • Choose the “Start blank” option to begin a new article from scratch.
    start blank

    Step 02: Add your content

    • You’ll be redirected to the editor window, where you can paste or write your content.
    add content you wnat to rewrite

    Step 03: Select the paragraph

    • Highlight the paragraph you want to rewrite. Once selected, a small “Ask AI to edit or rephrase” bar will appear above it.
    Ask AI

    Step 04: Choose the rephrase option

    • Click on the bar and select “Rephrase text” from the available options, such as “Improve writing,” “Make longer,” “Simplify,” or “Change tone.”
    rephrase text
    • Press Enter, and the AI will rewrite the selected paragraph.
    replace text

    Step 05: Apply the new version

    You can click “Replace section” to update the original or choose to add it below the existing paragraph, whichever suits your workflow.

    rephrased text

    Also read: How to write an article using Contentpen?

    Conclusion

    Rewriting pragraphs doesn’t have to be time-consuming. With Contentpen’s AI-powered editor, you can enhance your writing instantly. Whether you’re editing for clarity, tone, or variety, the rephrase tool helps you polish your content with just a few clicks.

    Frequently asked questions

    Can Contentpen rewrite entire articles or just paragraphs?

    Yes, Contentpen can help you rewrite entire articles or specific paragraphs, highlight the text you want to improve, and let the AI handle the rest.

    Does the rewrite tool change the meaning of my content?

    No, the tool is designed to maintain the original intent while improving wording, tone, and clarity.

    Can I choose different tones when rewriting a paragraph?

    Absolutely! Alongside the rephrase option, you can select different tones like formal, casual, or persuasive to match your content’s purpose.

    Is Contentpen beginner-friendly?

    Yes, the interface is intuitive and easy to use, even if you’ve never worked with AI writing tools before.

  • How to add a sitemap in Contentpen?

    How to add a sitemap in Contentpen?

    A sitemap is an XML file that lists your site’s important URLs, such as pages, videos, and other files. It helps search engines like Google discover and index your content more efficiently. But its usefulness doesn’t stop at search engines.

    Sitemaps also allow tools like Contentpen to automate internal linking for your blogs and articles. The best news? This process is only a one-time effort and doesn’t require manual tweaking as you add content.

    Curious to learn more? Let’s check how to add a sitemap in Contentpen with all methods considered.

    2 ways to add a sitemap in Contentpen

    There are two ways in which you can enter your sitemap in our AI writing tool:

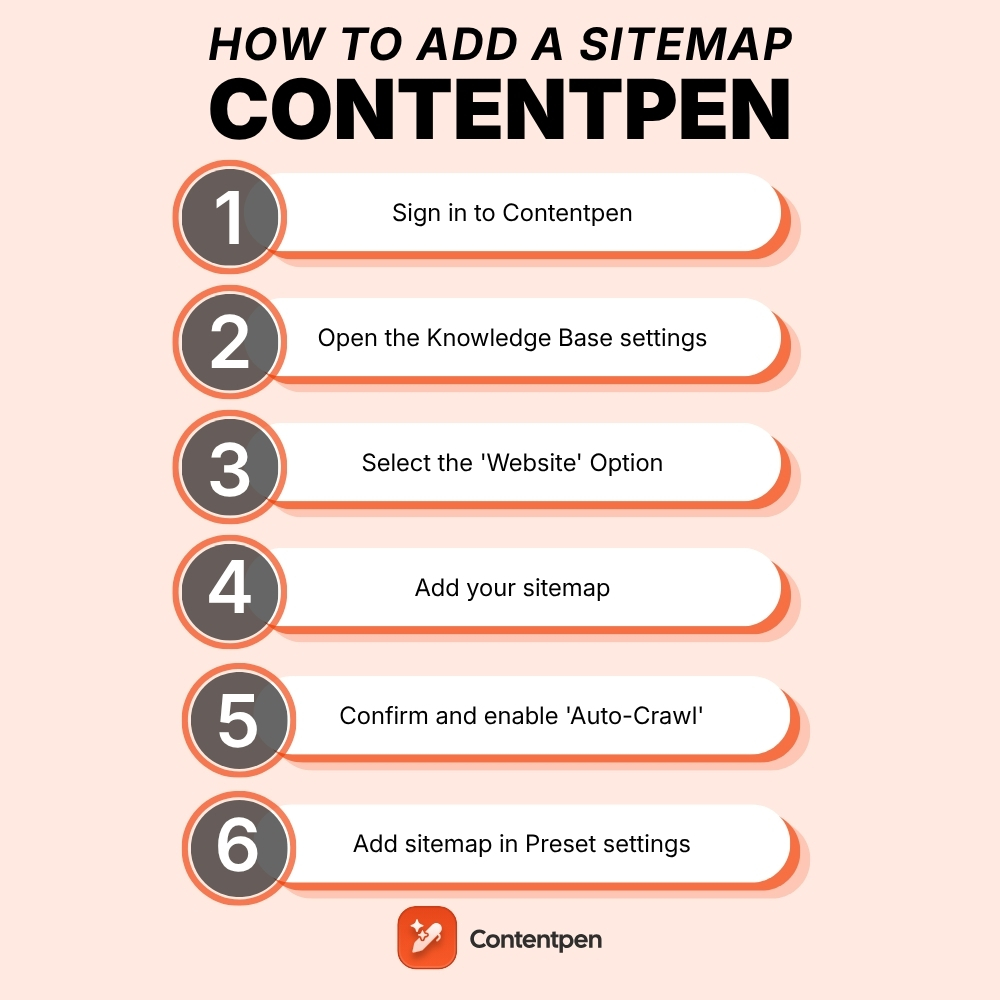
    • Through ‘Knowledge Base’ settings
    • Through ‘Presets’ options

    Let’s review them in more detail.

    Using the Knowledge Base settings

    Step 1: Sign in or create an account on Contentpen to access the main dashboard.

    Sign up screen - Contentpen.ai.

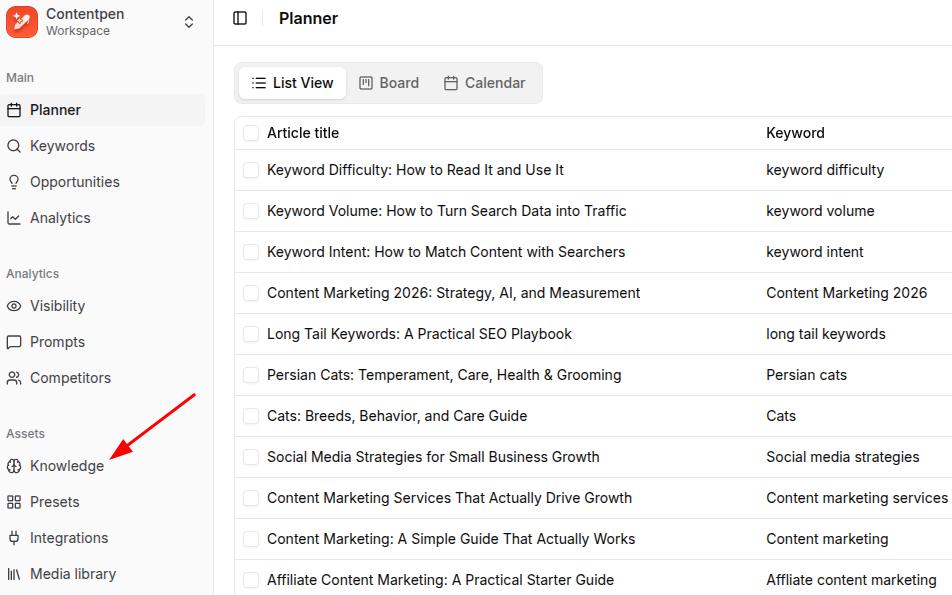
    Step 2: From there on, see the ‘Knowledge’ button from the left-side navbar and click on it.

    Selecting the 'Knowledge' settings from the main dashboard.

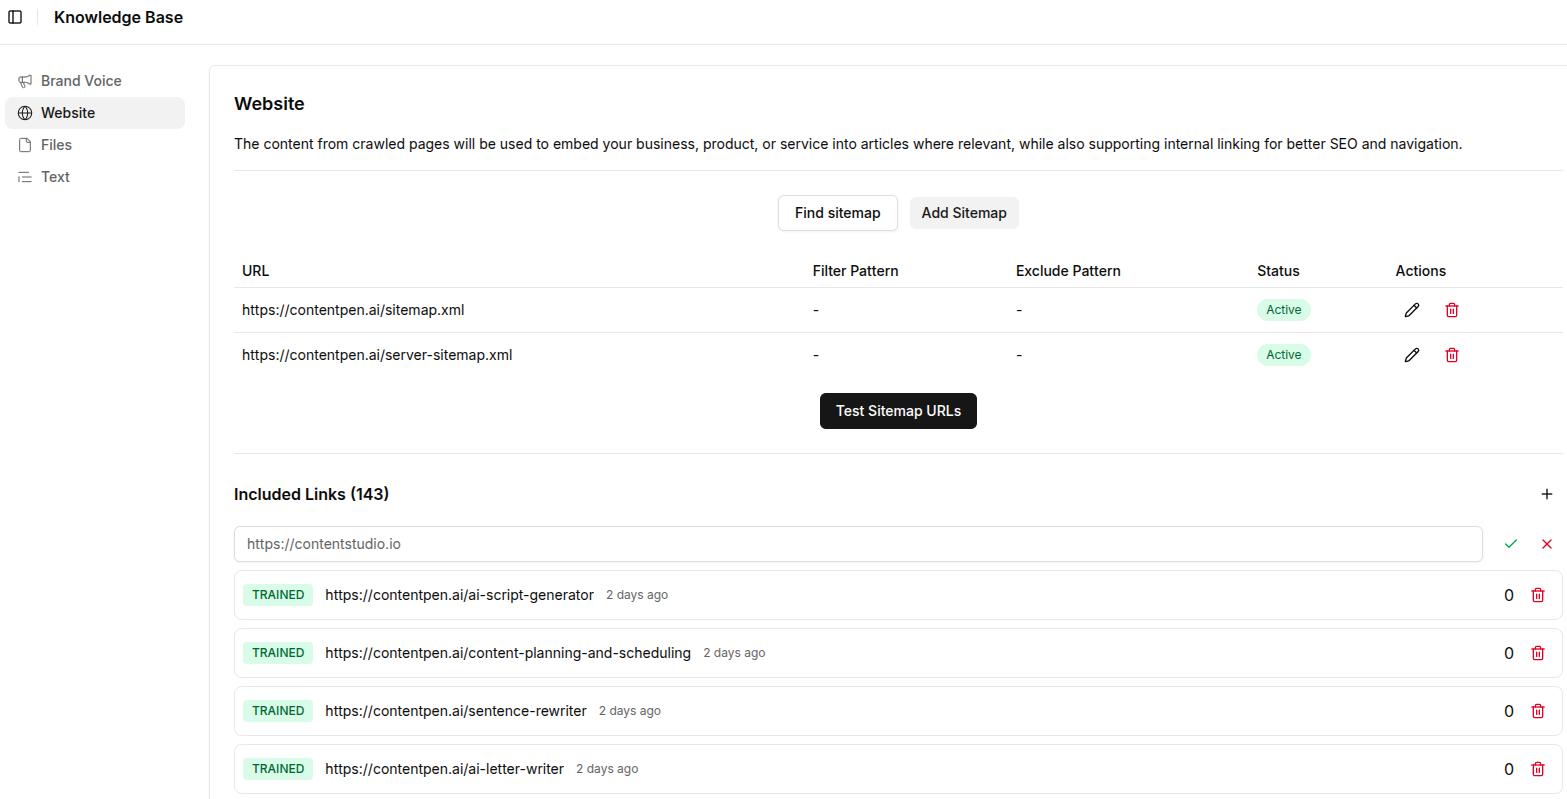
    Step 3: Then, click the ‘Website’ option to proceed with setting up your sitemap in Contentpen.

    Website settings, leading to the sitemap adding screen.

    On this screen, you see two buttons, ‘Find Sitemap’ and ‘Add Sitemap.’

    Usually, sitemaps follow a familiar pattern: 

    https://yoursite.com/sitemap.xml

    Or

    https://yoursite.com/server-sitemap.xml

    Step 4: If you know yours, click ‘Add Sitemap’ to proceed with the XML sitemap integration inside Contentpen.

    Adding sitemap screen - Contentpen.ai.

    On this screen, you can use the Filter and Exclude Pattern (optional) fields as well. In simpler terms, it means:

    • Filter Pattern – To only include selected categories or pages you prefer to show. For instance, ‘/blog/’.
    • Exclude Pattern – To leave out specific pages you don’t want found or crawled from the sitemap. For example, ‘/admin/’.

    Also read: Search engine basics: How they work and why they matter.

    Step 5: Alternatively, if you don’t know your sitemap or want this process to be completely automated, then use the ‘Find Sitemap’ button.

    'Find Your Sitemap' screen with the website URL occupying https://contentpen.ai/.

    At this screen, enter your domain and hit the ‘Find My Sitemap’ button to let Contentpen automatically discover your XML file(s).

    Contentpen automatically discovering XML sitemaps for a website.

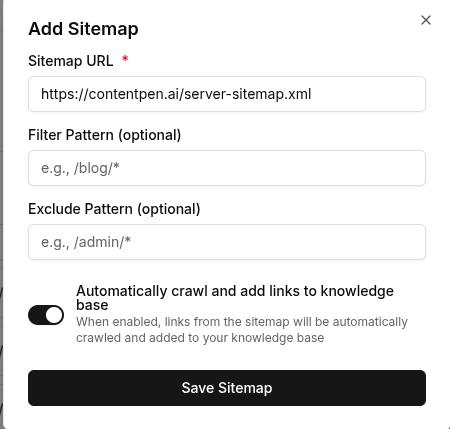
    Step 6: Once discovered, click ‘Add’ to include your sitemap in Contentpen and proceed with the same configuration steps as shown earlier in step 4.

    'Adding sitemap' screen for the server sitemap of Contentpen.

    Finally, you can test your added sitemap using the ‘Test Sitemap URLs ‘ button.

    Note: Keep the ‘Automatically crawl and add links to knowledge base’ slider on to help Contentpen learn contextual details from your pages. This will ensure smooth internal linking and better on-brand content for your blogs.

    Using the Presets settings

    Step 1: For the second method of adding your sitemap to Contentpen, go to the ‘Presets’ options from the main dashboard.

    Presets settings shown on the main content planner - Contentpen.ai.

    Then, click on the ‘Create New Preset’ button to proceed.

    Creating a new Contentpen preset.

    Step 2: Once you are at the preset settings, set up your ‘Style’, ‘Formatting’, ‘Structure’, and ‘Media’ details, as shown in the ‘How to use Contentpen presets’ blog.

    Step 3: After all the other preset options are done, go down to the final ‘Linking’ option.

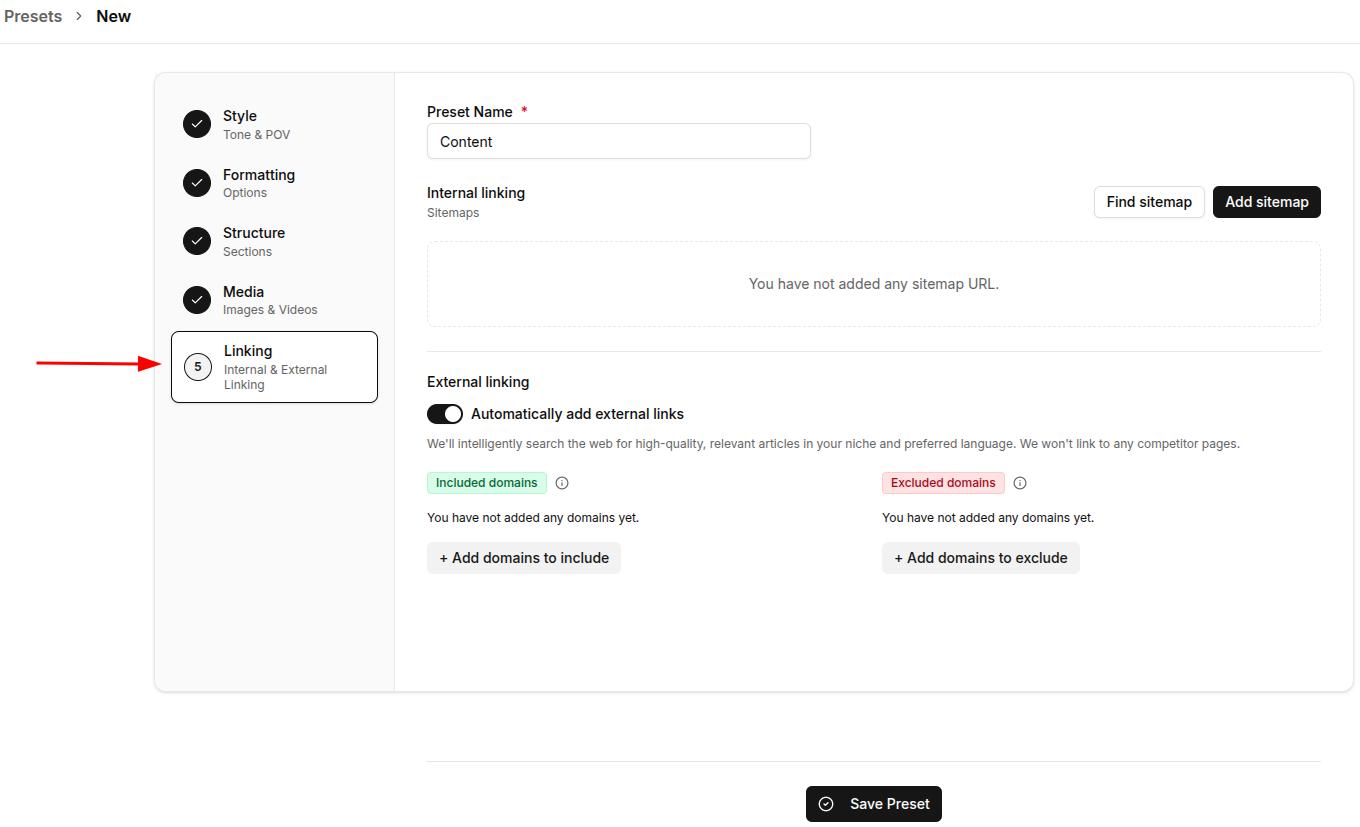
    Linking option inside the Presets settings - Contentpen.ai.

    Here you will find the same ‘Find sitemap’ and ‘Add sitemap’ buttons as in the previous method.

    Repeat step 4, or steps 5 and 6 from the Knowledge Base method to achieve a successful Contentpen sitemap setup.

    Note: You can toggle external links on or off from this screen. Use this feature to add or exclude domains that you don’t want as outbound sources in your content to strengthen your link profile and automate internal and external linking.

    Final thoughts

    Adding a sitemap in our SEO platform is simple, quick, and designed to make internal linking easier. Whether you prefer to let the system handle it automatically or want to add or adjust it manually, the process is smooth and flexible.

    Plus, with powerful customization options like exclude and filter patterns, you stay in full control of what shows up in your content.

    Once your sitemap is set up, you can fully automate your linking and content structure, saving hours on manual SEO work.

    From outline to publish-ready content that fills them

    check

    Structured

    check

    Consistent

    check

    SEO-aligned

    check

    Fast

    Generate Outlines FREE
    AI SEO Interface

    Frequently asked questions

    Can I add multiple sitemaps to Contentpen?

    Yes. If your website has more than one sitemap (e.g., a separate one for blog posts and products), you can add each one individually through the Knowledge Base or Presets settings.

    Does Contentpen use my sitemap for anything other than internal linking?

    Yes. Once crawled, your sitemap helps Contentpen build a knowledge base of your existing content, which it uses to generate more contextually relevant and on-brand articles.

    Is it possible to include only selected pages in my sitemap?

    Yes. The “Filter pattern” feature lets you specify which pages or categories you want to include, giving you complete control of your internal links.

    Will my sitemap update automatically when I publish new content?

    If you’ve enabled the automated feature, then yes. Your sitemap will update in real time as you publish new content.

    What happens if I change my website URL?

    In that case, you’ll need to update your sitemap settings with the new URL. You can either fetch it automatically again or manually paste the new sitemap.

    Do I need any technical skills to use the sitemap feature?

    Not at all. Whether you’re using the automated or manual method, the process is beginner-friendly and takes just a few clicks.

  • How to build a brand voice using Contentpen?

    How to build a brand voice using Contentpen?

    Brand voice is the distinct personality of a business that helps it stand out from others. It is one of the leading factors why some companies get a lot of traffic while others are never discovered.

    Building a brand voice for Contentpen is surprisingly simple. With just a few easy steps, you’ll be ready to publish tone-consistent content that is bound to engage, educate, and convert.

    No matter if you are a small business with multiple writers or a freelancer, the brand voice feature is definitely going to be very helpful to you. By using it, you can build trust with the audience in no time.

    So, let’s break down how you can use AI to develop a distinct, human, and memorable brand voice for your business.

    A step-by-step guide to setting up your brand voice

    The good part about Contentpen is that you don’t have to build a brand voice manually like most other writing tools. The AI text generator does most of the work once you sign in and add your website details.

    Step 01: Sign in and enter your website

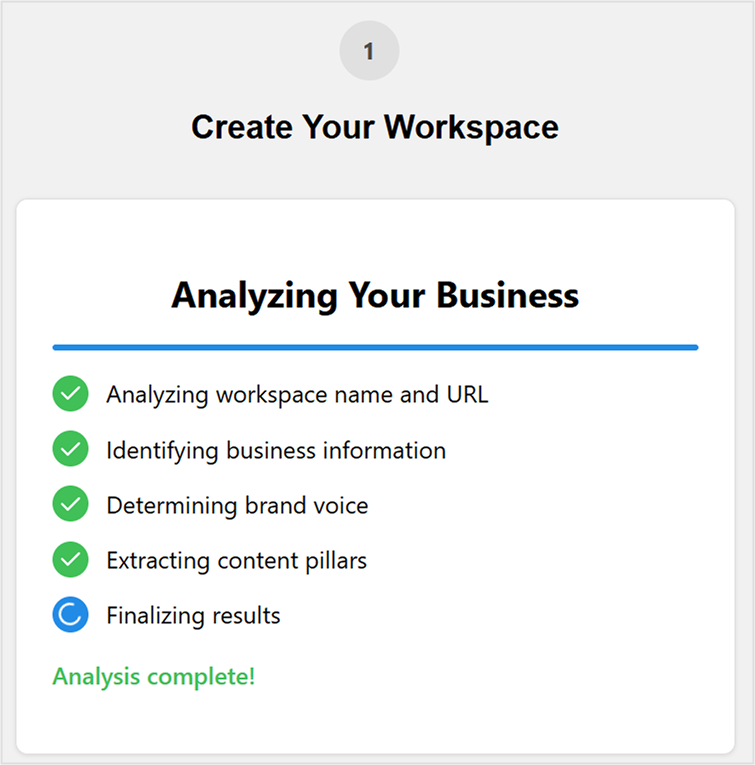
    Once you sign in to Contentpen, enter your website URL and name in the designated fields to start building your brand voice.

    Create your workspace inside Contentpen.

    From there, the platform goes to work instantly. It pulls your website’s content, tone, and language patterns to generate a preliminary brand voice profile.

    AI analyzing details for your business - Contentpen.ai.

    Step 02: Let AI analyze your content

    Contentpen uses AI to scan your existing website copy, blog posts, product descriptions, and even metadata. It identifies your tone, style, and audience preferences to create a brand voice that reflects your current content identity.

    The analysis covers three areas:

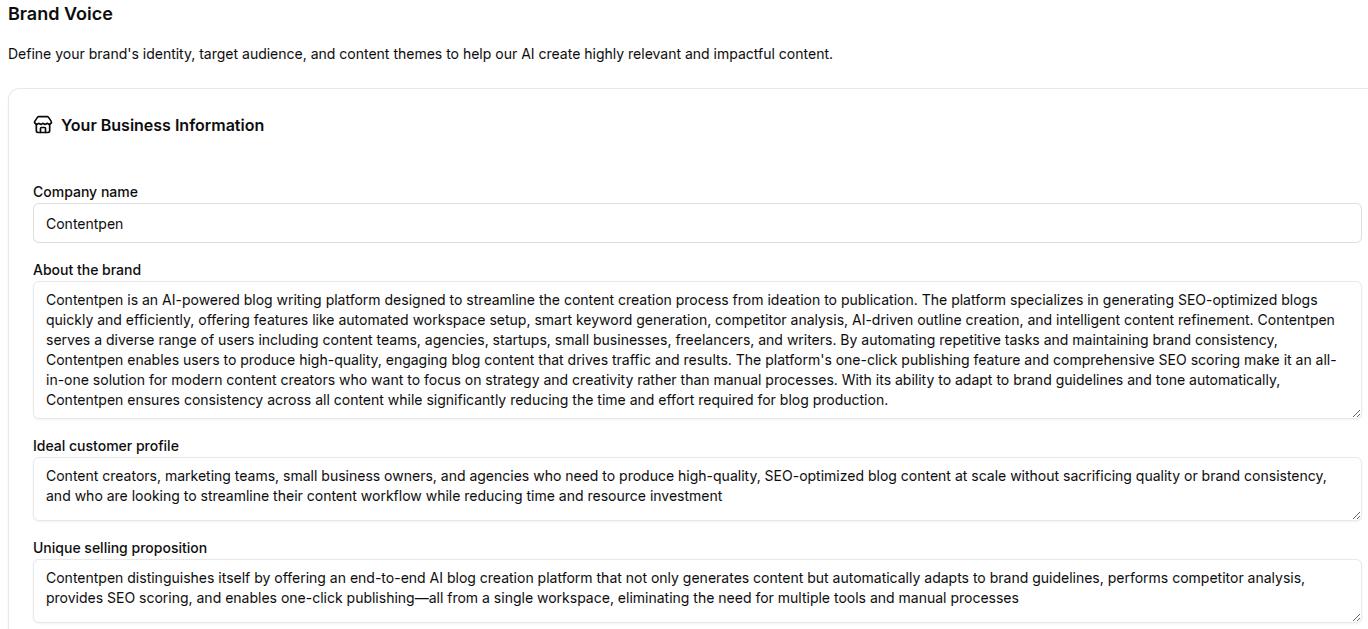
    • Business identity: Your brand persona (About the brand), ICP (Ideal Customer Profile), and USP (Unique Selling Point).
    Business identity information for brand voice settings.
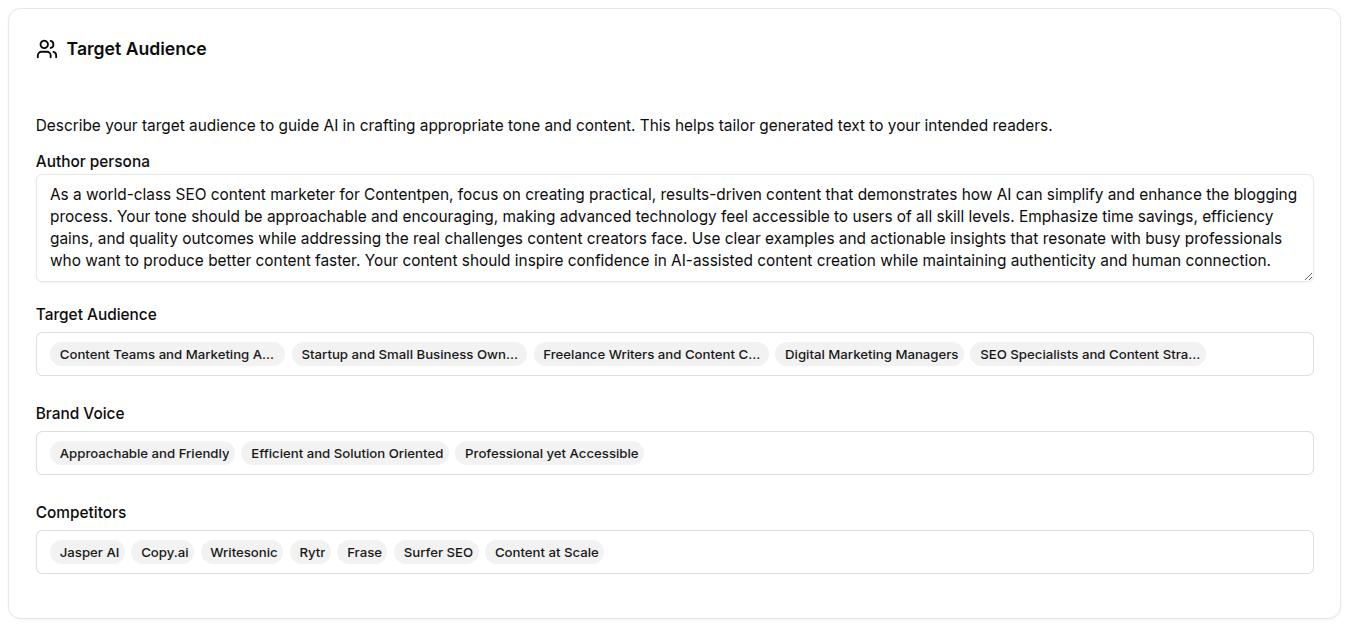
    • Audience targeting: Your author persona, target audience, voice, and competitors in the same niche.
    Author persona and target audience settings inside brand voice menu.
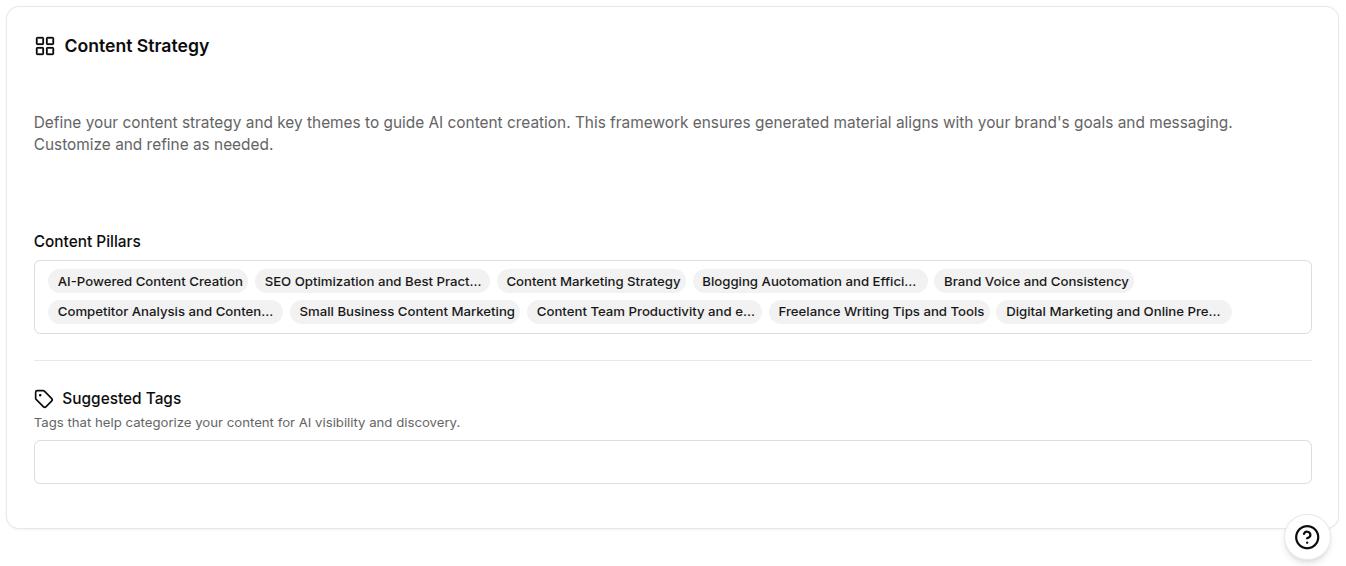
    • Content strategy: Your content themes (pillars) to align with your brand goals. Also, you can add any suggested tags manually that can help categorize your content for AI visibility and discovery.
    Content strategy options - Contentpen.ai.

    Step 03: Save and apply across your content

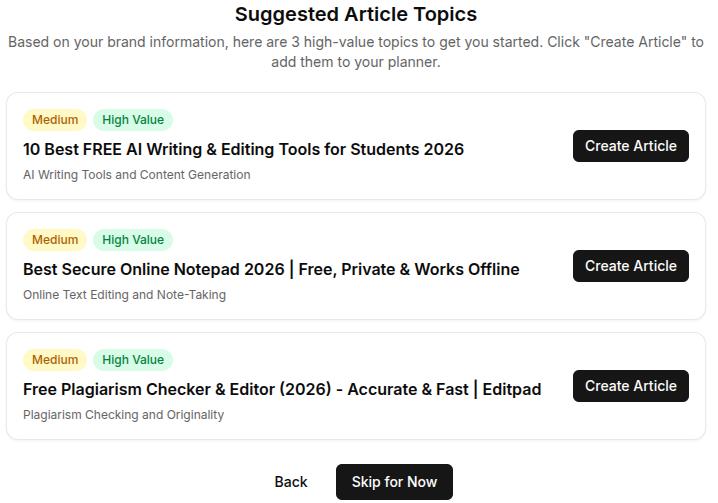
    Once you’re happy with the setup, you can save your brand voice and start using it instantly with the suggested topics. 

    Suggested article topics to begin your content journey - Contentpen.ai.

    Contentpen will now automatically align with your chosen brand voice for every blog post you write. You can click ‘Create Article’ to instantly make a blog, or choose ‘Skip for Now’ to access your main dashboard and write later.

    Write content that’s built to rank, not just read

    Create search-optimized blogs aligned with SEO and GEO signals, so your content performs well across search and AI-driven discovery.

    Try SEO Blogging FREE
    AI SEO Interface

    Additional step: Refine or update your brand voice anytime

    Not satisfied with the auto-generated voice or want to tweak it to align with your evolving brand personality? No problem. Contentpen gives you full control to manually adjust it. Here’s how:

    1. Head to your Contentpen dashboard.
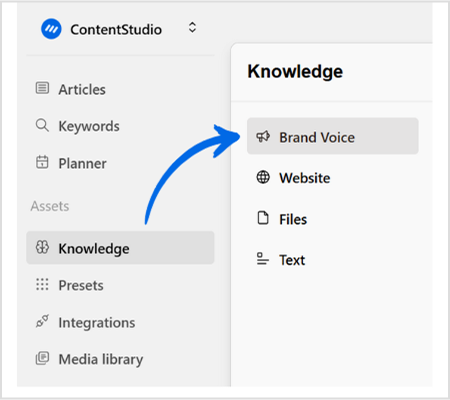
    2. From the left-hand menu, click on “Knowledge”, then select “Brand voice.”
    Knowledge settings leading to brand voice menu.

    In this section, you can manually update details like your USPs, target audience, author persona, tone, and more. Once you’ve made your changes, you can head out to the main dashboard, and Contentpen will automatically save all your details for the next draft.

    Final thoughts

    In 2026, brand voice isn’t just about logos and color palettes – it’s about how you sound. Whether you’re a startup or a growing digital brand, your voice is your vibe. It tells your audience who you are, what you stand for, and why they should care.

    The AI writing tool makes it incredibly easy to build a brand voice that stays consistent across all your content. It helps you establish your brand and improve share of voice in your niche with ease.

    Frequently asked questions

    Do I need any technical skills to build a brand voice on Contentpen?

    Not at all. Contentpen is built for ease: just sign in, add your website, and the AI will do the rest to determine your brand voice.

    Can I manually adjust the brand voice Contentpen creates?

    Yes! You can refine or completely update your brand voice anytime from the dashboard under the “Knowledge” settings.

    How does Contentpen analyze my content?

    It uses AI to analyze tone, sentence structure, vocabulary, and audience targeting patterns across your existing content.

    What if I don’t have a website yet?

    You can still build your brand voice manually by inputting your brand persona, target audience, USPs, tone, and content themes directly into the platform.

    Is the tool suitable for startups or solo creators?

    Absolutely. Contentpen is perfect for small teams or individuals who want to build a consistent and professional brand voice without a full-scale creative team.

  • How to connect your WordPress with Contentpen?

    How to connect your WordPress with Contentpen?

    Connecting your WordPress site to Contentpen is quick and easy. This integration allows you to seamlessly manage, schedule, and publish content from Contentpen directly to your WP dashboard without any manual work. 

    With just a few clicks, you can connect your site, install the Contentpen plugin, and start pushing content live, all from one place. 

    So, let’s get started.

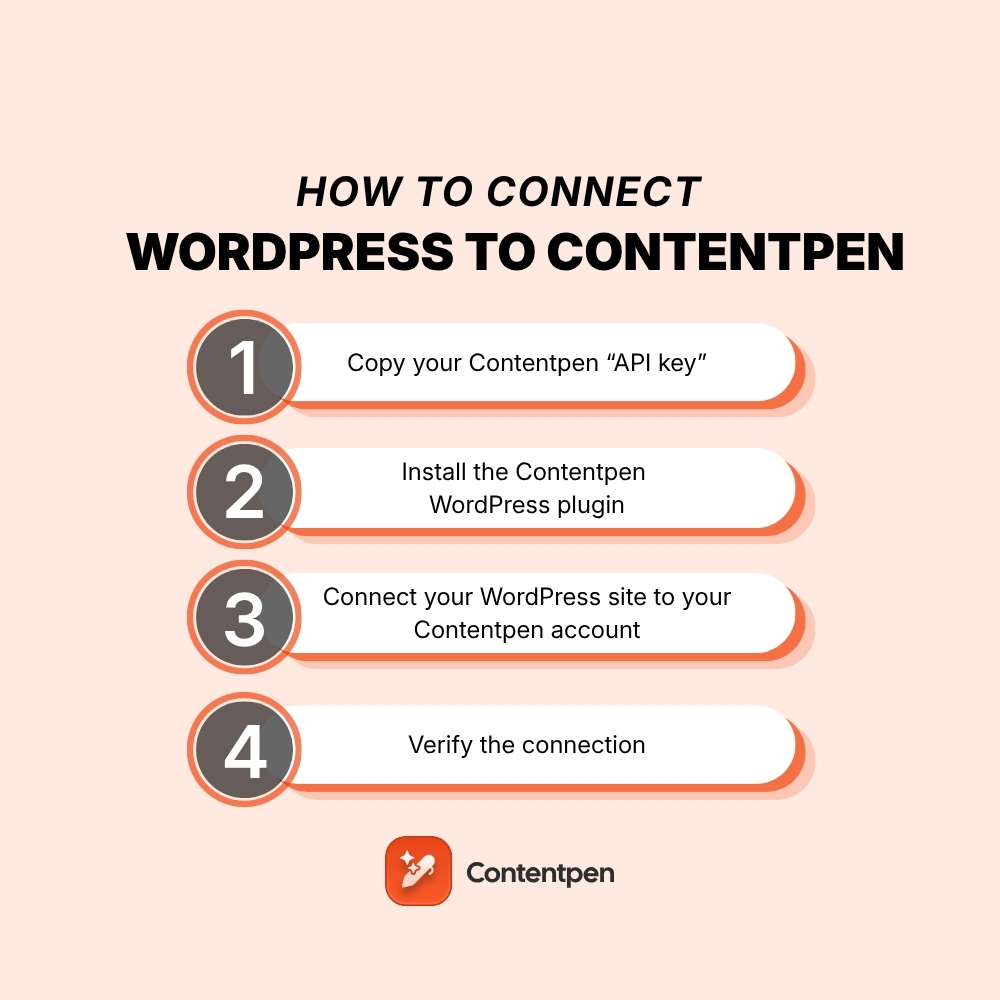
    Step 01: Copy your Contentpen “API key”

    • Start by logging into your Contentpen account. If you don’t have one yet, sign up at Contentpen.
    Sign up screen - Contentpen.ai.
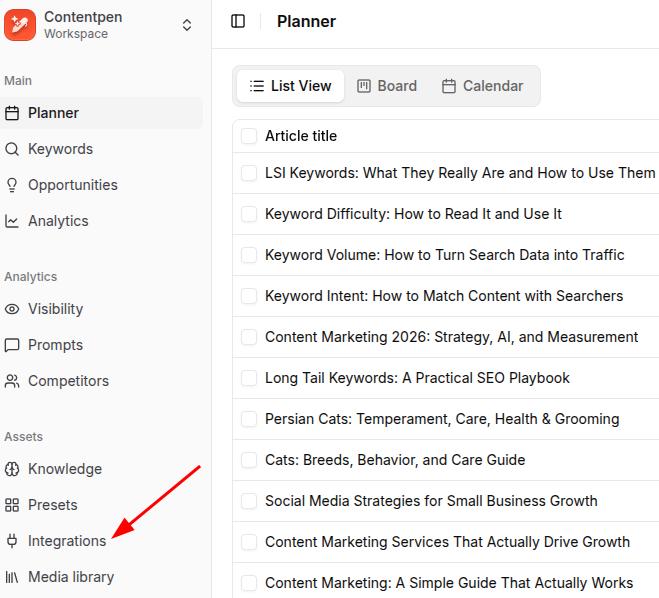
    • Go to the “Integration” tab in the left menu.
    Integrations tab from the main Contentpen dashboard.
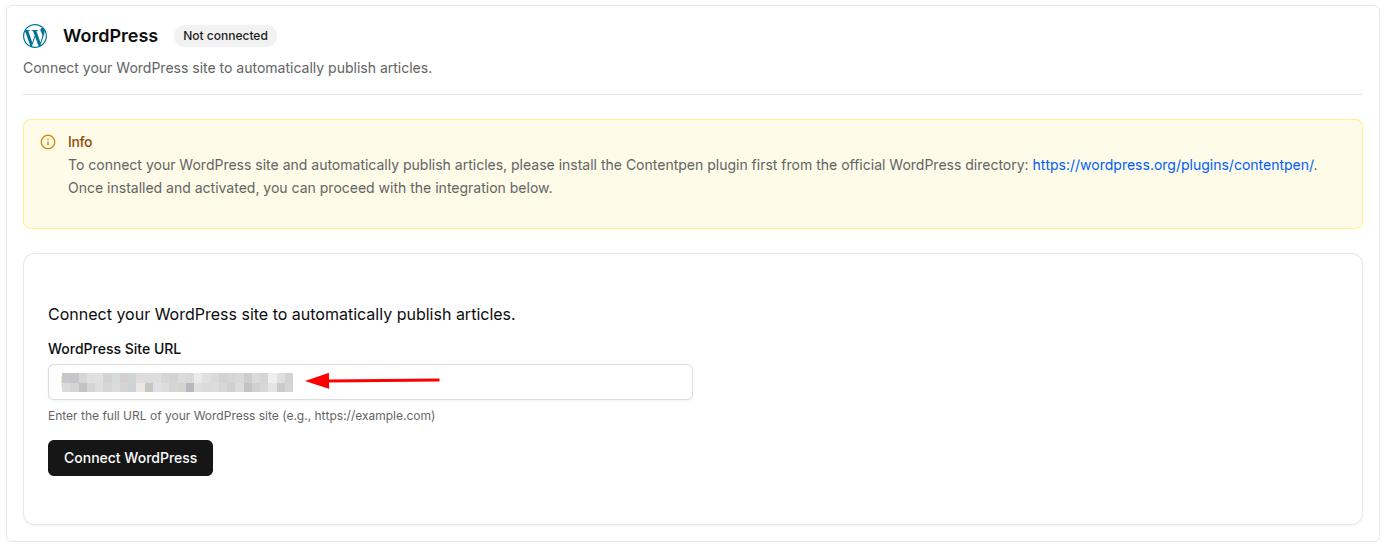
    • Enter your WordPress site URL and click “Connect WordPress.”
    Connect WordPress screen inside the Contentpen integrations tab.
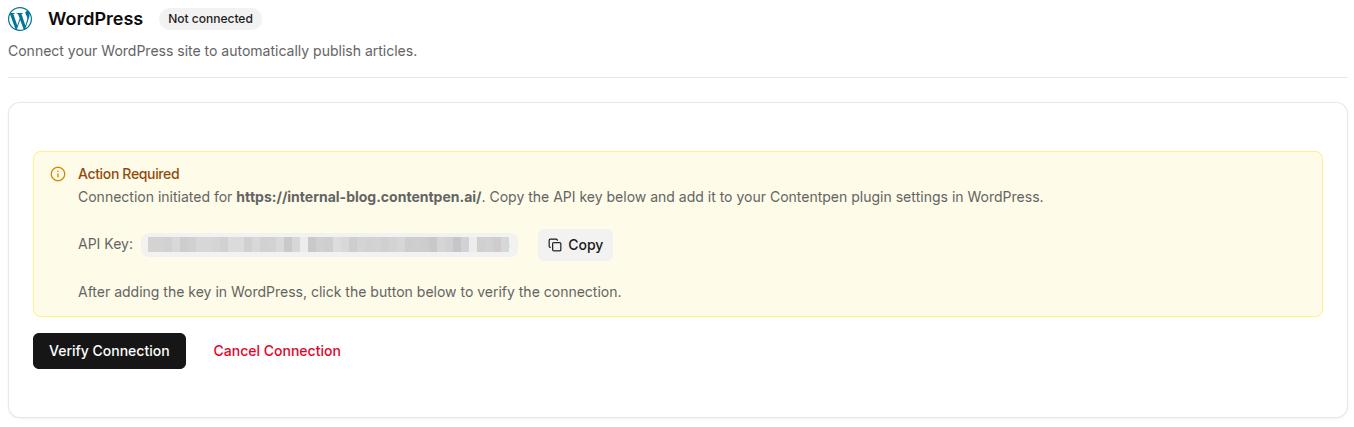
    • Then, copy the API Key that appears.
    Copying API key from Contentpen for WordPress integration.

    Once you’ve copied your API key, it’s time to install the Contentpen WordPress plugin.

    Step 02: Install the Contentpen WordPress plugin

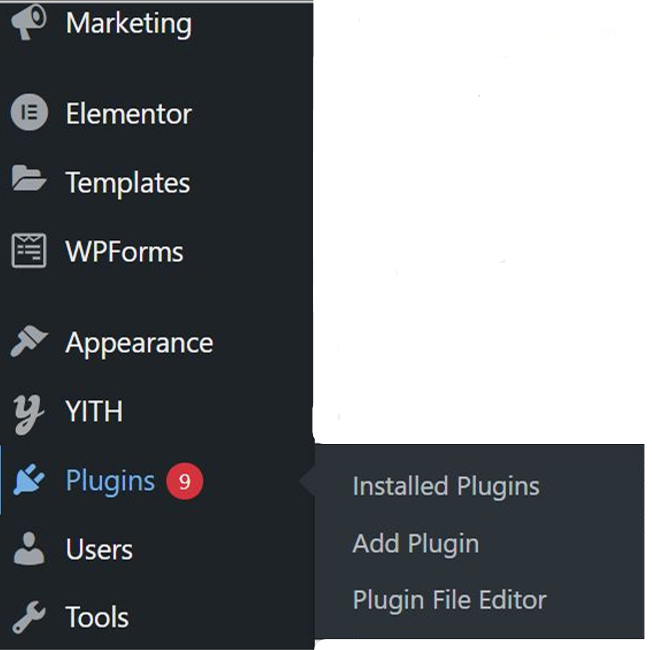
    • Log in to your WordPress admin panel. In the left-hand sidebar menu, hover over “Plugins” and then click “Add Plugin.”
    WordPress plugins.
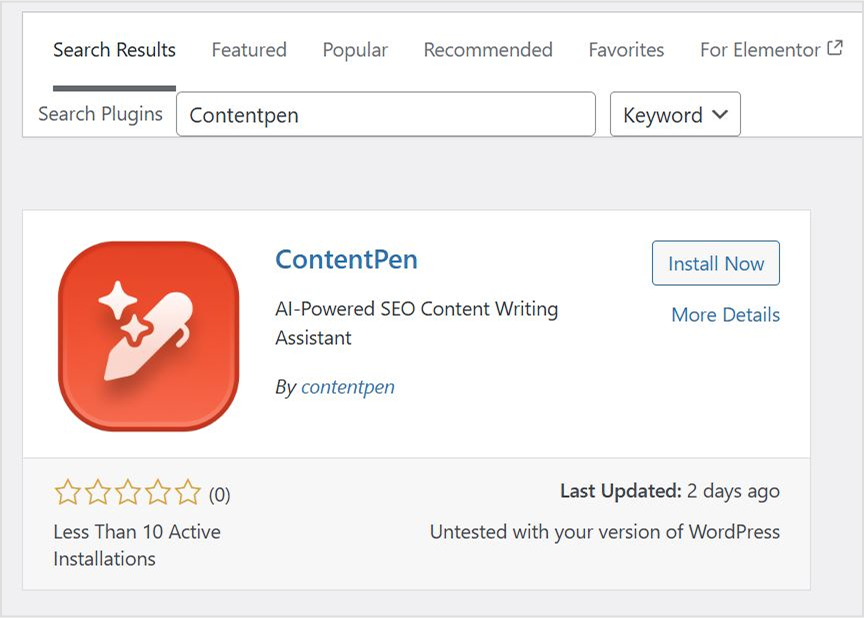
    • In the search bar at the top right, type “Contentpen.” You should see the official Contentpen plugin in the search results. Look for a plugin with the Contentpen logo and a description.
    • Once you’ve found the correct plugin, click the “Install Now” button next to it.
    'Install Now' button for CP plugin inside WordPress plugins.
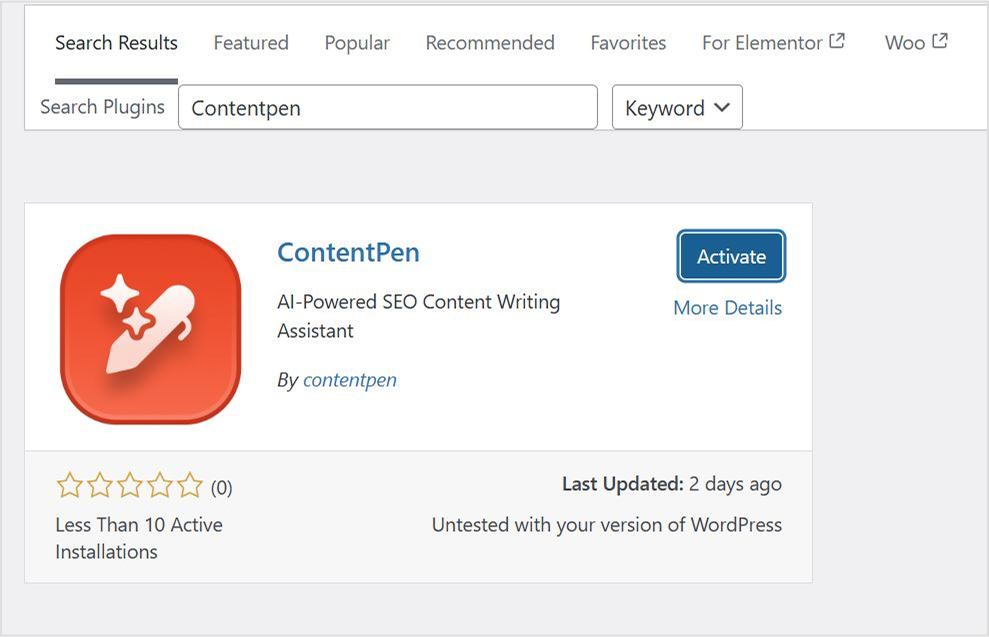
    • After the plugin has been installed, the “Install Now” button will change to “Activate.” Click “Activate” to enable the plugin on your WordPress site.
    Activating Contentpen plugin in WordPress.

    Step 03: Connect your WordPress site to your Contentpen account

    Once the plugin is activated, connect it to your Contentpen account.

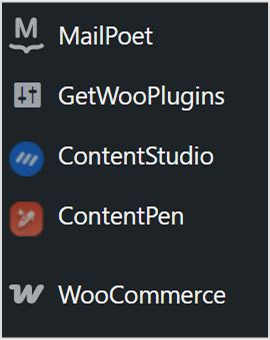
    • Now, you need to find the Contentpen settings. After activation, a new menu item for “Contentpen” might appear in your WordPress sidebar.
    Contentpen plugin added to WordPress.
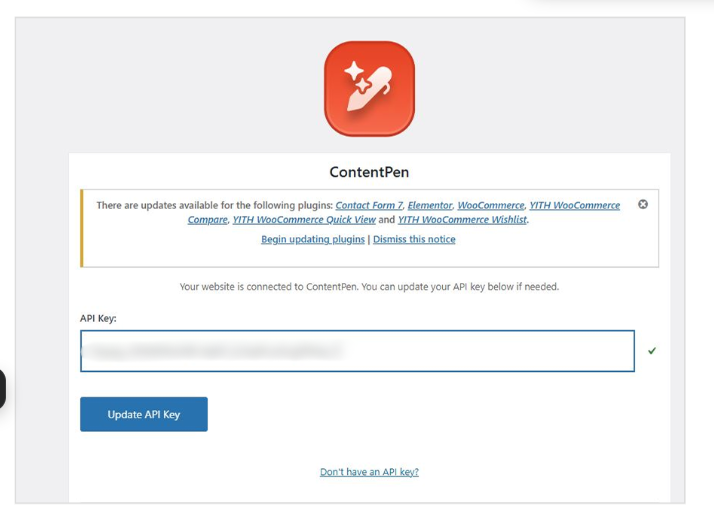
    • Go into the ‘Contentpen’ settings and paste the API key you copied earlier to link your WordPress site.
    Contentpen API key added to WordPress.
    • Save or update the settings to confirm the connection between Contentpen and your WP account.

    Step 04: Verify the connection from WordPress

    Once you’ve connected WordPress to the AI writing tool, it is time to verify the connection from Contentpen.

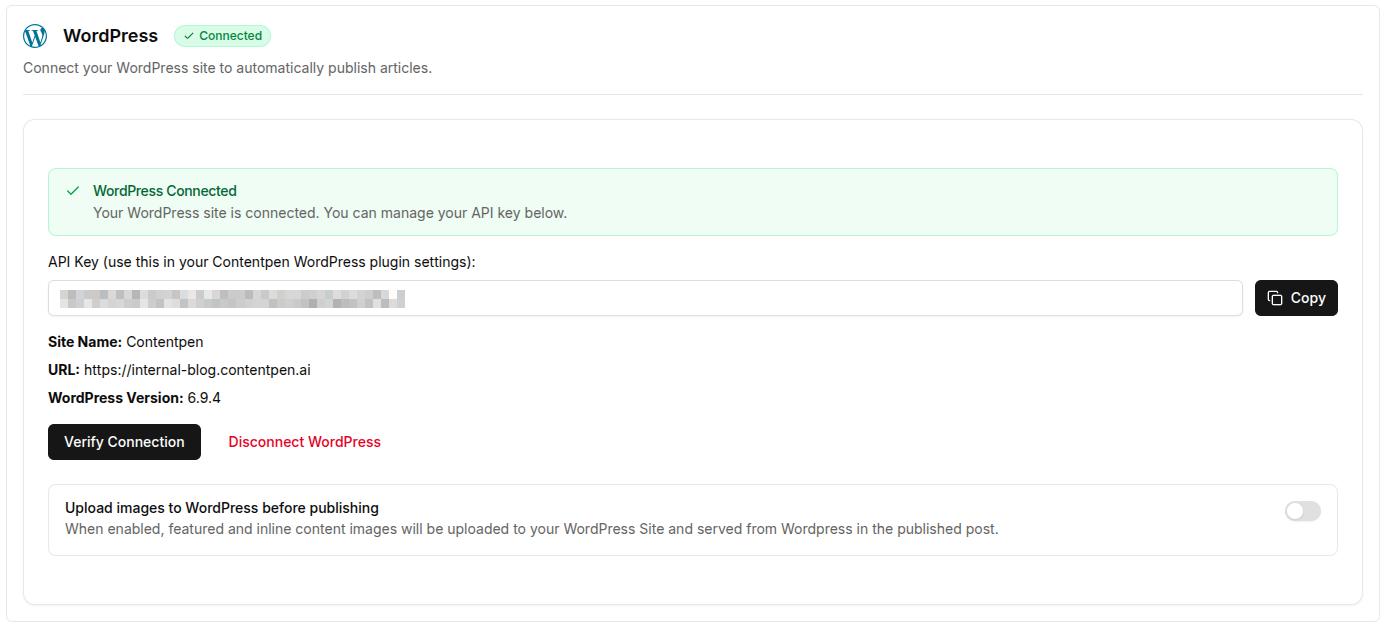
    • Click on the ‘Verify Connection’ button in the WordPress integrations tab and wait for a while. 
    'Verify Connection' button inside Contentpen integrations.
    • You will get a notification pop-up confirming that you have a successful connection with WordPress.

    You can also upload images that Contentpen generates directly to WordPress by using the slider at the bottom of the WP integration page.

    How to publish a blog directly from Contentpen to WordPress

    Let’s say you’ve just finalized a blog post draft in Contentpen. Instead of downloading and manually uploading it into WordPress, you can now:

    Step 01: Click on the content piece you want to publish.

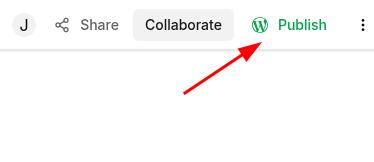
    Step 02: Hit the “Publish” button in the top right corner. 

    Publish directly to WordPress from Contentpen.

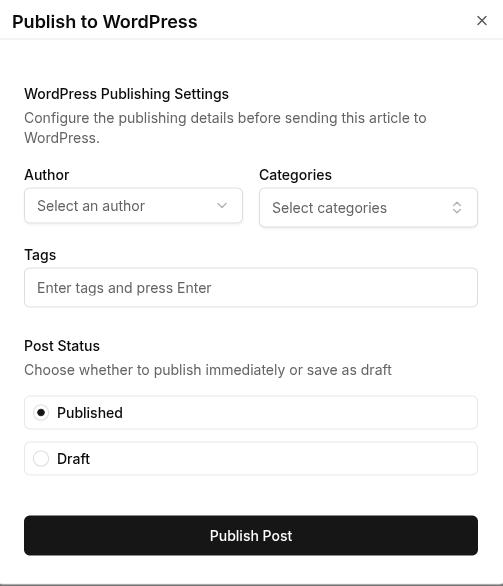
    Step 03: A pop-up will appear, allowing you to choose an author, assign categories, and add relevant tags for the post. You can also choose to send the content to your WP as a draft instead of publishing it directly.

    Publish to WordPress settings.

    Step 04: When you’re ready, hit the “Publish Post” button, and your blog will go live on your website instantly.

    Draft published to website directly from Contentpen.

    Final thoughts

    You’re all set! With Contentpen connected to WordPress, you can schedule, manage, and publish content without ever leaving the platform. 

    From here, you might want to explore scheduling posts in advance, enabling image uploads, or creating content directly from the AI writing assistant app.

    Remember to keep the plugin updated to stay compatible with new features as they roll out. Also, check out Contentpen blogs for more information about the tool and see how you can utilize it to write SEO-optimized content with convenience.

    From outline to publish-ready content that fills them

    check

    Structured

    check

    Consistent

    check

    SEO-aligned

    check

    Fast

    Generate Outlines FREE
    AI SEO Interface

    Frequently asked questions

    Where can I find my API key in Contentpen?

    Once logged into Contentpen, go to the “Integration” tab in the left menu, enter your WordPress site URL, click “Connect WordPress,” and your API key will be generated there.

    Do I need any coding skills to connect Contentpen with WordPress?

    Not at all! The setup involves simple copy-paste steps and plugin installation with no coding required.

    Can I disconnect Contentpen from WordPress anytime?

    Yes, you can remove the plugin or reset the integration from your Contentpen account at any time.

    Is it safe to use my API key in WordPress?

    Yes, your API key is unique to your account and securely links Contentpen with your site. However, never share it publicly or with untrusted users.

    What should I do if the connection between Contentpen and WordPress fails?

    Try these quick fixes first:

    API key not working: Re-copy it fresh from the Integration tab and avoid any stray spaces in the link
    Plugin not visible after installation: Refresh the plugins page or reinstall the plugin from WordPress
    Connection still failing: Check that your WordPress site URL is entered correctly in Contentpen (include https://)

    If none of these work, disconnect and reconnect from the Integration tab, or contact Contentpen support for help.