A sitemap is an XML file that lists your site’s important URLs, such as pages, videos, and other files. It helps search engines like Google discover and index your content more efficiently. But its usefulness doesn’t stop at search engines.
Sitemaps also allow tools like Contentpen to automate internal linking for your blogs and articles. The best news? This process is only a one-time effort and doesn’t require manual tweaking as you add content.
Curious to learn more? Let’s check how to add a sitemap in Contentpen with all methods considered.
2 ways to add a sitemap in Contentpen
There are two ways in which you can enter your sitemap in our AI writing tool:
Through ‘Knowledge Base’ settings
Through ‘Presets’ options
Let’s review them in more detail.
Using the Knowledge Base settings
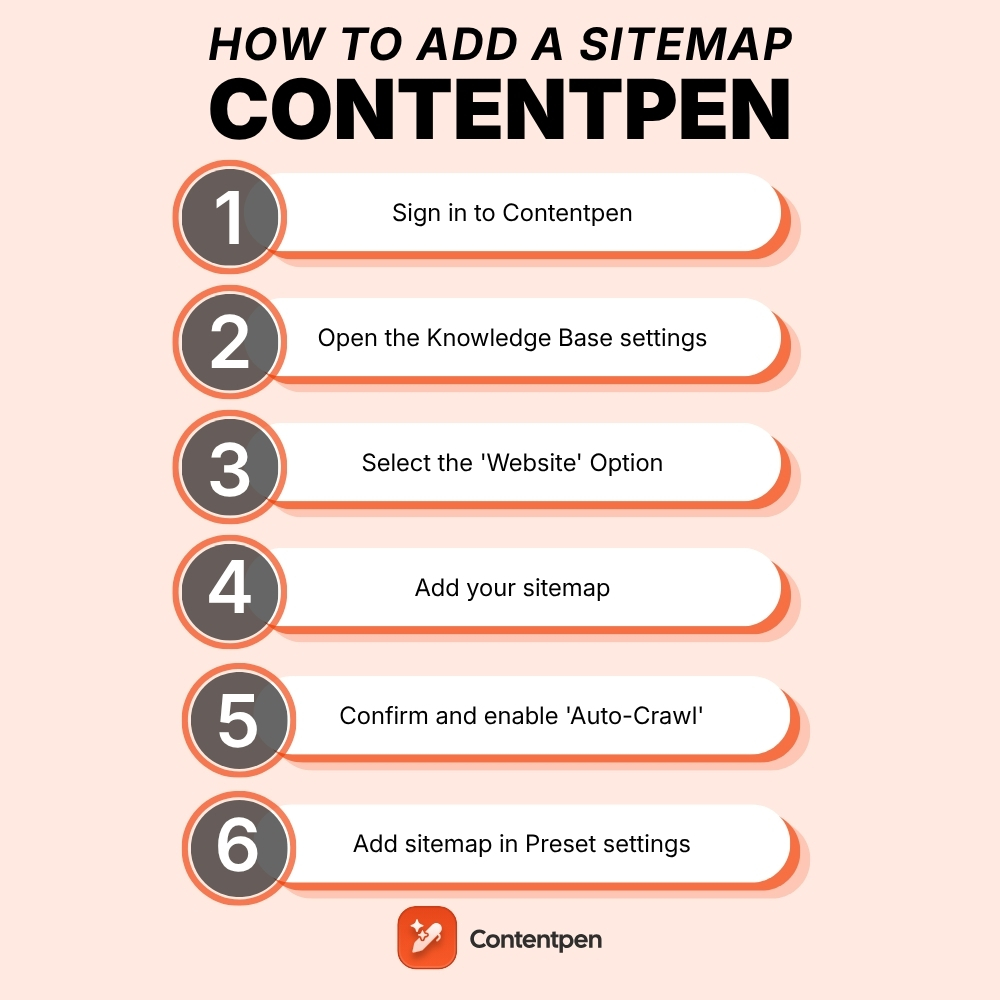
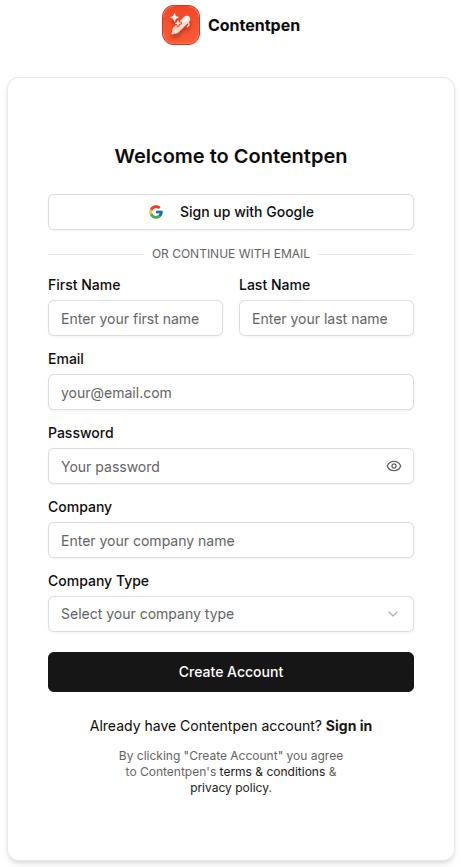
Step 1: Sign in or create an account on Contentpen to access the main dashboard.
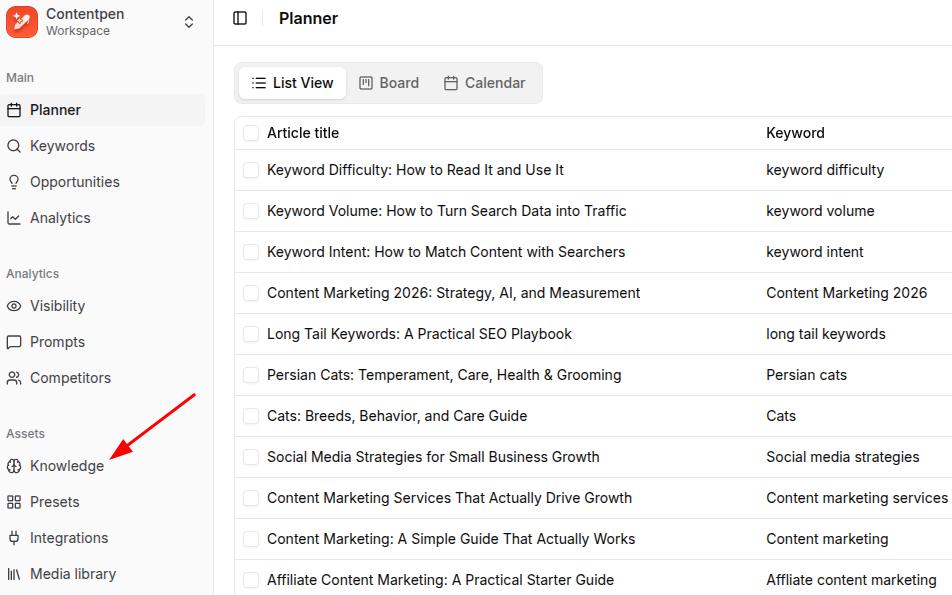
Step 2: From there on, see the ‘Knowledge’ button from the left-side navbar and click on it.
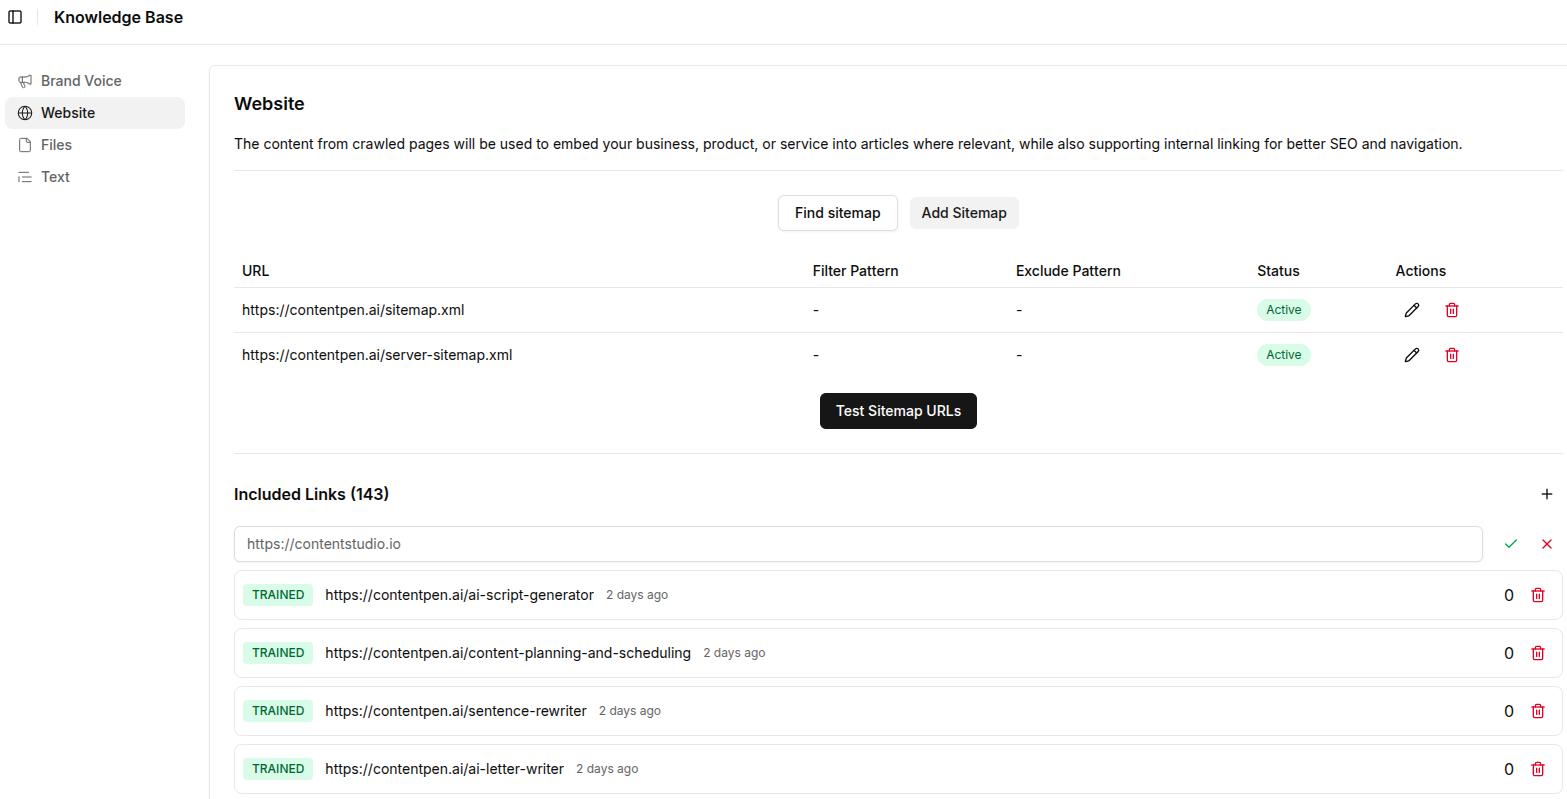
Step 3: Then, click the ‘Website’ option to proceed with setting up your sitemap in Contentpen.
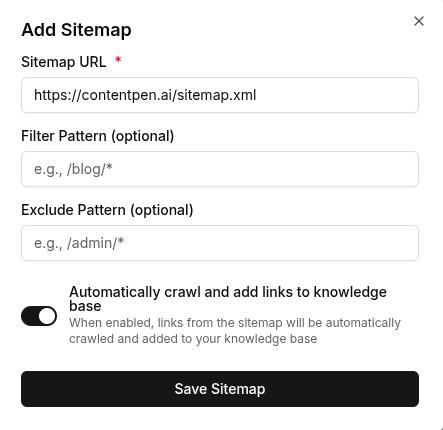
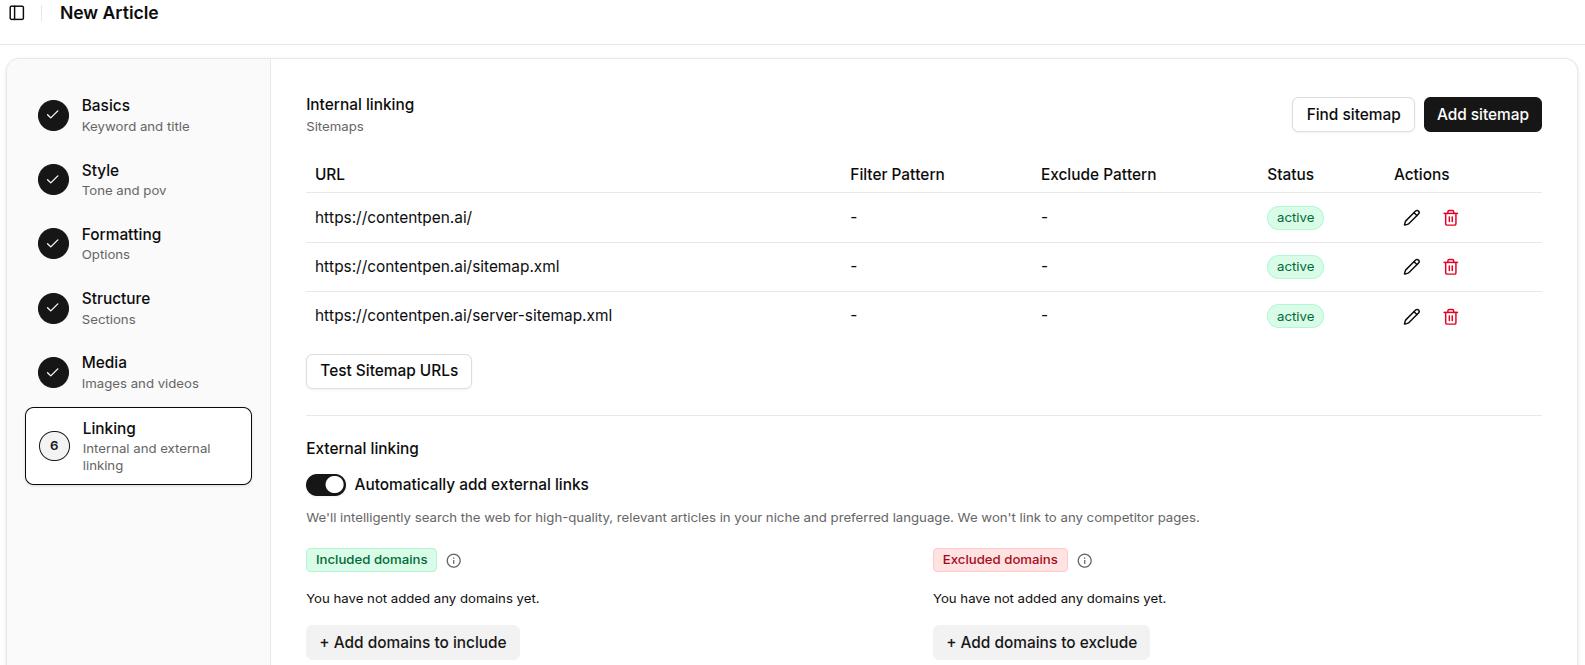
On this screen, you see two buttons, ‘Find Sitemap’ and ‘Add Sitemap.’
Usually, sitemaps follow a familiar pattern:
https://yoursite.com/sitemap.xml
Or
https://yoursite.com/server-sitemap.xml
Step 4: If you know yours, click ‘Add Sitemap’ to proceed with the XML sitemap integration inside Contentpen.
On this screen, you can use the Filter and Exclude Pattern (optional) fields as well. In simpler terms, it means:
Filter Pattern – To only include selected categories or pages you prefer to show. For instance, ‘/blog/’.
Exclude Pattern – To leave out specific pages you don’t want found or crawled from the sitemap. For example, ‘/admin/’.
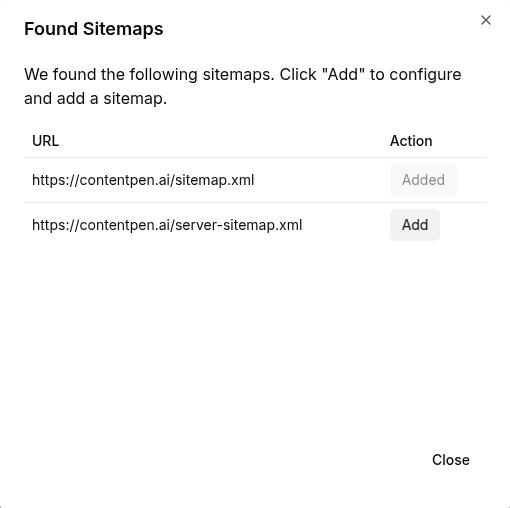
Step 5: Alternatively, if you don’t know your sitemap or want this process to be completely automated, then use the ‘Find Sitemap’ button.
At this screen, enter your domain and hit the ‘Find My Sitemap’ button to let Contentpen automatically discover your XML file(s).
Step 6: Once discovered, click ‘Add’ to include your sitemap in Contentpen and proceed with the same configuration steps as shown earlier in step 4.
Finally, you can test your added sitemap using the ‘Test Sitemap URLs ‘ button.
Note: Keep the ‘Automatically crawl and add links to knowledge base’ slider on to help Contentpen learn contextual details from your pages. This will ensure smooth internal linking and better on-brand content for your blogs.
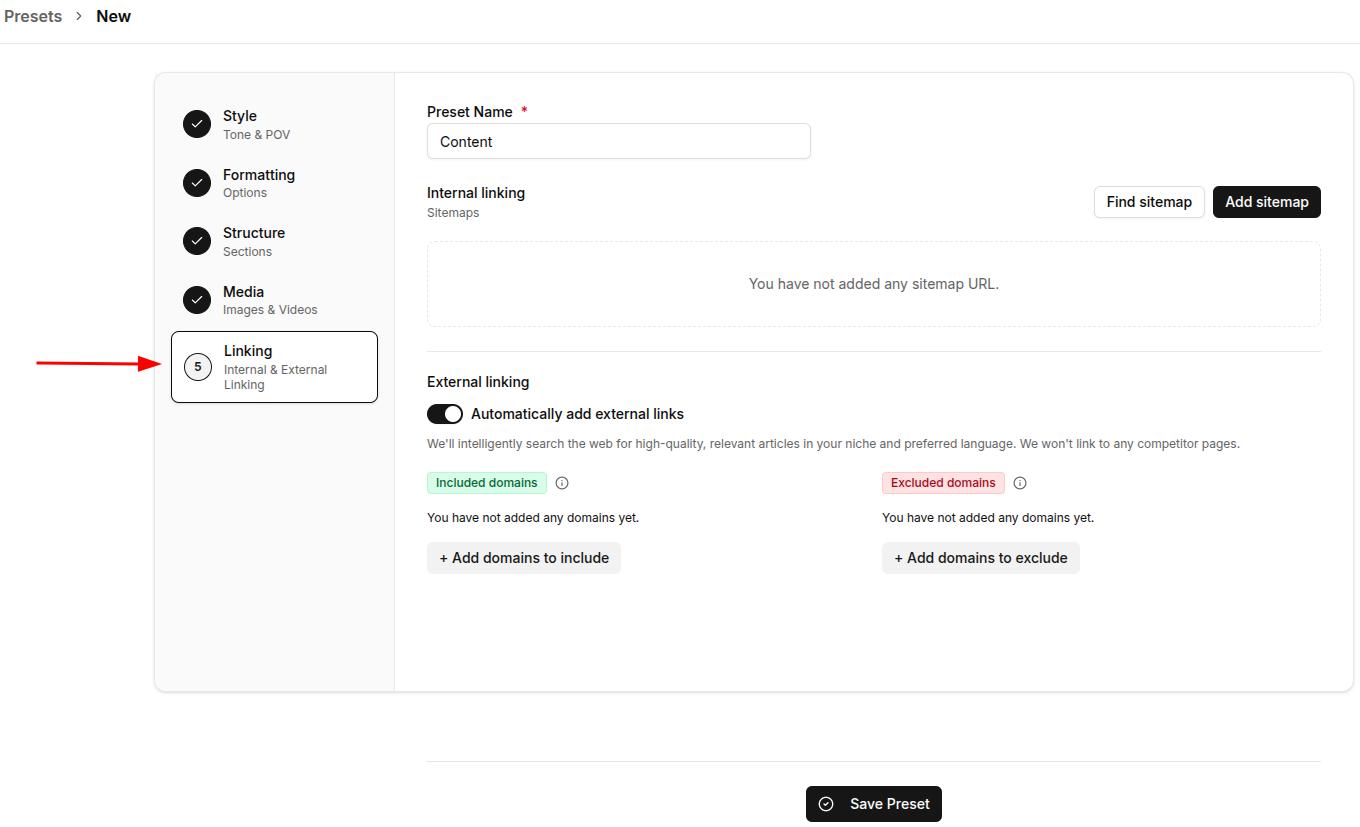
Using the Presets settings
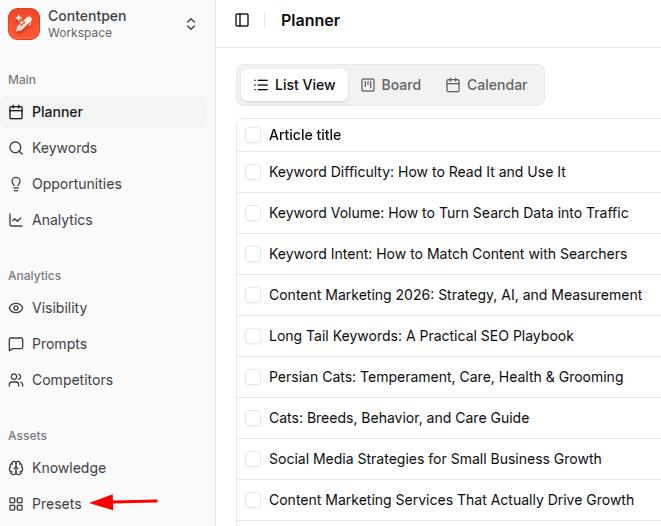
Step 1: For the second method of adding your sitemap to Contentpen, go to the ‘Presets’ options from the main dashboard.
Then, click on the ‘Create New Preset’ button to proceed.
Step 2: Once you are at the preset settings, set up your ‘Style’, ‘Formatting’, ‘Structure’, and ‘Media’ details, as shown in the ‘How to use Contentpen presets’ blog.
Step 3: After all the other preset options are done, go down to the final ‘Linking’ option.
Here you will find the same ‘Find sitemap’ and ‘Add sitemap’ buttons as in the previous method.
Repeat step 4, or steps 5 and 6 from the Knowledge Base method to achieve a successful Contentpen sitemap setup.
Adding a sitemap in our SEO platform is simple, quick, and designed to make internal linking easier. Whether you prefer to let the system handle it automatically or want to add or adjust it manually, the process is smooth and flexible.
Plus, with powerful customization options like exclude and filter patterns, you stay in full control of what shows up in your content.
Once your sitemap is set up, you can fully automate your linking and content structure, saving hours on manual SEO work.
From outline to publish-ready content
that fills them
Yes. If your website has more than one sitemap (e.g., a separate one for blog posts and products), you can add each one individually through the Knowledge Base or Presets settings.
Does Contentpen use my sitemap for anything other than internal linking?
Yes. Once crawled, your sitemap helps Contentpen build a knowledge base of your existing content, which it uses to generate more contextually relevant and on-brand articles.
Is it possible to include only selected pages in my sitemap?
Yes. The “Filter pattern” feature lets you specify which pages or categories you want to include, giving you complete control of your internal links.
Will my sitemap update automatically when I publish new content?
If you’ve enabled the automated feature, then yes. Your sitemap will update in real time as you publish new content.
What happens if I change my website URL?
In that case, you’ll need to update your sitemap settings with the new URL. You can either fetch it automatically again or manually paste the new sitemap.
Do I need any technical skills to use the sitemap feature?
Not at all. Whether you’re using the automated or manual method, the process is beginner-friendly and takes just a few clicks.
Brand voice is the distinct personality of a business that helps it stand out from others. It is one of the leading factors why some companies get a lot of traffic while others are never discovered.
Building a brand voice for Contentpen is surprisingly simple. With just a few easy steps, you’ll be ready to publish tone-consistent content that is bound to engage, educate, and convert.
No matter if you are a small business with multiple writers or a freelancer, the brand voice feature is definitely going to be very helpful to you. By using it, you can build trust with the audience in no time.
So, let’s break down how you can use AI to develop a distinct, human, and memorable brand voice for your business.
A step-by-step guide to setting up your brand voice
The good part about Contentpen is that you don’t have to build a brand voice manually like most other writing tools. The AI text generator does most of the work once you sign in and add your website details.
Step 01: Sign in and enter your website
Once you sign in to Contentpen, enter your website URL and name in the designated fields to start building your brand voice.
From there, the platform goes to work instantly. It pulls your website’s content, tone, and language patterns to generate a preliminary brand voice profile.
Step 02: Let AI analyze your content
Contentpen uses AI to scan your existing website copy, blog posts, product descriptions, and even metadata. It identifies your tone, style, and audience preferences to create a brand voice that reflects your current content identity.
The analysis covers three areas:
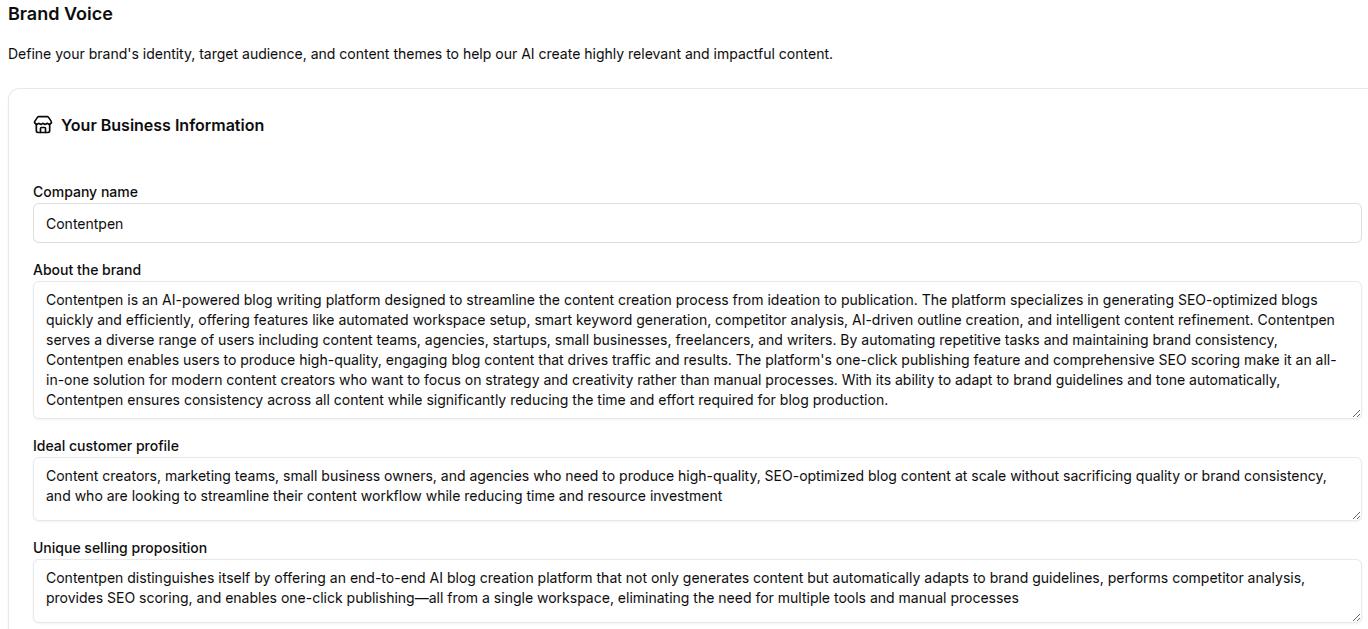
Business identity: Your brand persona (About the brand), ICP (Ideal Customer Profile), and USP (Unique Selling Point).
Audience targeting: Your author persona, target audience, voice, and competitors in the same niche.
Content strategy: Your content themes (pillars) to align with your brand goals. Also, you can add any suggested tags manually that can help categorize your content for AI visibility and discovery.
Step 03: Save and apply across your content
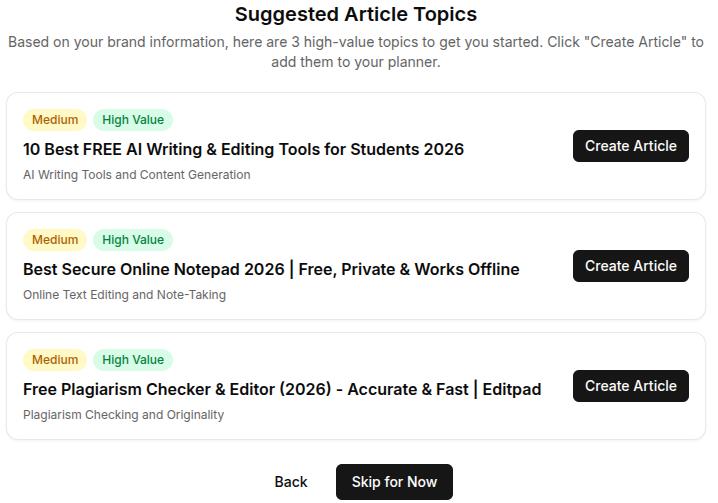
Once you’re happy with the setup, you can save your brand voice and start using it instantly with the suggested topics.
Contentpen will now automatically align with your chosen brand voice for every blog post you write. You can click ‘Create Article’ to instantly make a blog, or choose ‘Skip for Now’ to access your main dashboard and write later.
Write content that’s built to rank, not just read
Create search-optimized blogs aligned with SEO and GEO signals, so your content performs well across search and AI-driven discovery.
Additional step: Refine or update your brand voice anytime
Not satisfied with the auto-generated voice or want to tweak it to align with your evolving brand personality? No problem. Contentpen gives you full control to manually adjust it. Here’s how:
Head to your Contentpen dashboard.
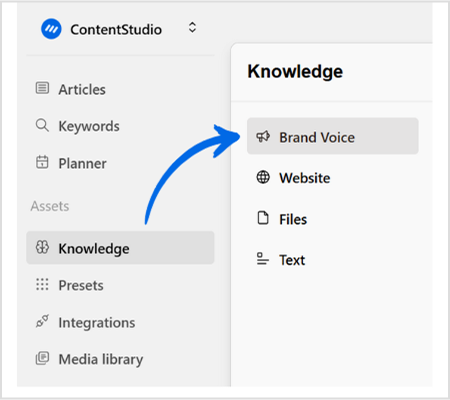
From the left-hand menu, click on “Knowledge”, then select “Brand voice.”
In this section, you can manually update details like your USPs, target audience, author persona, tone, and more. Once you’ve made your changes, you can head out to the main dashboard, and Contentpen will automatically save all your details for the next draft.
Final thoughts
In 2026, brand voice isn’t just about logos and color palettes – it’s about how you sound. Whether you’re a startup or a growing digital brand, your voice is your vibe. It tells your audience who you are, what you stand for, and why they should care.
The AI writing tool makes it incredibly easy to build a brand voice that stays consistent across all your content. It helps you establish your brand and improve share of voice in your niche with ease.
Frequently asked questions
Do I need any technical skills to build a brand voice on Contentpen?
Not at all. Contentpen is built for ease: just sign in, add your website, and the AI will do the rest to determine your brand voice.
Can I manually adjust the brand voice Contentpen creates?
Yes! You can refine or completely update your brand voice anytime from the dashboard under the “Knowledge” settings.
How does Contentpen analyze my content?
It uses AI to analyze tone, sentence structure, vocabulary, and audience targeting patterns across your existing content.
What if I don’t have a website yet?
You can still build your brand voice manually by inputting your brand persona, target audience, USPs, tone, and content themes directly into the platform.
Is the tool suitable for startups or solo creators?
Absolutely. Contentpen is perfect for small teams or individuals who want to build a consistent and professional brand voice without a full-scale creative team.
Connecting your WordPress site to Contentpen is quick and easy. This integration allows you to seamlessly manage, schedule, and publish content from Contentpen directly to your WP dashboard without any manual work.
With just a few clicks, you can connect your site, install the Contentpen plugin, and start pushing content live, all from one place.
So, let’s get started.
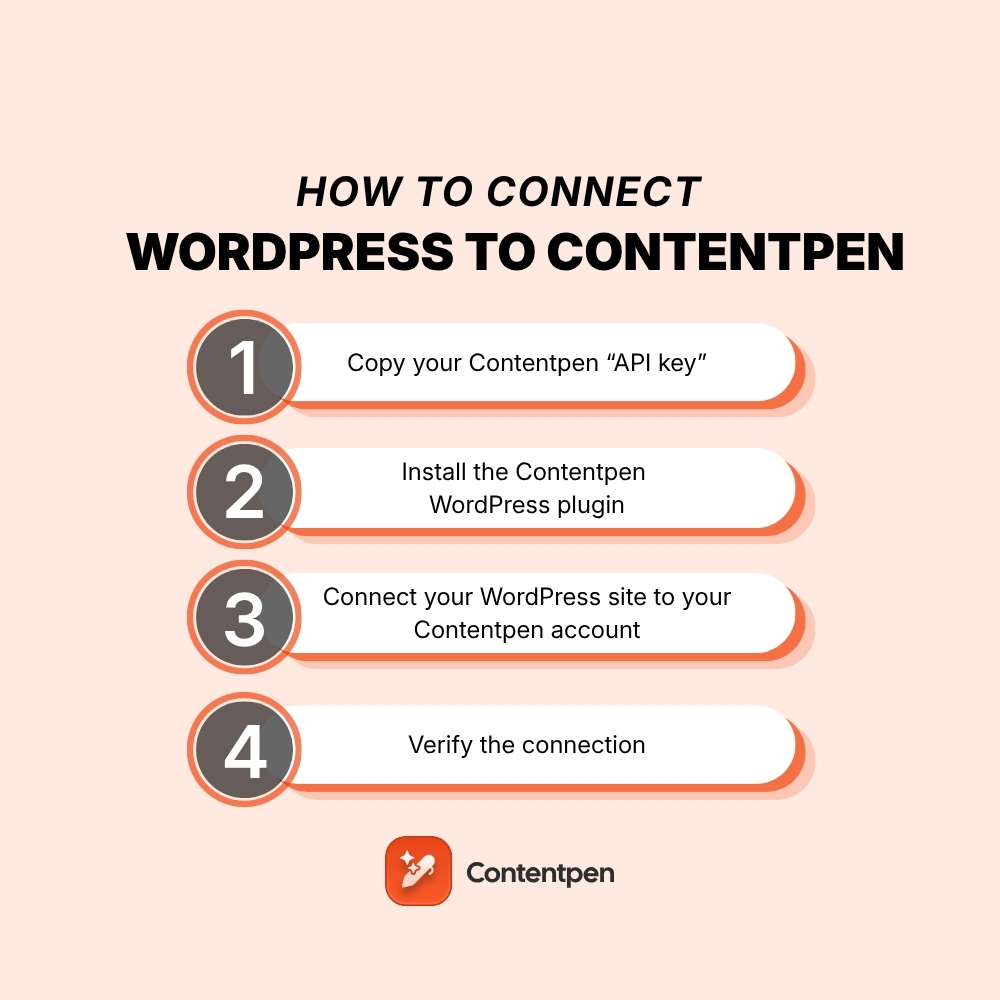
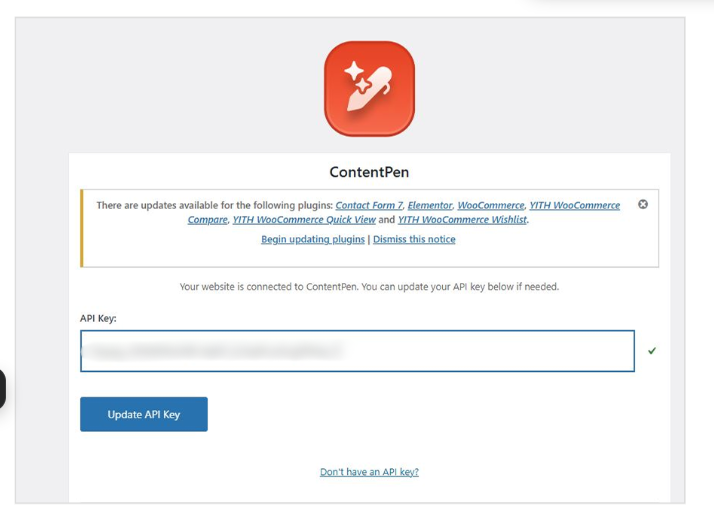
Step 01: Copy your Contentpen “API key”
Start by logging into your Contentpen account. If you don’t have one yet, sign up at Contentpen.
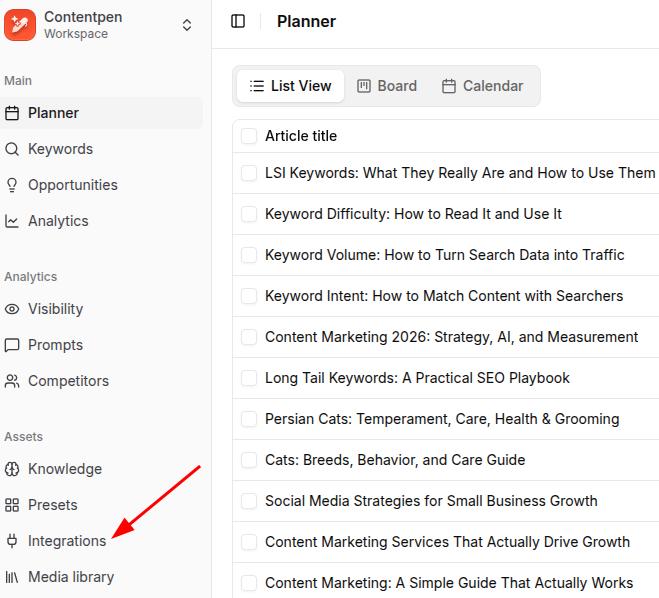
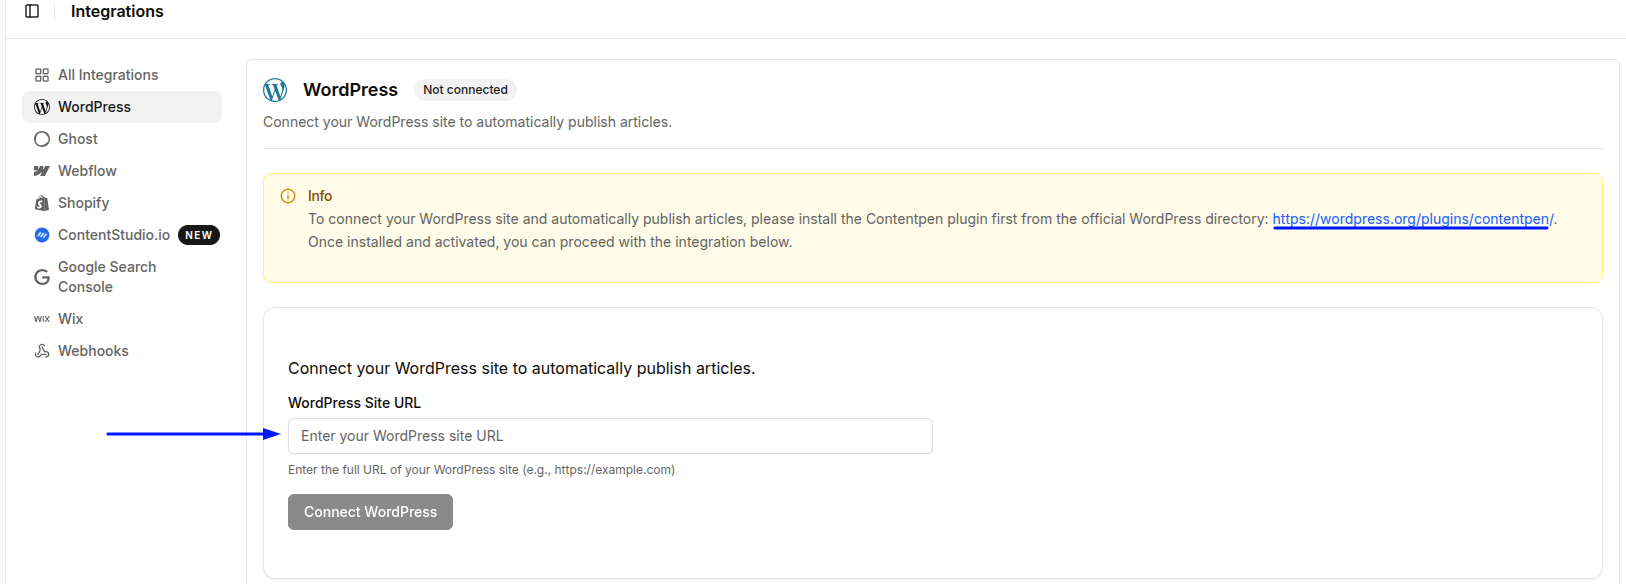
Go to the “Integration” tab in the left menu.
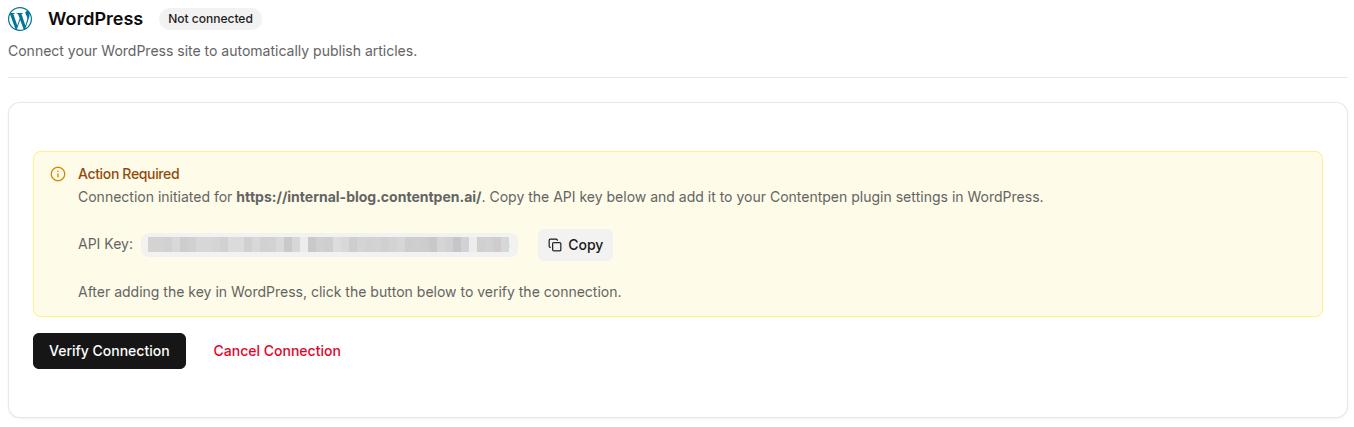
Enter your WordPress site URL and click “Connect WordPress.”
Then, copy the API Key that appears.
Once you’ve copied your API key, it’s time to install the Contentpen WordPress plugin.
Step 02: Install the Contentpen WordPress plugin
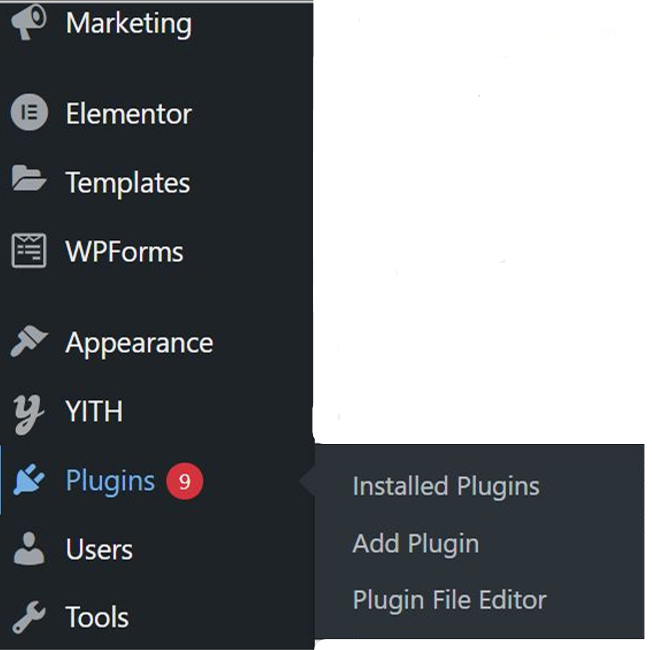
Log in to your WordPress admin panel. In the left-hand sidebar menu, hover over “Plugins” and then click “Add Plugin.”
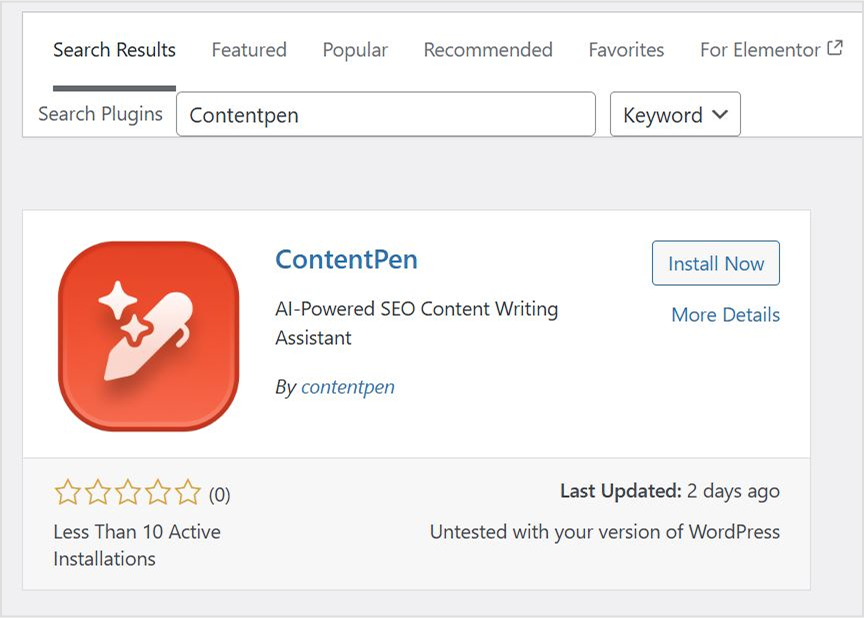
In the search bar at the top right, type “Contentpen.” You should see the official Contentpen plugin in the search results. Look for a plugin with the Contentpen logo and a description.
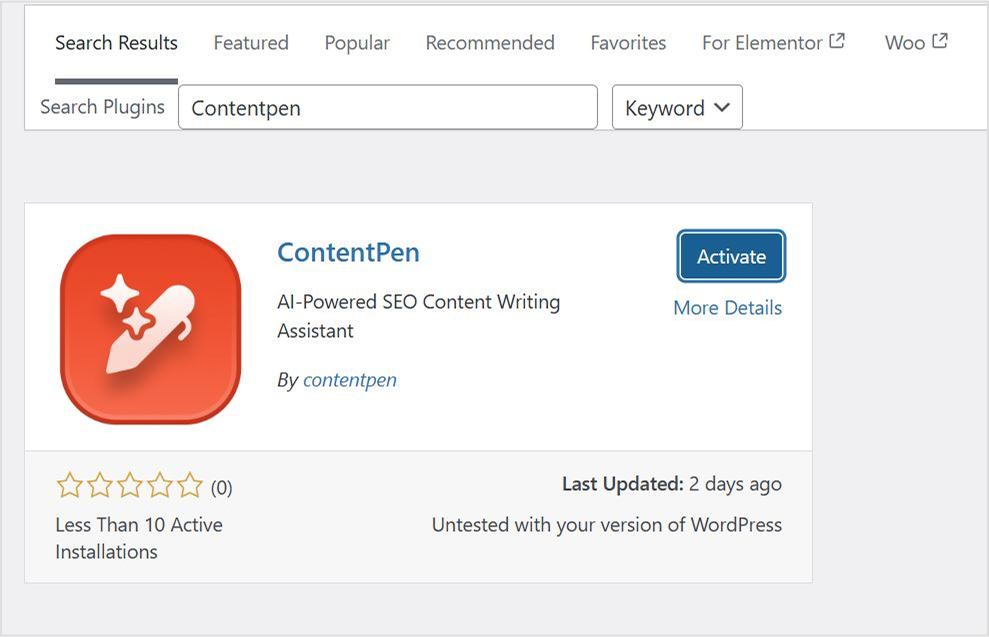
Once you’ve found the correct plugin, click the “Install Now” button next to it.
After the plugin has been installed, the “Install Now” button will change to “Activate.” Click “Activate” to enable the plugin on your WordPress site.
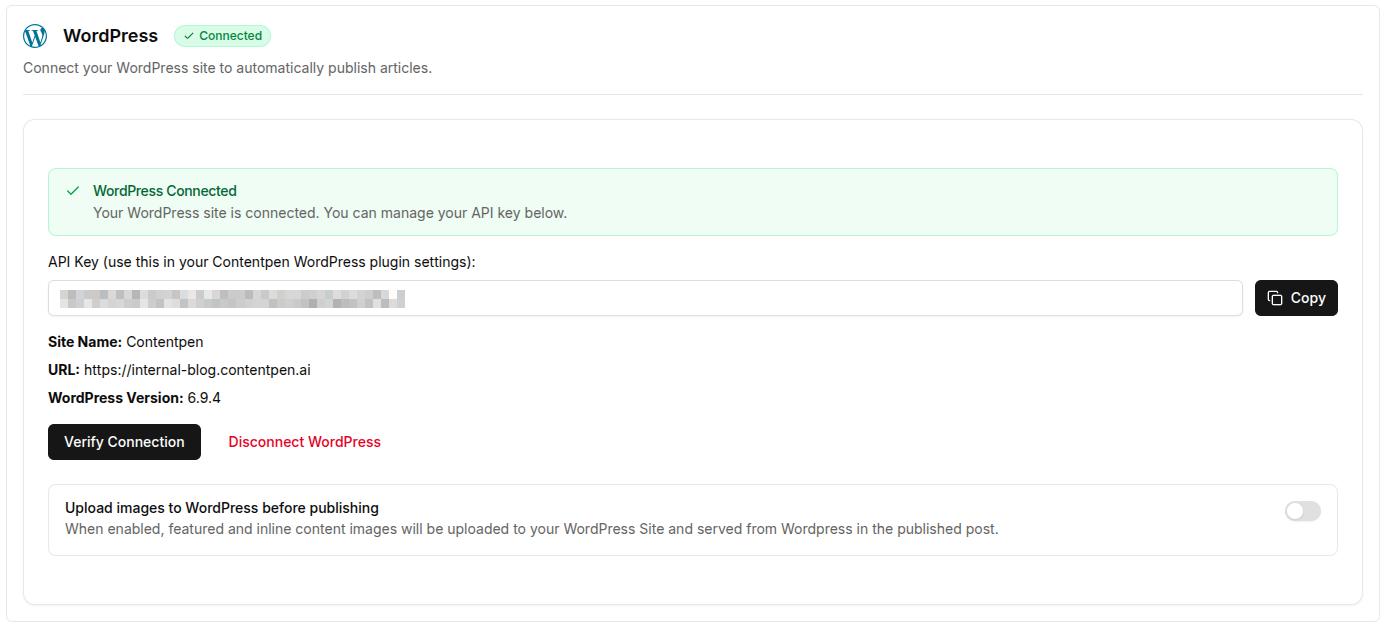
Step 03: Connect your WordPress site to your Contentpen account
Once the plugin is activated, connect it to your Contentpen account.
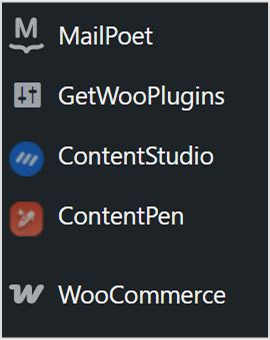
Now, you need to find the Contentpen settings. After activation, a new menu item for “Contentpen” might appear in your WordPress sidebar.
Go into the ‘Contentpen’ settings and paste the API key you copied earlier to link your WordPress site.
Save or update the settings to confirm the connection between Contentpen and your WP account.
Step 04: Verify the connection from WordPress
Once you’ve connected WordPress to the AI writing tool, it is time to verify the connection from Contentpen.
Click on the ‘Verify Connection’ button in the WordPress integrations tab and wait for a while.
You will get a notification pop-up confirming that you have a successful connection with WordPress.
You can also upload images that Contentpen generates directly to WordPress by using the slider at the bottom of the WP integration page.
How to publish a blog directly from Contentpen to WordPress
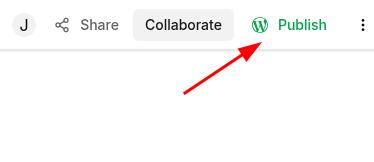
Let’s say you’ve just finalized a blog post draft in Contentpen. Instead of downloading and manually uploading it into WordPress, you can now:
Step 01: Click on the content piece you want to publish.
Step 02: Hit the “Publish” button in the top right corner.
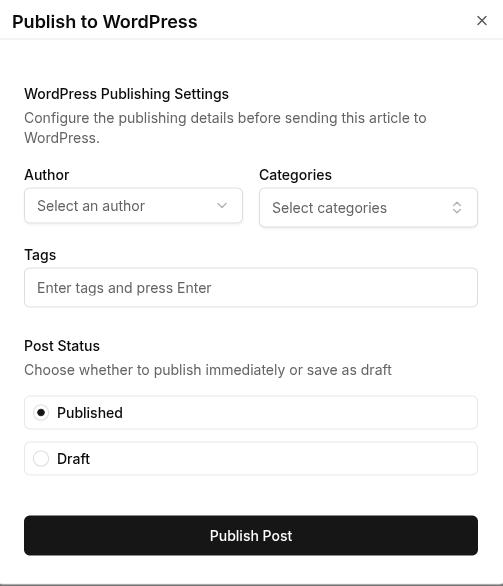
Step 03: A pop-up will appear, allowing you to choose an author, assign categories, and add relevant tags for the post. You can also choose to send the content to your WP as a draft instead of publishing it directly.
Step 04: When you’re ready, hit the “Publish Post” button, and your blog will go live on your website instantly.
Final thoughts
You’re all set! With Contentpen connected to WordPress, you can schedule, manage, and publish content without ever leaving the platform.
From here, you might want to explore scheduling posts in advance, enabling image uploads, or creating content directly from the AI writing assistant app.
Remember to keep the plugin updated to stay compatible with new features as they roll out. Also, check out Contentpen blogs for more information about the tool and see how you can utilize it to write SEO-optimized content with convenience.
From outline to publish-ready content
that fills them
Once logged into Contentpen, go to the “Integration” tab in the left menu, enter your WordPress site URL, click “Connect WordPress,” and your API key will be generated there.
Do I need any coding skills to connect Contentpen with WordPress?
Not at all! The setup involves simple copy-paste steps and plugin installation with no coding required.
Can I disconnect Contentpen from WordPress anytime?
Yes, you can remove the plugin or reset the integration from your Contentpen account at any time.
Is it safe to use my API key in WordPress?
Yes, your API key is unique to your account and securely links Contentpen with your site. However, never share it publicly or with untrusted users.
What should I do if the connection between Contentpen and WordPress fails?
Try these quick fixes first:
– API key not working: Re-copy it fresh from the Integration tab and avoid any stray spaces in the link – Plugin not visible after installation: Refresh the plugins page or reinstall the plugin from WordPress – Connection still failing: Check that your WordPress site URL is entered correctly in Contentpen (include https://)
If none of these work, disconnect and reconnect from the Integration tab, or contact Contentpen support for help.
Remember when creating a blog post meant spending hours drafting content, formatting text, adding images, and then going through multiple editing rounds? Those days are becoming obsolete. Content creation has transformed from a lengthy, meticulous process into something anyone can efficiently create a blog in 10 minutes.
This revolution in blogging has democratized content production, allowing writers of all experience levels to publish professional-quality articles without excessive time investment.
The good news is that modern content creation tools have transformed this process. What once took hours can now be accomplished in minutes without sacrificing quality.
This revolution in content production empowers writers of all experience levels to publish professional-quality articles efficiently and consistently.
Let’s see how you can create a blog post in 10 minutes.
What is the best way to create a blog in 10 minutes?
Creating a blog the traditional way is exhausting. From researching the topic, drafting content, optimizing for SEO, to finally formatting everything, it can easily take hours, if not days. And if you’re managing multiple tasks or clients, that time adds up fast. The pressure to consistently produce high-quality content can feel overwhelming and unsustainable.
Introducing Contentpen – The best AI blog writer online
Contentpen is an AI blog writing tool designed to help users create high-quality, SEO-optimized content efficiently.
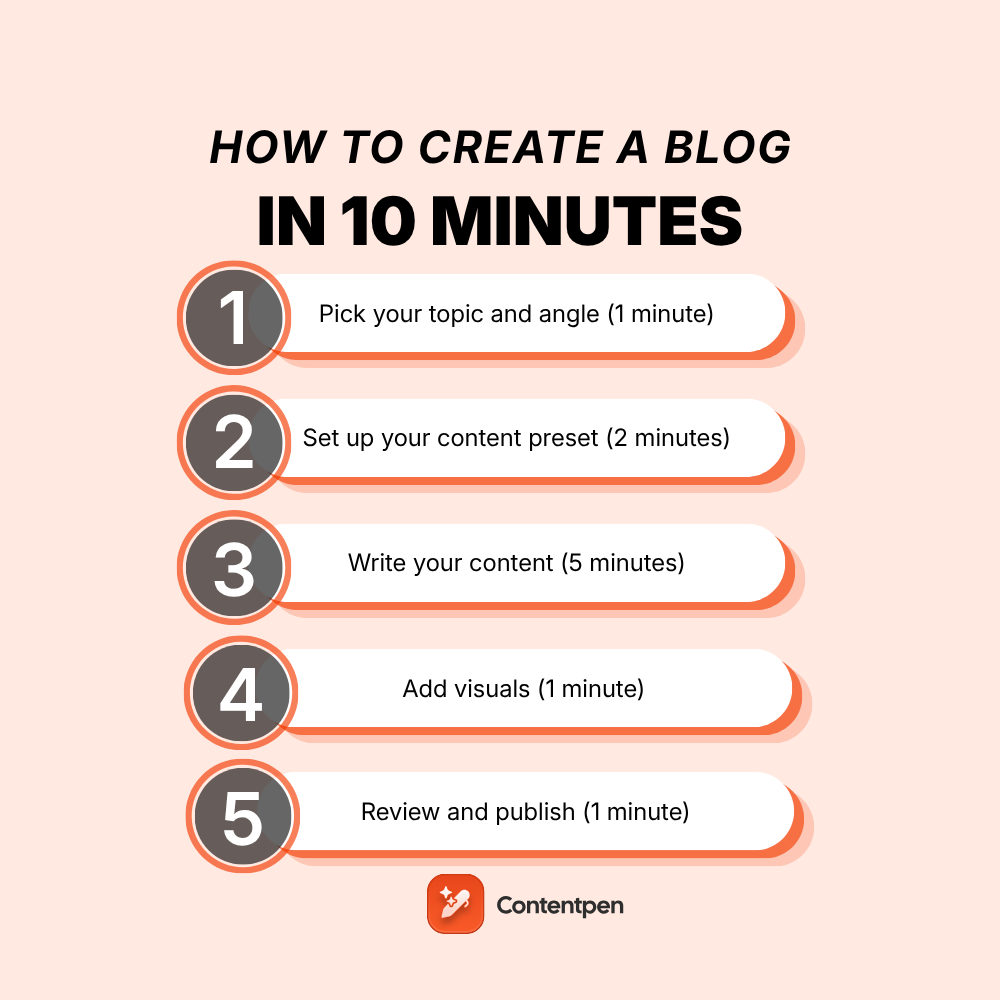
The 10-minute content creation system explained
Here’s the streamlined workflow that makes 10-minute content creation possible:
1. Pick your topic and angle (1 minute)
Begin by identifying what specific value you’ll deliver to readers. Instead of broad topics like “digital marketing,” focus on targeted angles like “how small businesses can use email marketing to increase repeat purchases.” This clarity creates a natural structure for your content and helps you stay focused during the writing phase.
2. Set up your content preset (2 minutes)
This is where Contentpen truly shines. Configure your content preset once with settings that match your content goals:
Tone of voice: Select from options like “clear and straightforward,” “professional but approachable,” “helpful and solution-focused,” or “confident without being pushy.” This setting ensures a consistent voice across all your content without constant conscious adjustment.
Target audience: Define precisely who you’re writing for – marketing professionals, business owners, IT managers, product teams, or other specific groups. This setting helps you maintain appropriate terminology and examples throughout your content.
Formatting preferences: Choose which text treatments to apply automatically. Enable bold formatting for key concepts, italics for emphasis, tables for data presentation, pull quotes for important insights, and list formatting for scannable information.
Structure elements: Select your preferred article length (small, medium, or large) and additional sections like key takeaways, conclusions, and FAQs. These structural elements create reader-friendly content without requiring manual formatting.
Linking strategy: Configure how you want internal and external links handled. Set up automatic internal linking to your existing content and control which external domains to include or exclude.
3. Write your content (5 minutes)
With your preset handling of all formatting and structural decisions, you can focus entirely on your ideas. This is pure content creation – no more switching between writing and formatting modes. The preset acts like a professional editor working alongside you, automatically implementing your predetermined style preferences as you write.
Since you don’t need to worry about how your content will look, you can dedicate your full attention to explaining concepts clearly, providing valuable insights, and connecting with your readers. Many writers report that this focused approach not only saves time but also improves the quality of their writing.
4. Add visuals (1 minute)
Visuals dramatically improve reader engagement, but finding, sizing, and positioning images often becomes a time-sink. Your Contentpen preset handles these technical aspects automatically:
Featured images are properly sized and positioned
In-article images maintain consistent formatting
Tables follow your predetermined styling
Visual hierarchy remains consistent across all content
Simply select the images you want to include, and your preset ensures they enhance your content without disrupting your writing flow.
5. Review and publish (1 minute)
With structural and formatting elements handled automatically, your final review can focus entirely on content quality. Quickly scan for:
Clarity of your main points
Coherence of your overall argument
Any obvious grammatical issues
Effectiveness of your headline
Once satisfied, you can publish with confidence, knowing your content maintains professional quality and brand consistency – all created in just 10 minutes.
This streamlined approach doesn’t just save time – it fundamentally changes the content creation experience. By removing technical distractions, Contentpen lets you focus on what truly matters: sharing your expertise and connecting with your audience through valuable content.
How Contentpen presets transform content creation
Think of presets as your personal content production team – a designer, editor, and SEO specialist working silently in the background while you focus solely on your ideas. Let’s explore how each component of this system works together to revolutionize your content creation process:
Style settings that establish your consistent voice
Every writer knows that maintaining a consistent tone across multiple articles is challenging. Without a system, your writing voice might shift depending on your mood or energy level. Contentpen solves this through style presets that provide a consistent framework:
Tone of voice options include:
Clear and straightforward: Direct language that prioritizes simplicity and clarity, ideal for instructional content or technical explanations
Professional but approachable: Balanced tone that conveys expertise while remaining conversational, perfect for business blogs and thought leadership
Helpful and solution-focused: Empathetic tone that emphasizes practical answers to reader problems, great for how-to content
Confident without being pushy: Authoritative voice that presents strong opinions while respecting different perspectives
Target audience settings ensure your content speaks directly to:
Marketing professionals and teams: Using appropriate terminology and examples relevant to marketers’ daily challenges
Product managers and teams: Framing concepts in terms of product development cycles and user experience
Business owners and founders: Focusing on practical implementation and business outcomes rather than theory
IT managers and developers: Incorporating technical specificity while maintaining accessibility
Digital marketing agencies: Addressing agency-specific workflows and client relationship considerations
When you select these style settings, Contentpen subtly guides your writing process. For example, if you’ve selected “helpful and solution-focused” for a business owner audience, the system might suggest more actionable subheadings and practical examples instead of theoretical discussions.
Formatting options that create visual consistency
Readers form impressions about your content quality within seconds, largely based on visual presentation. Inconsistent formatting signals amateur content, while consistent styling builds trust. Contentpen’s formatting presets automatically implement your visual preferences:
Text formatting elements you can automate include:
Bold for important keywords: Drawing attention to critical terms and concepts that define your topic
Italic for subtle emphasis: Creating natural reading rhythm by highlighting key phrases
Tables for organized data: Presenting comparative information in consistently styled, scannable formats
Quotes for testimonials or insights: Setting apart important statements with distinctive styling
Lists for easily scannable information: Breaking complex processes into digestible steps with consistent formatting
Heading case consistency options include:
Title case: How to Create a Blog in Less Than 10 Minutes
Sentence case: How to create a blog in less than 10 minutes
lowercase: how to create a blog in less than 10 minutes
When implemented across dozens or hundreds of articles, these consistent formatting choices create a professional, cohesive reading experience that builds trust with your audience. Rather than spending time manually formatting each element, your preset applies these styling decisions automatically.
Structure settings that enhance readability
Content structure significantly impacts how readers engage with your ideas. Well-structured content leads readers naturally from introduction to conclusion, while poor structure creates confusion and abandonment. Contentpen’s structure presets implement proven readability principles:
Article structure options include:
Small articles (3-4 headings): Concise content focused on a single specific topic or question
Medium articles (5-8 headings): Comprehensive coverage of broader subjects with multiple subtopics
Large articles (8+ headings): In-depth explorations of complex topics with detailed subsections
Additional structural elements you can automatically include:
Key takeaways: Summary sections highlighting essential points for readers who scan
Conclusion: Synthesized wrap-ups that reinforce main arguments and provide closure
FAQs: Anticipatory question-and-answer sections addressing common reader concerns
Featured images: Consistently positioned and sized visual elements that enhance engagement
In-article visuals: Strategically placed images that break up text and illustrate concepts
These structure settings don’t just save time – they implement proven readability principles that keep readers engaged. When readers encounter content with a familiar, logical structure, they can focus on your ideas rather than struggling to follow your organization.
Linking strategies that strengthen your content ecosystem
Strategic linking transforms standalone articles into interconnected content ecosystems that boost SEO performance and reader engagement. However, managing links manually across dozens or hundreds of articles becomes impossibly complex. Contentpen’s linking presets automate this process:
Internal linking capabilities include:
Sitemap integration: Automatically identifying relevant connection points within your existing content
Content relationship mapping: Building logical pathways between related topics
Instead of spending hours manually identifying and inserting links, your preset implements your linking strategy automatically across all content.
Three real examples of Contentpen presets in action
Let’s explore three scenarios demonstrating how different preset configurations serve specific content needs:
The marketing consultant’s educational blog
Scenario: Jessica runs a digital marketing consultancy and needs to regularly publish educational content for potential clients.
Preset configuration:
Style: Professional but approachable tone targeting business owners and marketing professionals
Formatting: Bold for key marketing terms, italics for emphasis, lists for step-by-step instructions
Structure: Medium articles (5-8 headings) with conclusion and FAQs sections
Linking: Automatic internal linking to related marketing resources on her site
Why this works: This preset creates professionally structured content that positions Jessica as an expert while making complex marketing concepts accessible to business owners. The consistent formatting and helpful additional sections (like FAQs) enhance readability and demonstrate thoroughness.
Time-saving benefit: Jessica can focus entirely on sharing her marketing expertise without worrying about formatting consistency or structure. Her articles always look professional and maintain the same helpful tone that her audience expects.
The SaaS company’s product updates
Scenario: A software company needs to regularly publish product updates and feature announcements.
Preset configuration:
Style: Clear and straightforward tone targeting IT managers and developers
Formatting: Tables for feature comparisons, bullet lists for key changes
Structure: Small articles (3-4 headings) with a key takeaways section highlighted at the top
Linking: Internal links to documentation and previous feature announcements
Why this works: This preset configuration creates concise, well-organized product updates that technical audiences can quickly scan for relevant information. The consistent structure helps regular readers know exactly where to look for the information they need.
Time-saving benefit: Multiple team members can contribute to product update articles while maintaining perfect consistency in branding, terminology, and presentation, critical for technical documentation.
The travel blogger’s destination guides
Scenario: Marco creates in-depth travel guides about international destinations.
Preset configuration:
Style: Helpful and solution-focused tone targeting travel enthusiasts
Formatting: Quotes for local insights, bulleted lists for packing tips
Structure: Large articles (8+ headings) with featured images and in-article photography
Linking: External linking enabled to trusted travel resources and booking sites
Why this works: This preset creates comprehensive, visually rich travel guides with consistent sections that readers come to expect (accommodations, local transportation, must-see attractions). The helpful tone and solution-focused approach build trust with travelers planning their trips.
Time-saving benefit: Marco can create detailed travel guides in a fraction of the typical time, allowing him to publish more frequently and cover more destinations. The preset ensures that his guides maintain the same quality and structure that his audience values.
Why blogs still matter in a world full of videos?
Today, videos are everywhere. TikTok, YouTube, and Instagram clips fill our screens daily. With so much video content, you might wonder if blogs are still worth creating. The answer is a strong yes. Written content offers unique benefits that videos simply cannot replace.
Better visibility in search engines
When people search for information online, written content still shows up more often in results. Search engines like Google can understand text much better than video content. This means:
Blogs help more people find your website through searches
Written content can rank for many different search terms at once
Search engines can better understand what your site is about through your writing
Links between your blog posts help search engines see your site as valuable
Text is easier for search engines to read and recommend to others
Content that lasts longer
Unlike social media posts that disappear quickly, blog articles can bring value for years:
A good blog post can continue getting readers long after you publish it
You can easily update old posts to keep them current
Your collection of articles builds up over time, creating a valuable resource
Helpful content continues solving people’s problems for years
Older posts keep working for you without additional effort
Turning readers into customers
Blog content is excellent at guiding people toward becoming customers:
You can naturally include a call to action at key points in your articles
Readers can sign up for more content while reading your blog
People often feel more comfortable considering purchases while reading
You can offer downloadable resources in exchange for contact information
Written comparisons and reviews help people make buying decisions
Explaining complex topics thoroughly
Some subjects need detailed explanations that videos can’t provide effectively:
Readers can go through the information at their own speed
Complex ideas often need careful reading to understand
Technical details and data are easier to present in text
Step-by-step instructions are simple to follow in written form
People can easily refer back to specific parts of your article
Reaching more types of people
Written content works for people in situations where video doesn’t:
People with hearing problems can access written content easily
Blogs work for people with slow internet connections
Text can be translated into other languages more accurately
People can read blogs at work without needing headphones
Screen readers can convert text for people with visual impairments
Easier and cheaper to create
Blog content typically needs fewer resources than good videos:
You only need a computer to write
No special equipment or editing software required
Writing usually takes less time than video production
Text is easier to fix and update later
One person can handle the entire writing process
What readers prefer
Many people still prefer reading in certain situations:
Professional information is often easier to understand in writing
People like to scan written content during work hours
Technical instructions are clearer in text form
In-depth topics benefit from the structure of written content
Some people simply prefer reading to watching videos
Working with videos, not against them
Blogs and videos can work together effectively:
Blog posts can expand on ideas from your videos
Written content can provide details to support video demonstrations
Articles make information from videos searchable
Adding videos to blog posts increases engagement
Written content brings different people to your site than videos alone
How Contentpen changes the content creation game
Content creation technology has fundamentally transformed what’s possible for writers and publishers. With platforms like Contentpen and the power of content presets, you can transform your ideas into polished, professional articles in just minutes. This efficiency doesn’t just save time – it enables more consistent publishing, broader topic coverage, and ultimately, greater audience impact.
Frequently asked questions
How can I create quality content so quickly?
The 10-minute approach works because it separates content creation from technical formatting. By using structured outlines and content presets, you can focus purely on your ideas while automation handles the presentation aspects. It’s like having a professional designer and editor working alongside you in real-time.
Does content presets limit my creativity or make my blog look generic?
Unlike basic templates, modern content presets offer sophisticated customization while maintaining design coherence. Contentpen’s presets handle technical formatting while still allowing your unique voice and style to shine through. You can also modify presets to create a signature look for your content.
How do content presets differ from regular blog templates?
Templates typically control only the basic layout, while content presets manage dozens of parameters, including typography, spacing, image handling, interactive elements, and platform-specific optimizations. They’re much more comprehensive and specifically designed for efficient content production rather than just visual presentation.
Can I use the 10-minute approach if I’m not a professional writer?
Absolutely. In fact, this approach particularly benefits non-professional writers by providing structure and handling technical aspects of content creation. The preset system acts as a guide, helping you organize your thoughts while ensuring a professional presentation.
Can content created this quickly perform well in search engines?
Yes. Search engines prioritize valuable, well-structured content – which this approach delivers. Contentpen’s presets include SEO-friendly formatting, heading structures, and metadata optimization. Your content’s search performance ultimately depends on its value to readers, not how long it took to create.
How can I make my quickly created content stand out from competitors?
Focus on bringing unique perspectives, original insights, or exclusive information to your topics. While presets handle formatting consistency, your distinct viewpoint and expertise will differentiate your content. Consider incorporating only original research, personal experiences, or specialized knowledge that you can provide.
Can I still personalize my content when using presets?
Absolutely. Presets handle the technical and design foundation, but you maintain complete control over your content, voice, and creative direction. You can also customize presets to align perfectly with your brand identity while retaining all the time-saving benefits.
How to set up your Contentpen workspace? A beginner’s guide
Setting up your Contentpen workspace is super easy, and it only takes a few minutes to get started.
Whether you’re a content marketer, agency, or brand strategist, this setup guide will help you personalize your workspace and tailor it to your content needs.
So let us walk you through the steps:
A step-by-step guide to create a Contentpen workspace
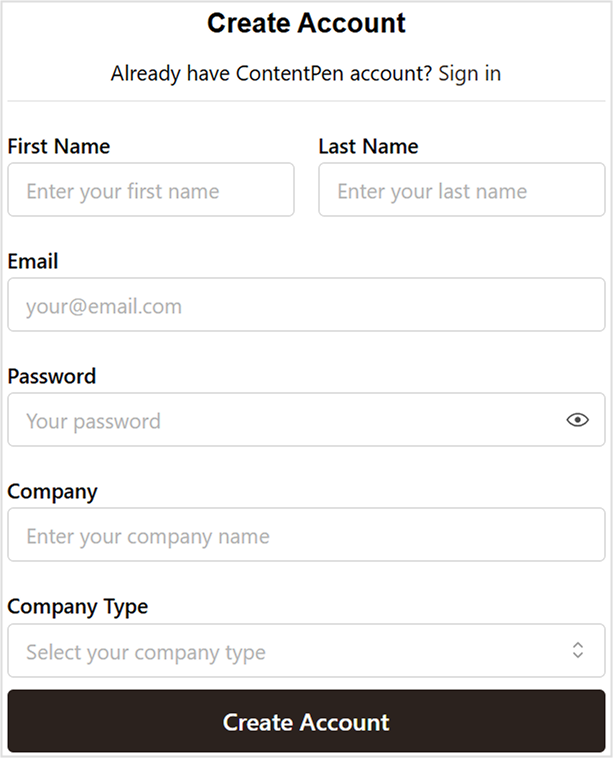
To get started, simply sign up for your Contentpen account by entering your name, email address, and a secure password. You can also add your team or brand name if you’d like, and choose the company type. This will help Contentpen decide your niche and show related content suggestions when you write or optimize articles.
Once that’s done, click on “Create Account”, and you’re in!
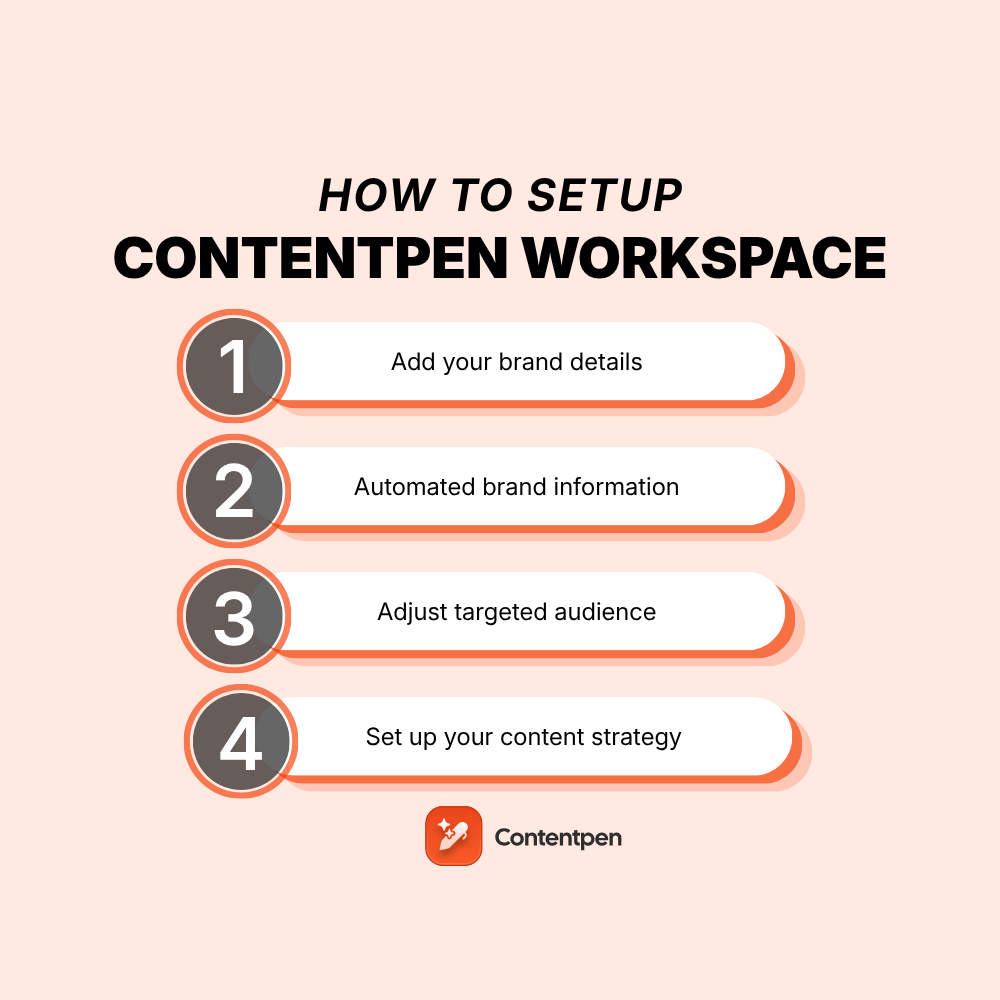
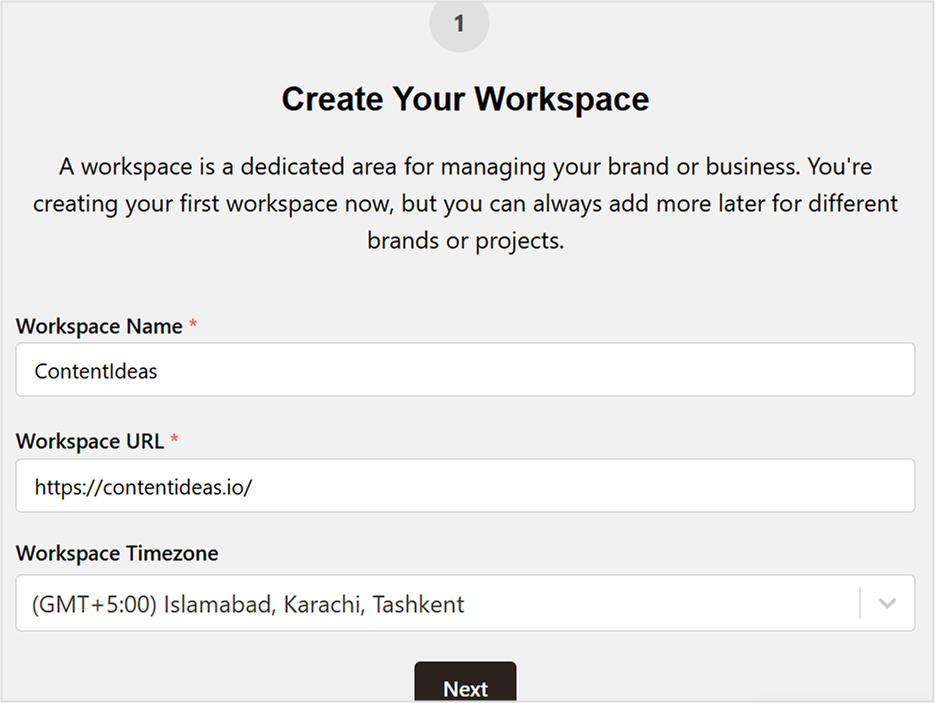
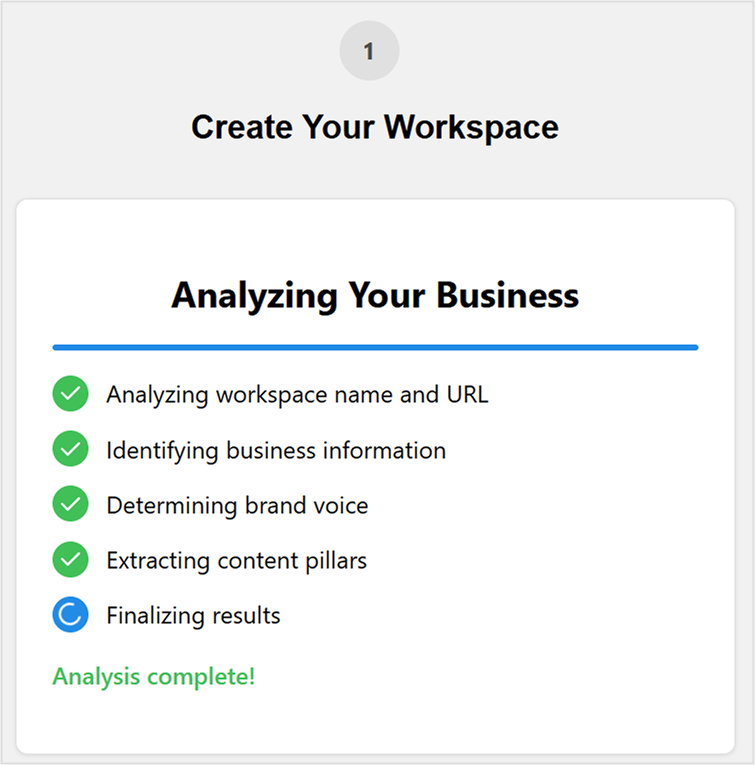
Step 01: Add your brand details
Start by entering your basic brand details:
Workspace name
Workspace URL
Workspace timezone
Once you enter the details, Contentpen will analyze the information for further customization.
Step 02: Automated brand information
After you’ve added your brand info in the SEO platform, the AI agent jumps into action. It automatically pulls key brand elements from your website, including:
Your ideal customer profile (ICP)
Your unique selling proposition (USP)
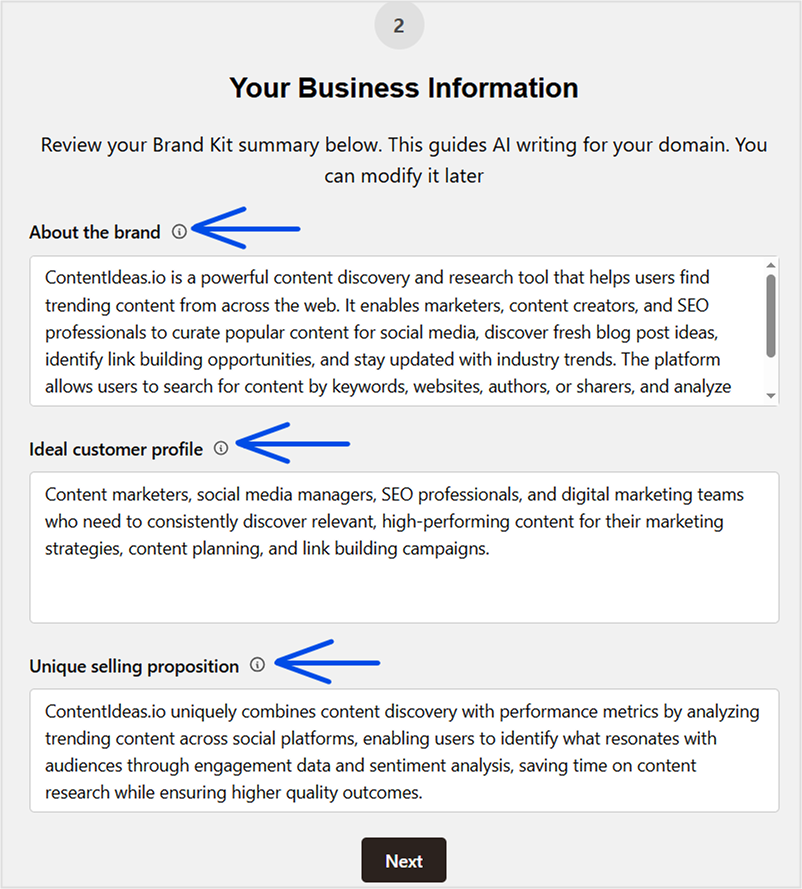
You’re free to tweak or add more details here if needed. Once everything looks good, hit “Next.”
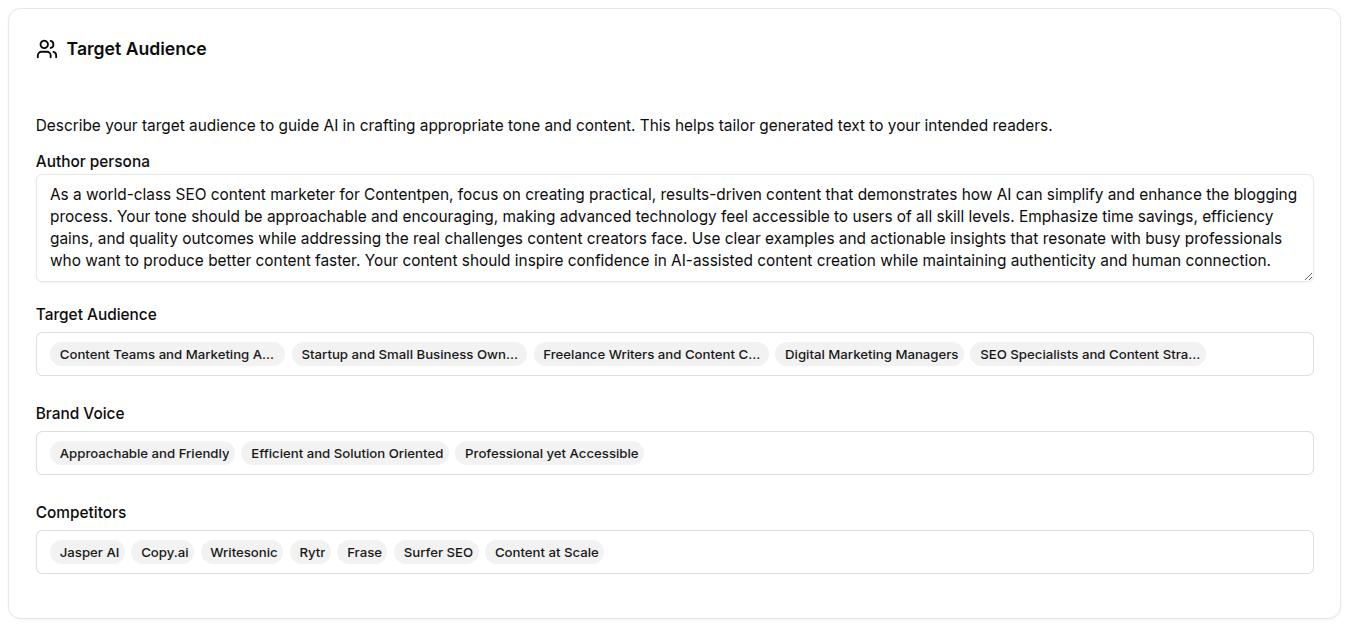
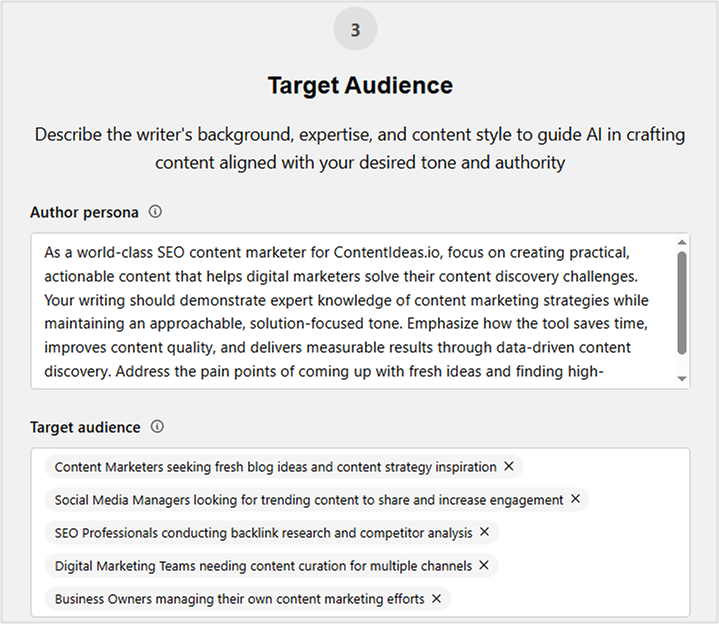
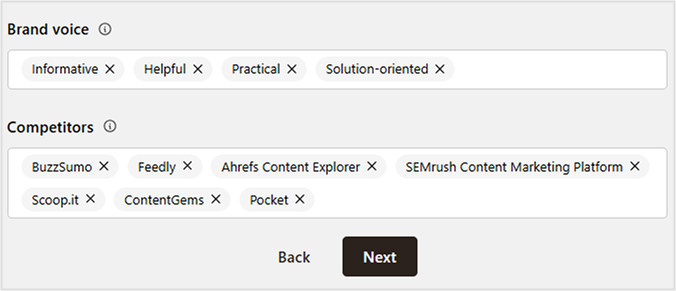
Step 03: Adjust the targeted audience
On the next screen, you’ll come across another automated section containing author persona, target audience, brand voice, and competitors’ details.
The platform auto-generates:
An author persona
Your target audience profile
Your brand voice
A list of top competitors
Everything is editable. Keep what works, remove what doesn’t, and make sure it matches your brand’s personality and goals.
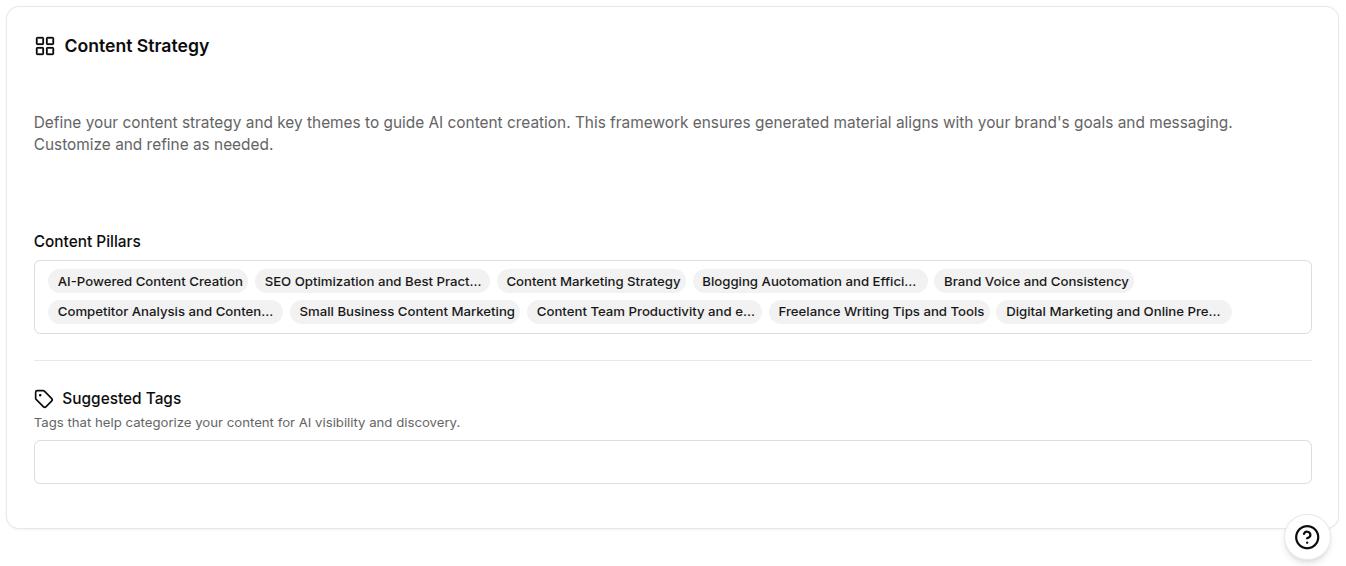
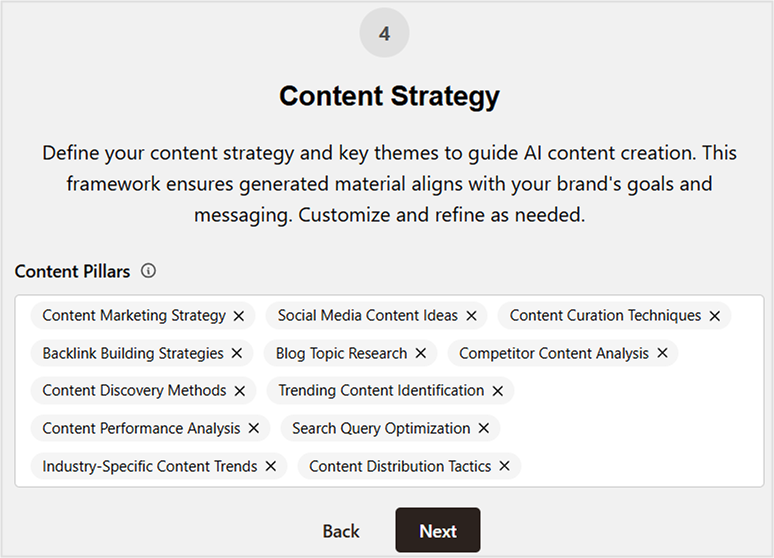
Step 04: Set up your content strategy
Finally, you’ll be asked to fine-tune your content strategy.
Here, you can add or remove content pillars that are not relevant to you or your business/service. Once you’re done, click “Next,” and you’re all set!
That’s it – your workspace is ready!
You’ll be redirected to the main Contentpen dashboard, where you can begin creating content effortlessly.
Write content that’s built to rank, not just read
Create search-optimized blogs aligned with SEO and GEO signals, so your content performs well across search and AI-driven discovery.
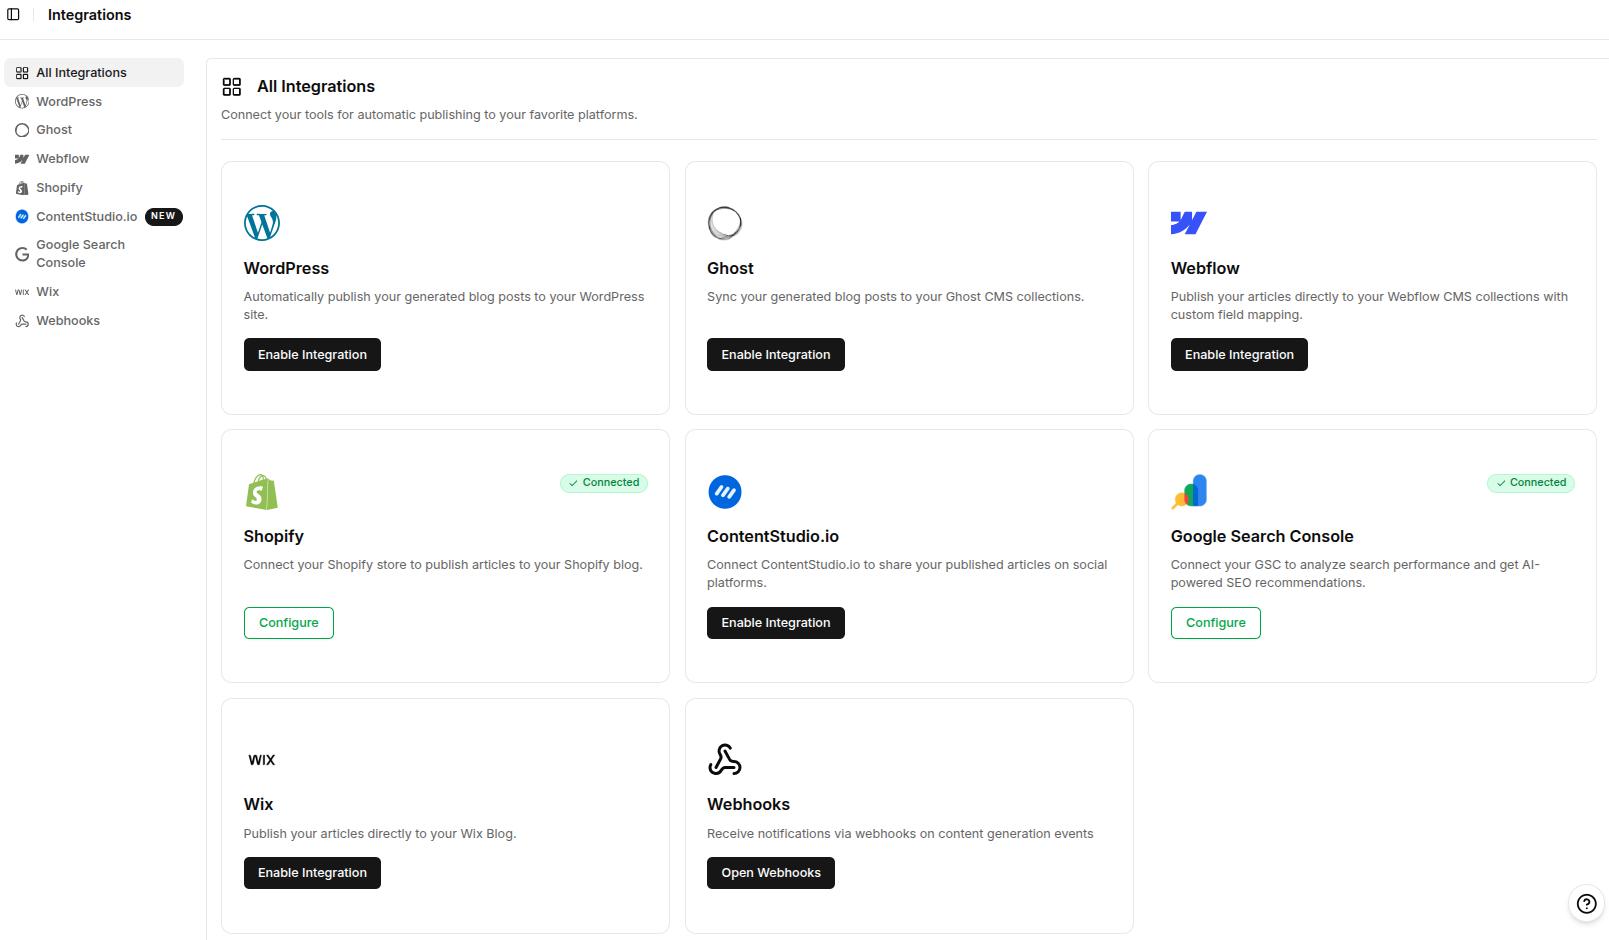
Contentpen now natively supports Ghost, Wix, Webflow, ContentStudio.io, WordPress, and Shopify integrations. It also connects with Google Search Console to surface website analytics.
For CMS platforms, such as WordPress, first add the Contentpen plugin to the account, then paste the full URL of your site into Contentpen.
Voila! Integration made easy!
You can also create customized workflows using our ‘Webhooks‘ feature so you can receive real-time notifications (success or failure) about your blogs.
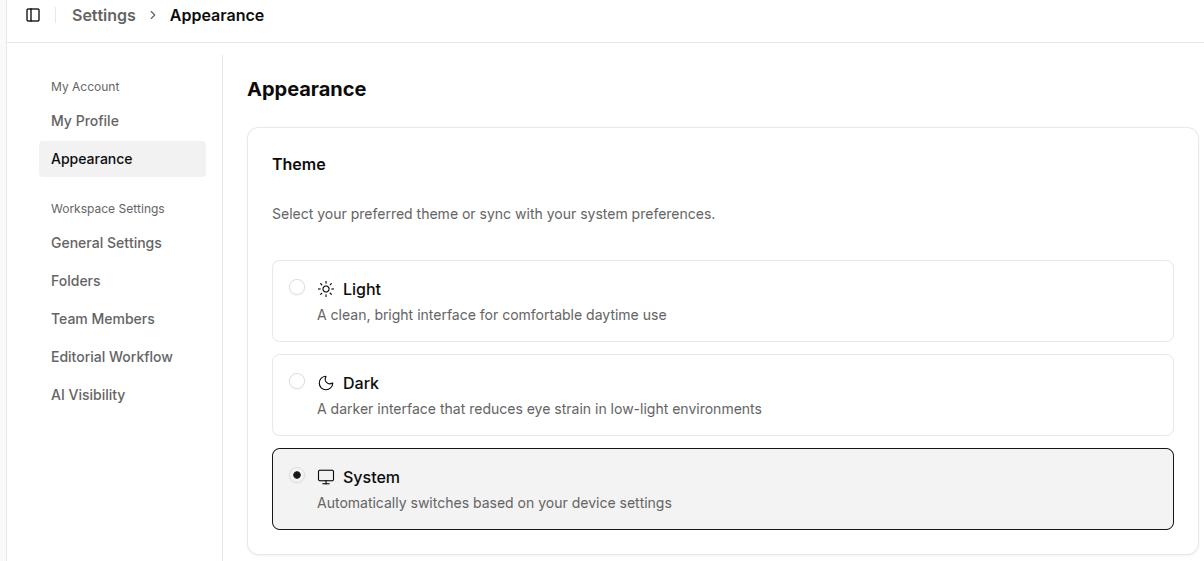
#2: Customize appearance
Contentpen supports both ‘Light’ and ‘Dark’ modes to help you feel accustomed to your workspace. The appearance is set to ‘System’ by default.
After customizing the appearance settings, you can also upload your own avatar and change your display name if needed.
#3: Create and organize articles with folders
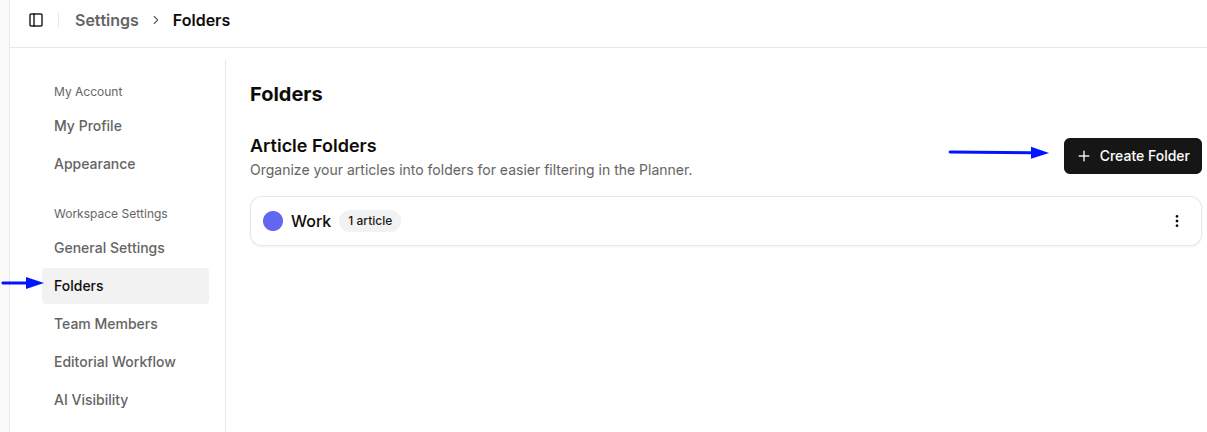
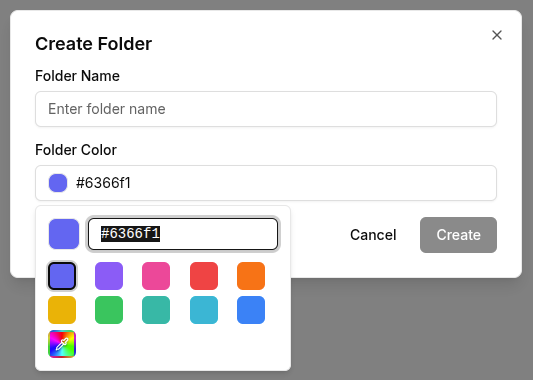
Contentpen simplifies content organization with folders that you can create and edit.
To create a folder, go to ‘Workspace Settings -> Folders’ option.
Here, you can choose a color for the folder to simplify content sorting.
Then, click on ‘Create’. And just like that, you have created your first content folder!
Now you can visit your content planner and add the articles to the created folder to streamline your writing workflow.
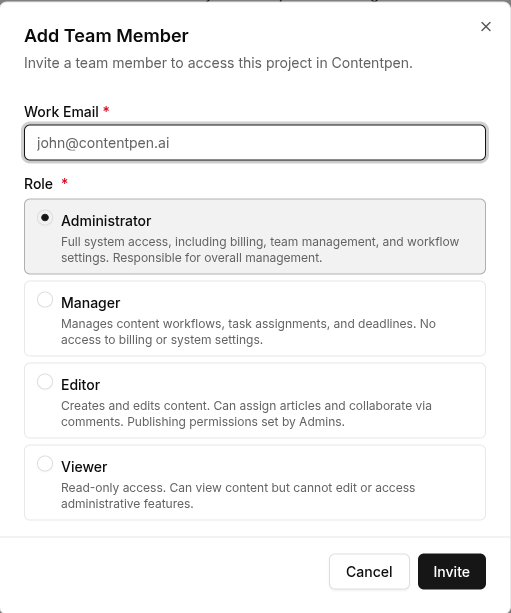
#4: Assign team members to your workspace
You can add team members to your workspace by simply navigating to ‘Workspace Settings -> Team Members’ screen and clicking the ‘Add Team Member’ button.
Here, include the team members’ work email and assign them a proper access role.
Then, click the ‘Invite’ button, and that’s it. Your teammate will now be on board once they click and join Contentpen with the link they receive in their email.
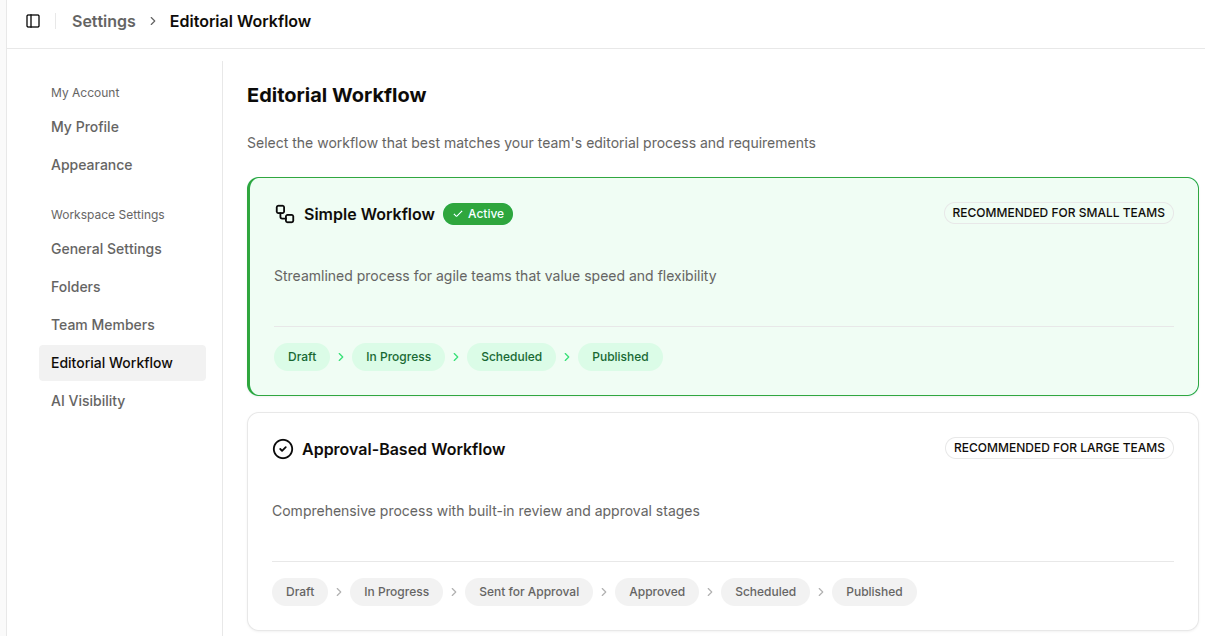
#5: Choose your editorial workflow
Another thing we recommend is selecting the editorial workflow under workspace settings.
Contentpen offers two options: ‘Simple Workflow’ (for small teams) and ‘Approval-Based Workflow’ (for large teams).
Choose whichever one suits your team size and needs with a single click.
Final thoughts
Setting up the Contentpen workspace is a straightforward process. It hardly takes a few minutes to start publishing high-quality, SEO- and GEO-ready blogs that gauge the audiences and boost organic traffic for better conversions.
With just a few easy steps, you’ve set the foundation for a content workflow that’s smart, organized, and built around your brand. Whether you’re writing solo or collaborating with a team, your workspace is now fully tailored to your needs.
Frequently asked questions
Can I update my brand details later?
Yes! All brand details, including workspace name, URL, and time zone, can be edited anytime from your settings.
Is Contentpen suitable for agencies managing multiple clients?
Absolutely. You can create and switch between multiple workspaces. You can also choose your own editing workflow, making it easy to manage content strategies for different clients.
Will I lose progress if I don’t complete the setup in one go?
No, Contentpen auto-saves your progress, so you can resume setup anytime from where you left off.
What happens after setup? Can I start publishing immediately?
Once your setup is complete, you’ll land on the Contentpen dashboard, where you can start creating and scheduling content right away.
Is there a free trial to explore the platform before committing?
Definitely! Contentpen offers a 7-day free trial so you can explore all features and see how it fits your workflow before upgrading to the paid plan.
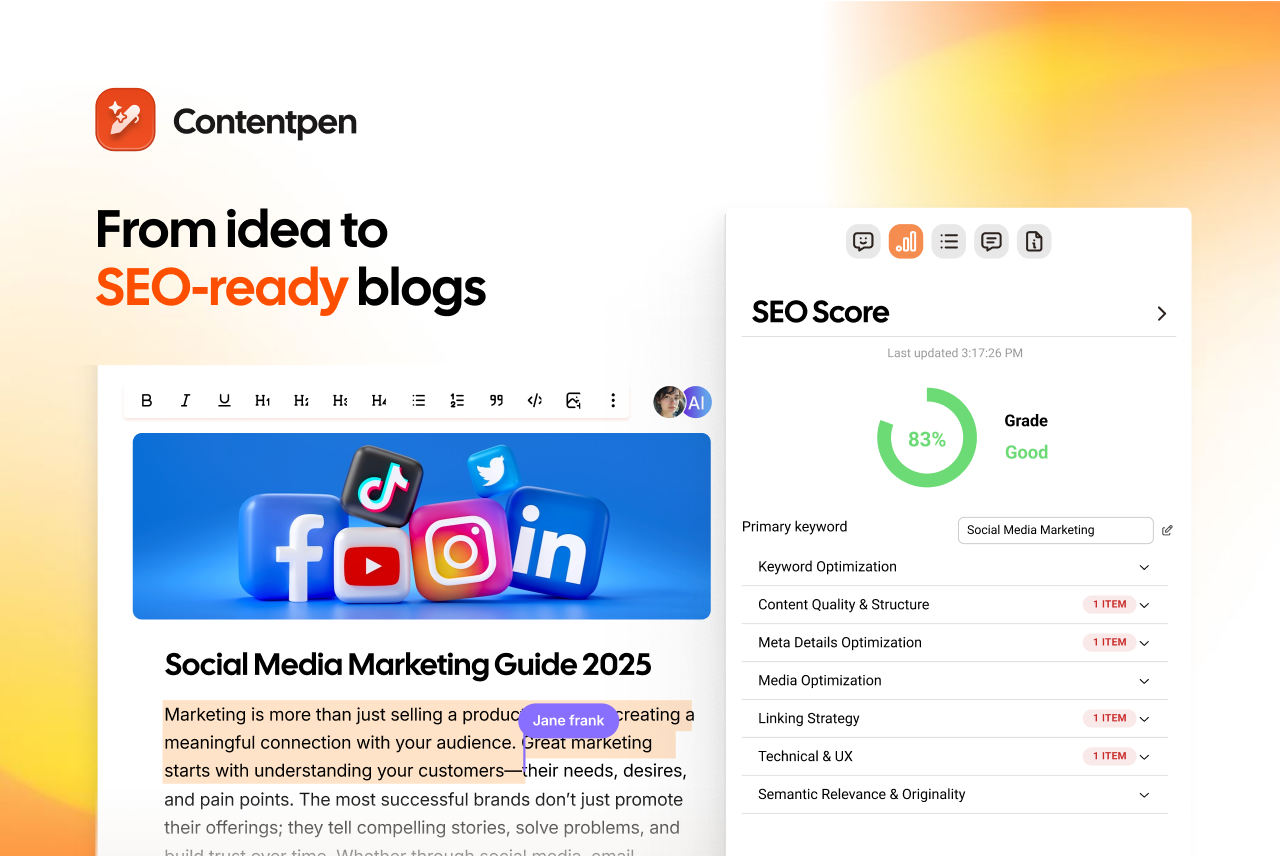
Writing a well-structured, engaging article is easier than ever with Contentpen. This powerful AI writing tool online helps you generate, customize, and optimize content with just a few clicks.
Whether you’re crafting a quick blog post or a detailed guide, Contentpen streamlines the process, saving you time while maintaining quality.
Contentpen is an AI-powered writing assistant designed to help users create high-quality, SEO- and GEO-optimized content efficiently.
The tool comes with the following features:
SEO scoring: Contentpen analyzes your meta title and description, content readability, and internal and external linking to provide a realistic SEO score. This scoring helps you identify the areas for improvement and take relevant action.
Keyword research: Contentpen automatically displays keyword difficulty, search volume, and intent for keywords relevant to your niche to help you plan and write content that ranks and converts.
Built-in media library: The media library manages all the uploaded media in one place. You can also store all the in-article and featured images Contentpen generates for you and categorize them using tags and attributes for better searchability.
SERP analysis: The SEO platform analyzes all top competitors for a target keyword and creates outlines and writes content that helps you beat your rivals with confidence.
Integrated publishing: With Contentpen, you can publish directly to Ghost, Wix, Webflow, Shopify, WordPress, and ContentStudio. The one-click publishing streamlines workflows and helps you meet deadlines.
Website analytics: See your total clicks, impressions, CTR, and average position directly from Google Search Console in real-time. The tool helps you avoid tool switching so that you can focus on the metrics that matter without compromising productivity.
SEO opportunities: Contentpen surface top page changes (winners) and pages that have lost traffic (losers) so that you can take appropriate action quickly. The AI-powered suggestions also show what you need to do to regain the top SERP positions.
Some other features, such as bulk content generation, content scheduling, etc., also come bundled in the ‘Premium’ package, which you can try with the free 7-day Contentpen trial today.
From outline to publish-ready content
that fills them
Steps to write SEO and GEO-optimized articles with Contentpen
Now that you know the details about our platform, let’s discuss the flow of writing an actual article with Contentpen.
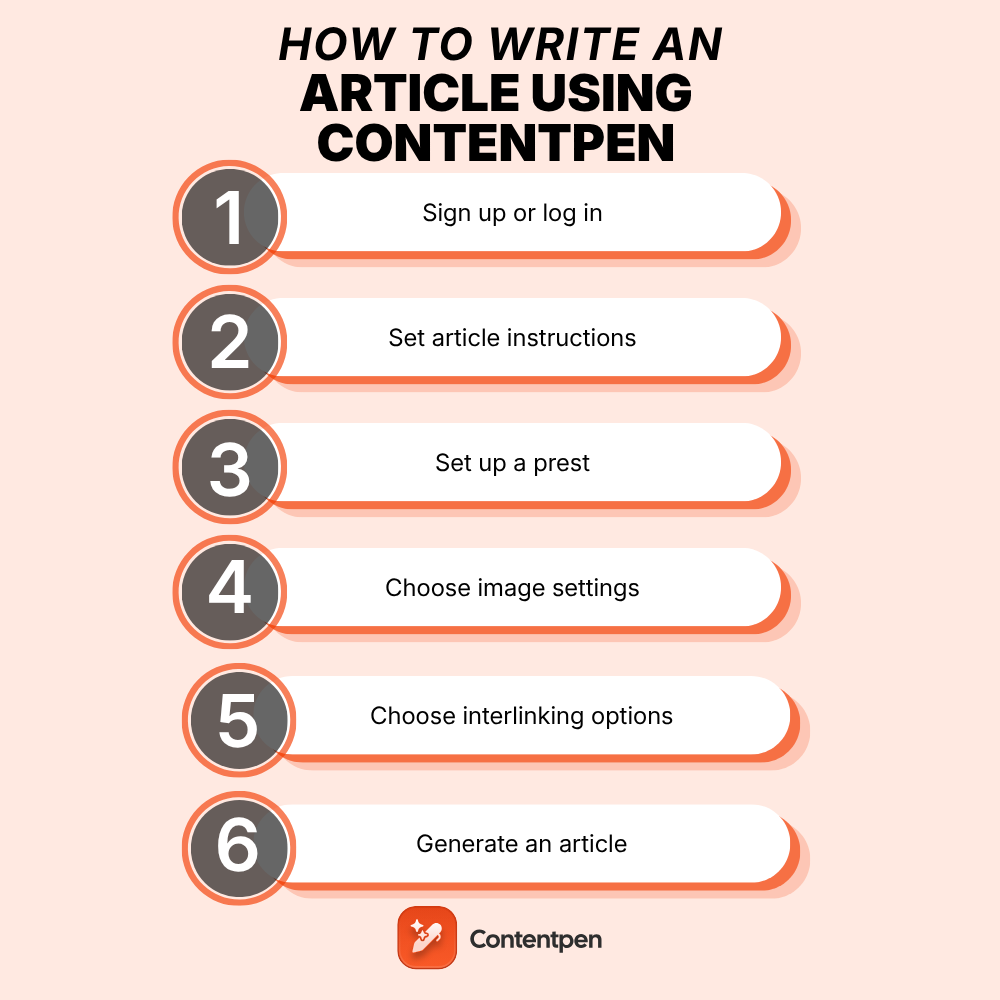
Step 1: Sign up or log in
Visit the Contentpen website and click “Sign up” if you’re a new user or “Log in” if you already have an account.
Enter your details, including first and last name, email, password, company name, and type. For first-time users, you will be requested to enter your card details, but don’t worry, you won’t be charged anything. You will gain access to our free 7-day trial, which you can cancel at any time.
After entering all the information, enter your credentials and access your main Contentpen dashboard.
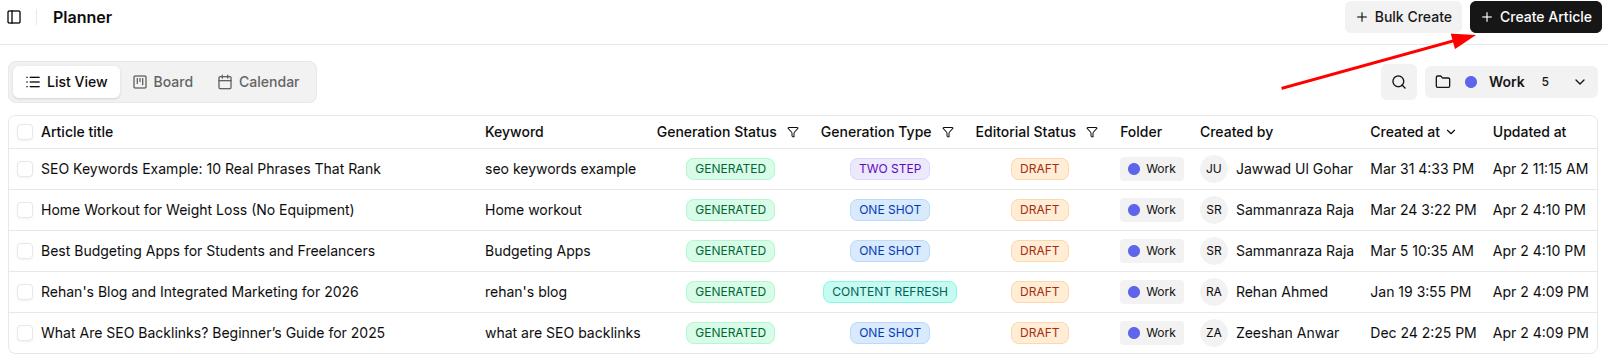
Step 2: Create a new article
Once inside the dashboard, navigate to the “Planner” section. Click on the “Create Article” button in the upper right corner to start writing.
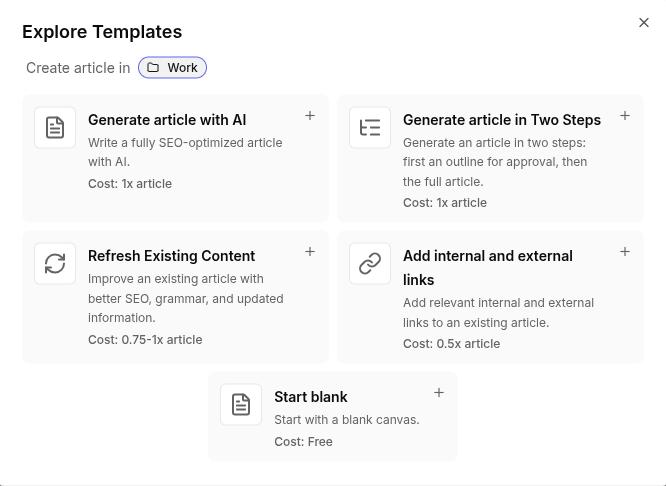
Step 3: Choose a template
Once you click this button, you’ll see the template screen. Here, you can choose between the following 5 templates:
Generate article with AI: In this mode, Contentpen will create an article in one shot using just your content preset, focus keyword, and secondary keywords.
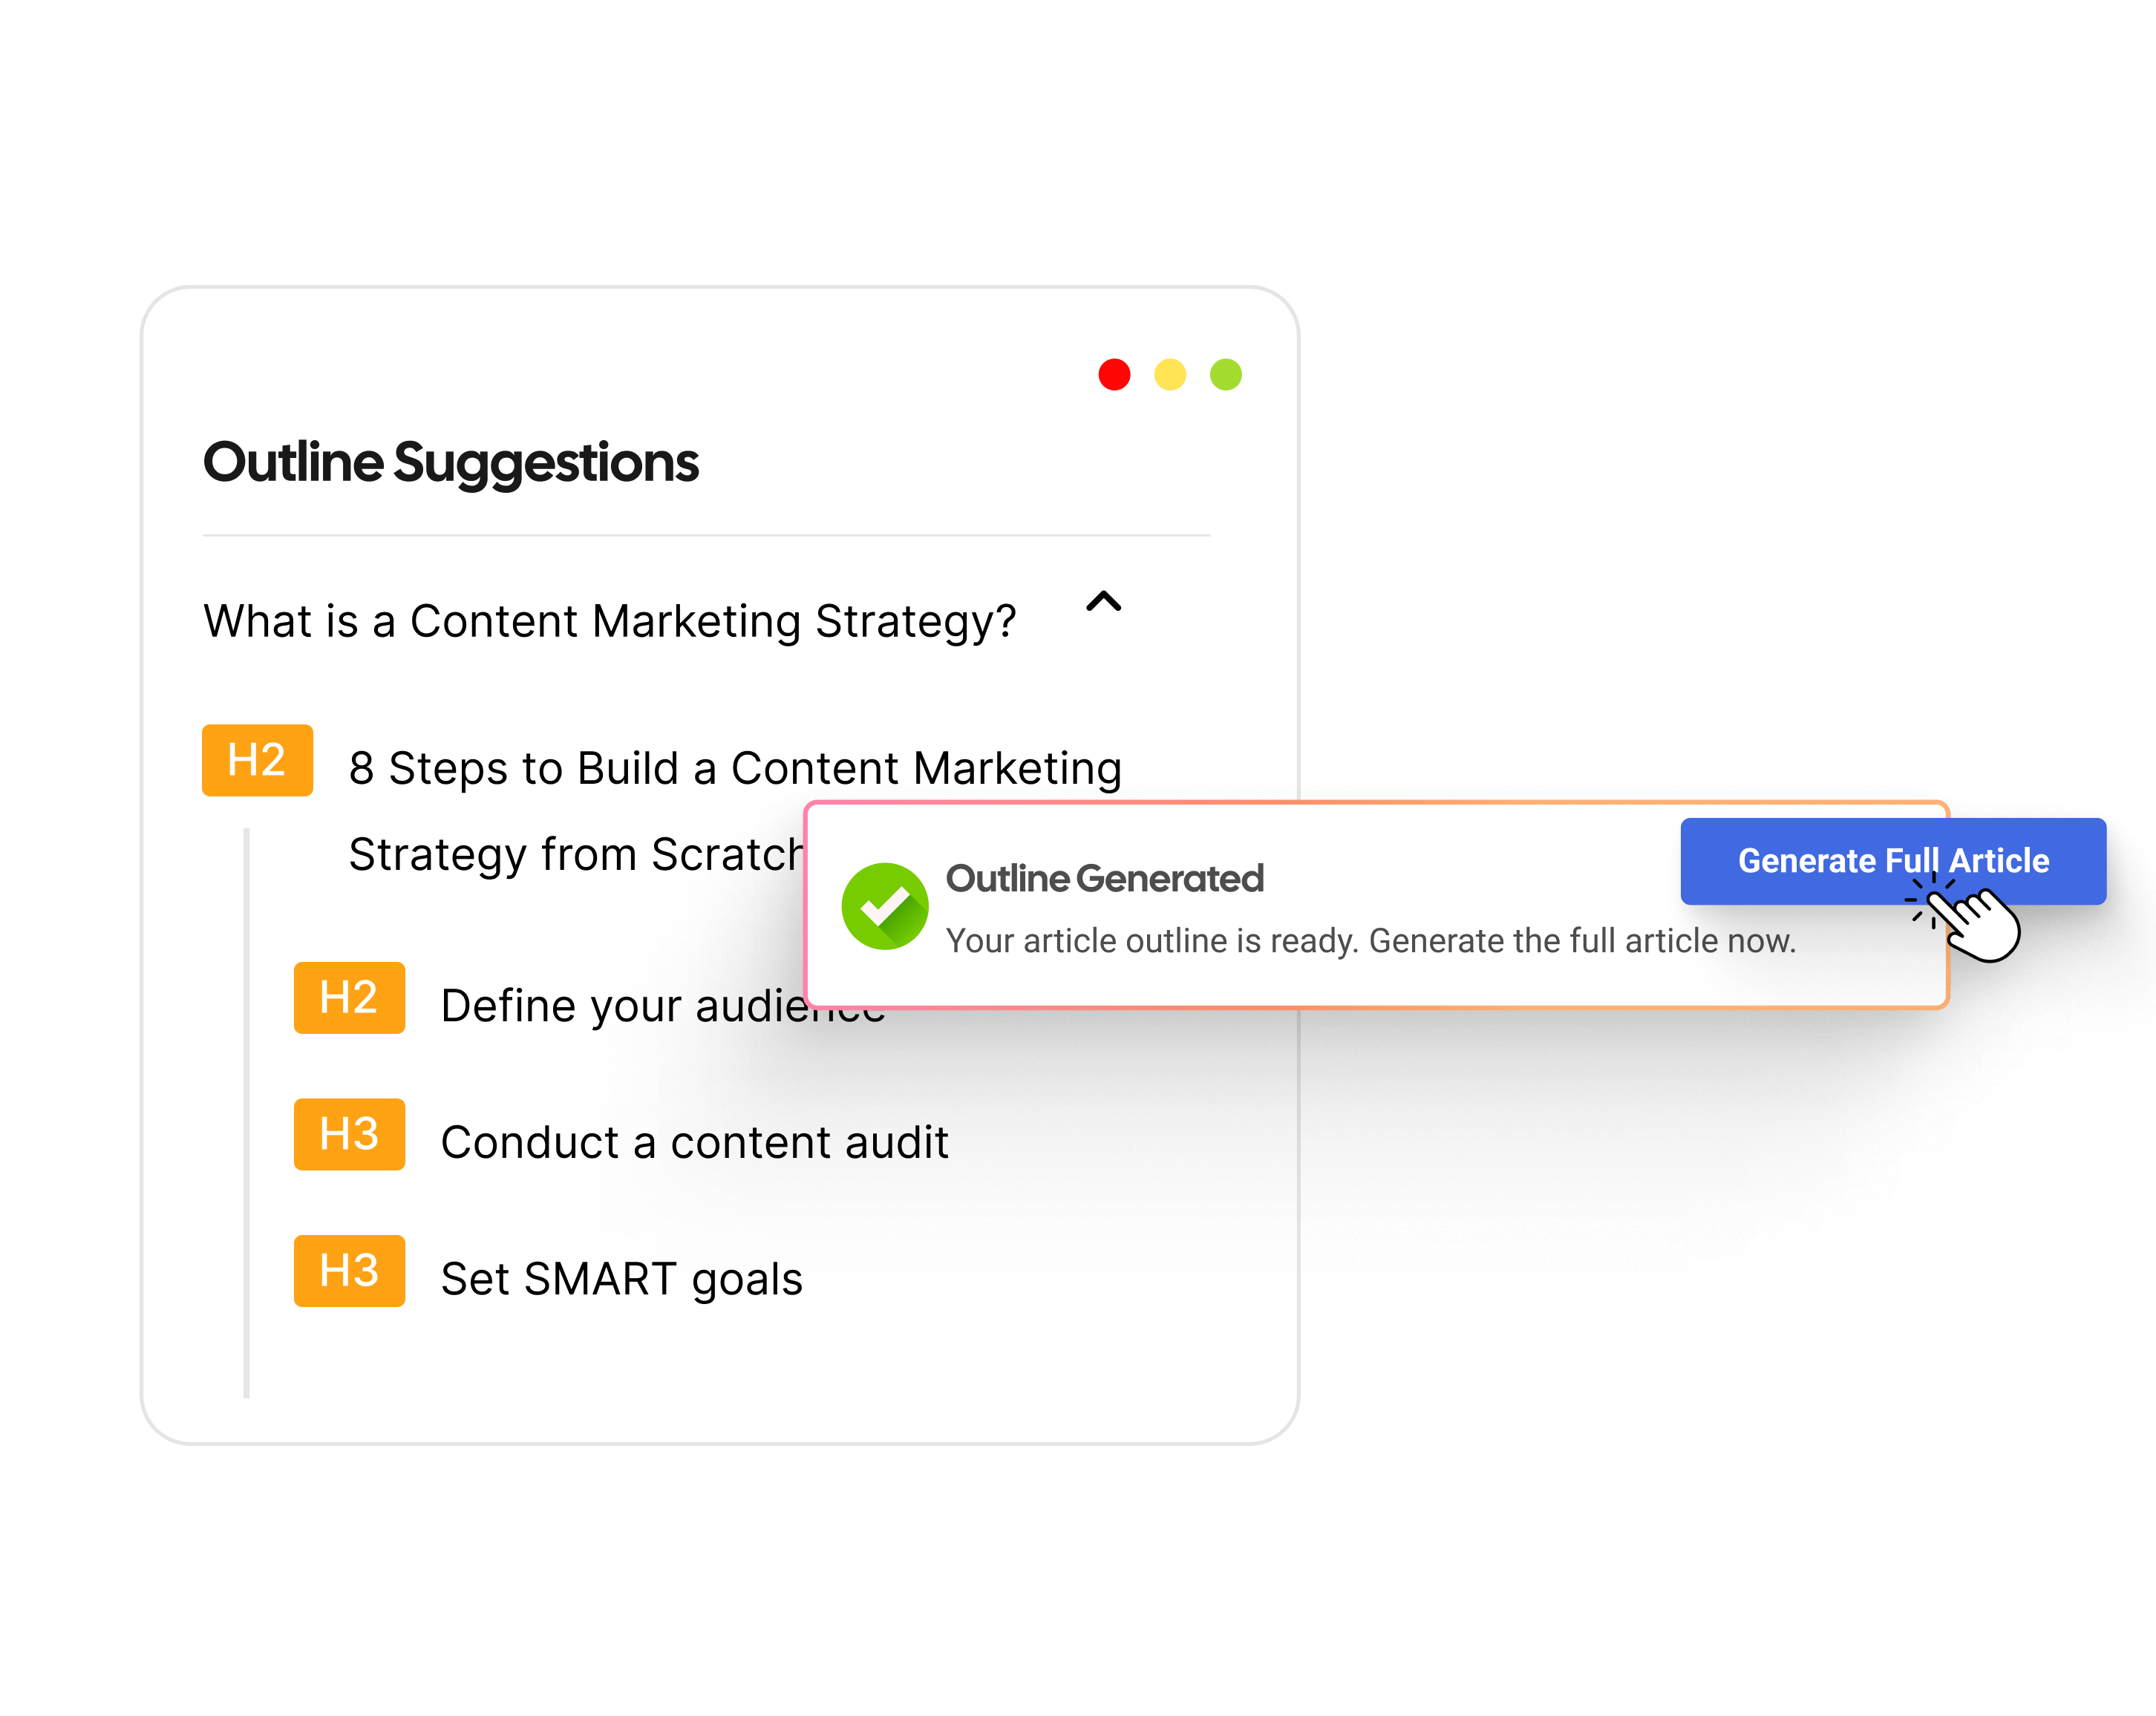
Generate an article in Two Steps: This template works in a two-step process: Contentpen will first create a blog outline, which you can edit or modify according to your needs, before generating the final article.
Refresh Existing Content: If you don’t want to start from scratch, you can also refresh content by adding angles missed by competitors to give you a ranking edge. This mode also generates relevant blog visuals to enhance audience engagement and CTR.
Add internal and external links: With this template, the AI blog writer only modifies the internal and external links in your existing content. However, before choosing this option, make sure you’ve set up the sitemap in Contentpen properly.
Start blank: If you don’t want to receive any AI-generated text and want the creative control yourself, you can start blank. During your write-up, you can take help from our ‘Ask AI’ assistant to refine the clarity and delivery of content.
Step 4: Customize your article settings
Contentpen offers 6 key customization categories to make the best possible blogs for your requirements.
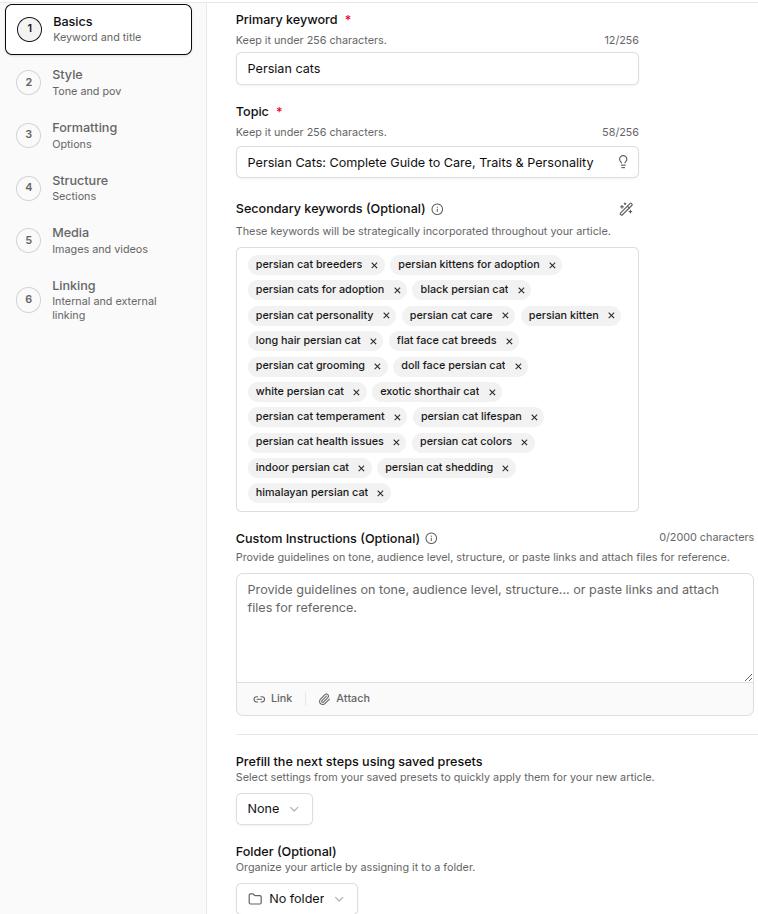
Basics – Add your primary keyword, topic, and secondary keywords, or use our integrated AI for help. Include any custom instructions if needed. Then, choose your Contentpen preset and the content folder before clicking ‘Next’ to proceed.
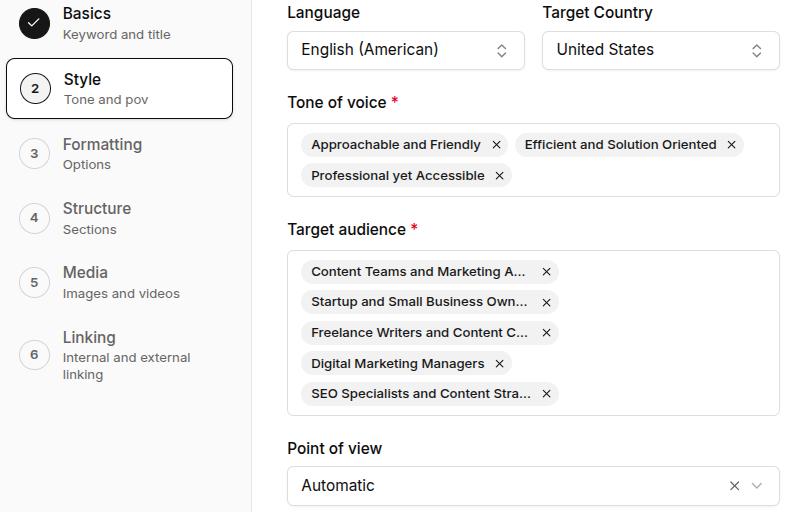
Style – Define the tone of voice, target audience, and point of view you want for your article. You can also choose from 50+ languages to write your article and multiple target countries for a better impact.
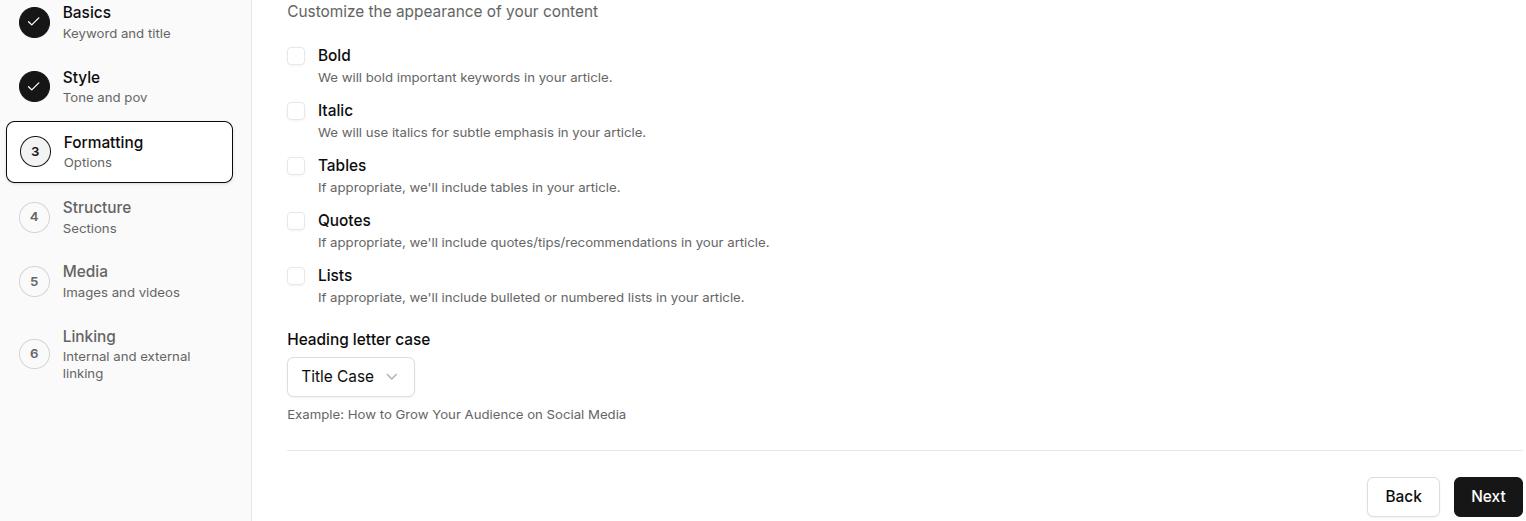
Formatting – Choose formatting options like bold, italics, tables, quotes, and lists for your content. Select the heading letter case before moving on to the next stage.
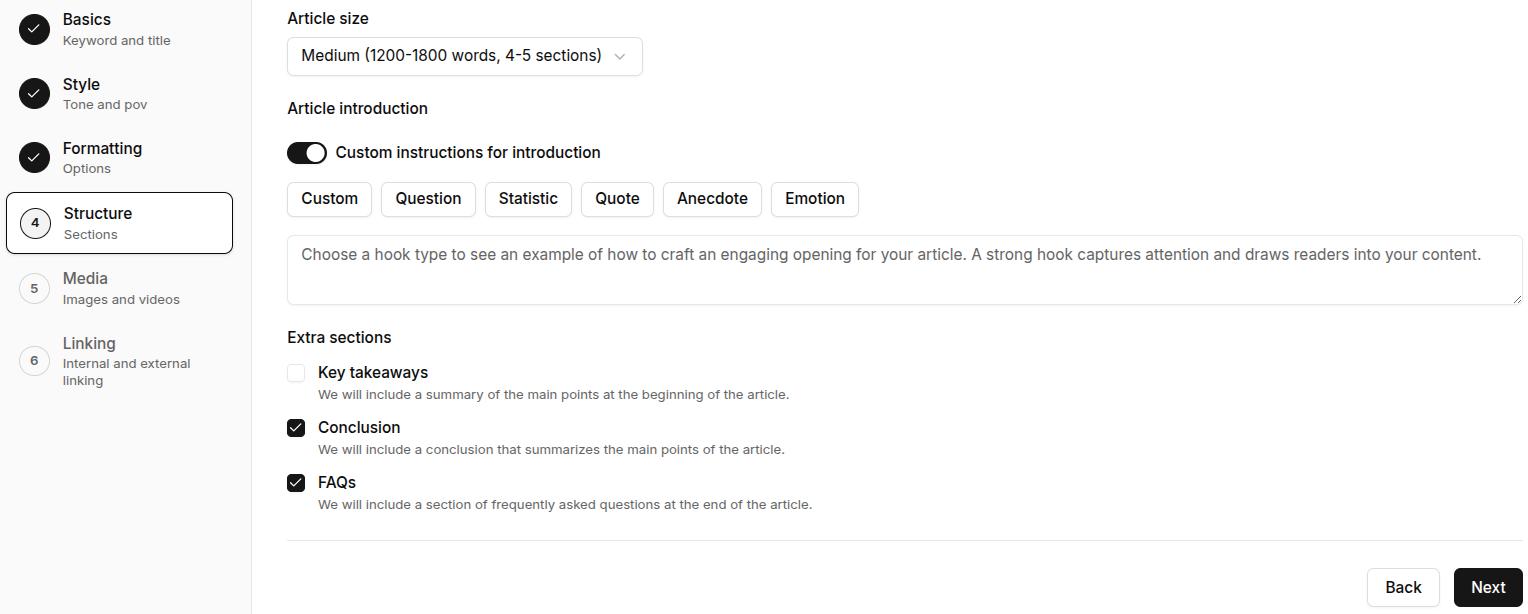
Structure – Set the article size (content length). Here, you can also give custom instructions for the article introduction. Finally, tick the extra sections needed in the blog, for instance, key takeaways, conclusions, and FAQs. Click ‘Next’ to proceed.
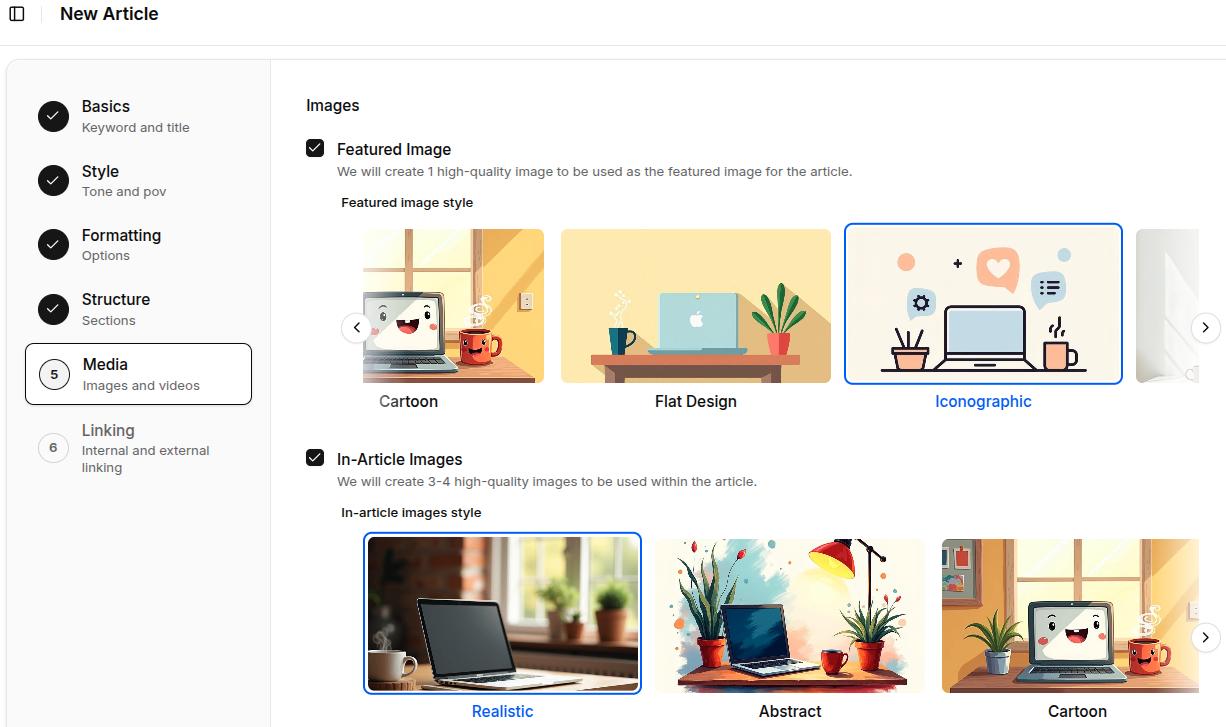
Media – Select the type of featured and in-article images you want generated for the article. You can choose between 12 different visual styles to make your content look exactly how you like.
Linking – At this screen, you can customize your internal and external links. Add your sitemap if you haven’t already to enable internal linking. Include or exclude domains that you don’t want to see as external links, or toggle them off entirely.
Pro tip: Use the ‘Test Sitemap URL’ button to double-check if Contentpen can access your site structure for effective internal linking.
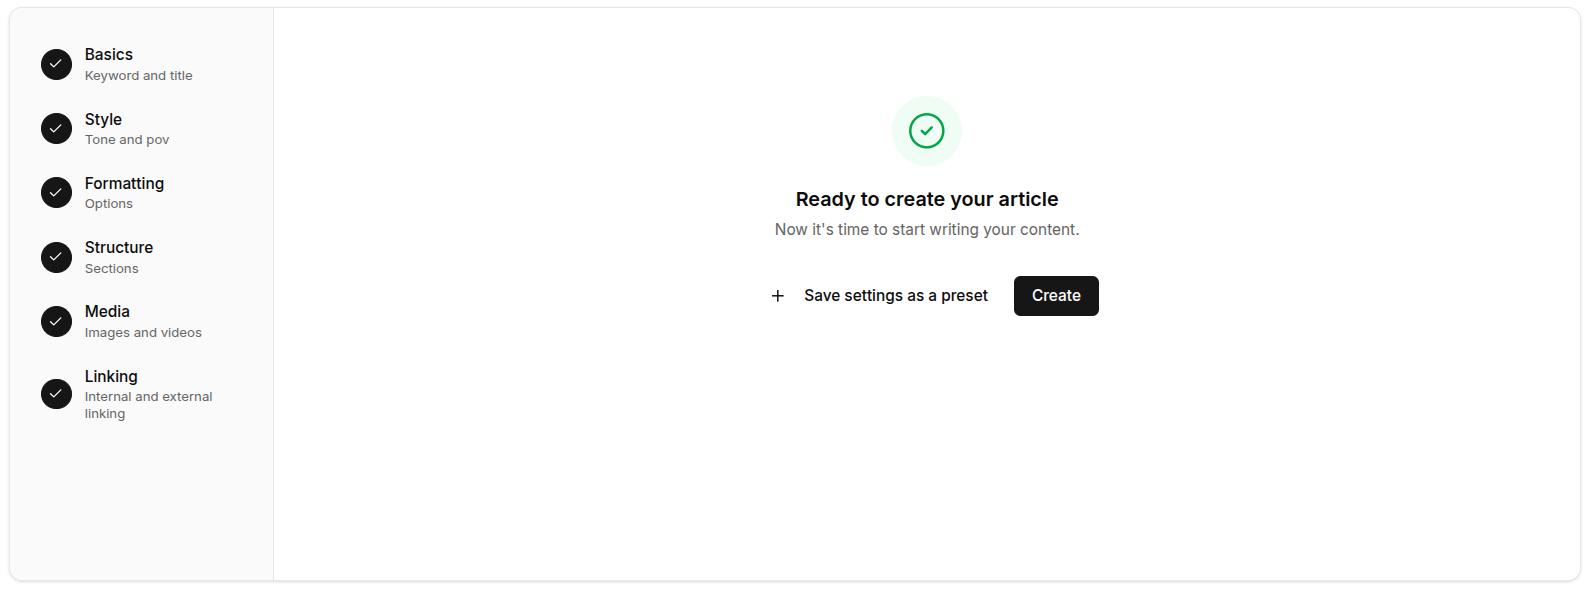
Step 5: Generate the article
After completing all the article settings, you may see the ‘Ready to create your article’ screen, where you’ll be asked to save your current settings as a preset or continue to create the article.
After you click ‘Create’, wait for a while until Contentpen is done processing your request. The time taken to complete processing depends on the type of content template and the length of the article selected.
Step 6: Review and optimize your article
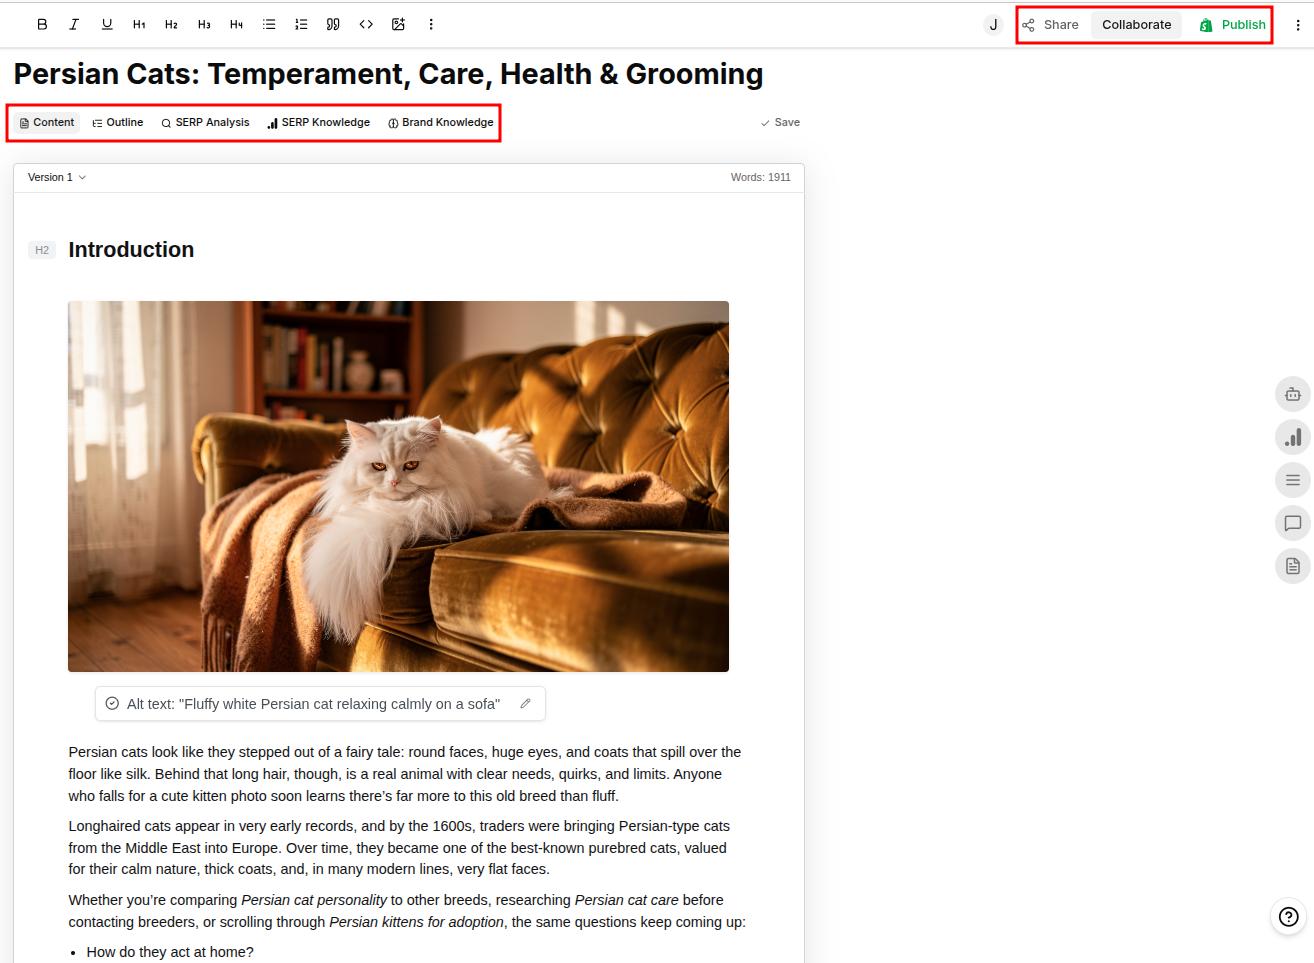
If you’ve closely followed all the steps so far, you’ll now see the tool’s output: a complete SEO- and GEO-optimized article.
Once Contentpen generates your article, do a quick review before publishing.
Check your SEO score by clicking the right-hand panel. Contentpen analyzes your meta title and description, keyword usage, readability, and linking strategy to flag what’s working and what’s not. Work through the suggestions to further enhance the SEO score.
Refine with Ask AI. If any section feels off, highlight it and use the ‘Ask AI’ assistant to rephrase, expand, or adjust it. You can also give it broader instructions like “make the introduction more conversational” or “shorten the conclusion.”
Review SEO article settings, including its metadata, slug, target keyword, audience persona, and editorial status.
Add comments in the blog to help your teammates understand your point of view for a particular angle and work together to further polish the article.
What are the best practices for using Contentpen efficiently?
To get the best results, provide clear input instructions to Contentpen. Provide relevant keywords that serve your purpose well, adjust the AI-generated content style and tone to your preference, and review the output once before publishing.
Is the content generated by Contentpen SEO optimized?
Yes, Contentpen ensures that every article is SEO and GEO optimized by satisfying search intents, reviewing competitors’ content, and integrating the right keywords and meta details.
Can I use Contentpen for multiple websites or projects?
Yes, you can create multiple workspaces to manage the content of different brands separately. Each workspace allows the AI to learn from past activities, ensuring improved performance and relevance over time.
What happens if I’m not satisfied with the content?
You can request revisions from the AI assistant or edit the content as needed. Contentpen also offers support to ensure the content meets your standards.
Can I go back to each article setting after publishing the content?
Yes. Contentpen enables you to go back and regenerate your article using different settings through its ‘Regenerate article’ feature.