Category: Blogging

Explore expert blogging guides, tips, and strategies to improve your writing, grow your audience, and master content creation.

  • How to write a business blog that earns trust and customers

    How to write a business blog that earns trust and customers

    Most business owners start a blog for one reason. They want more customers. Then, three posts in, they’re stuck writing about “industry trends” because that’s what they think a business blog is supposed to sound like.

    Learning how to write a business blog means treating content like a sales conversation you’re having with a stranger who hasn’t decided to trust you yet. You have to earn that trust with something useful before you ever ask for anything back.

    This guide walks through what a business blog actually is, how to pick topics your future customers are already searching for, and a simple structure for writing posts. You’ll also see where a tool like Contentpen speeds up the process for your convenience.

    So, let’s get into it, shall we?

    Key takeaways

    • A business blog is written to win customers for a specific company, and it succeeds or fails based on whether it answers real buyer questions.
    • Build your topic list from what customers actually ask you, not from generic industry keywords.
    • Use a simple Hook, Help, Handoff (H, H, H) structure for every post so it reads like advice, not a brochure.
    • Match your call to action to how close the reader is to buying, instead of pitching the same thing at the end of every post.
    • Treat AI tools as the first draft, then add your own numbers, opinions, and customer stories to make the post worth reading.

    What is a business blog?

    A business blog is a blog that a company publishes to attract, educate, and eventually convert potential customers. 
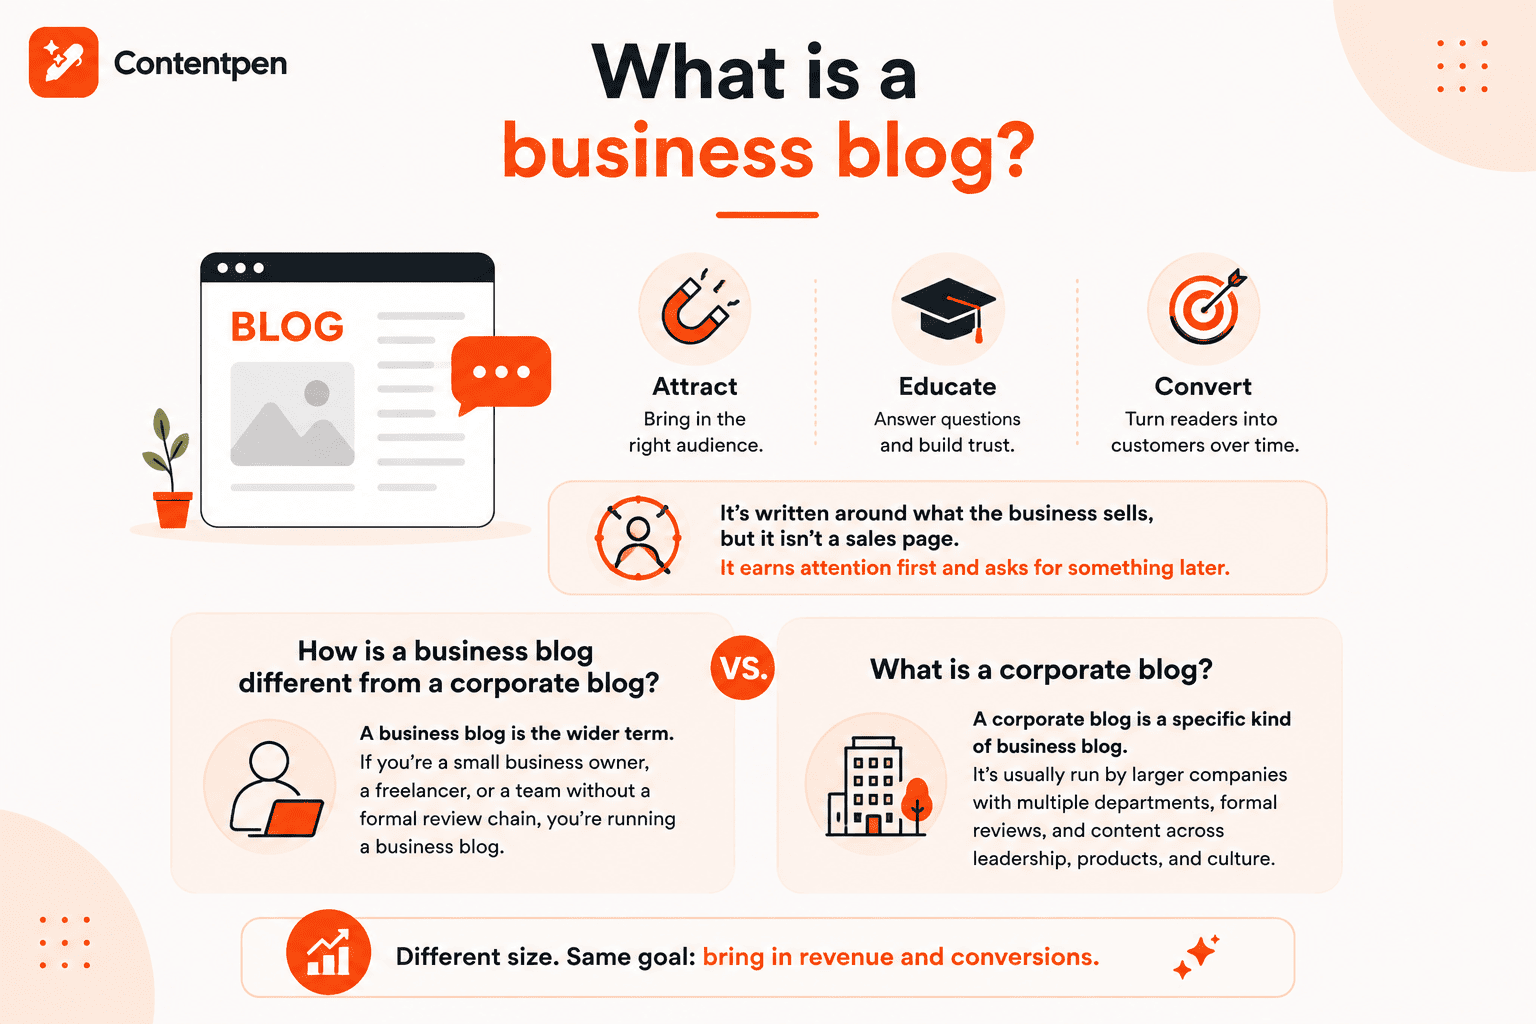
    Defining a business blog - Contentpen.ai.

    It’s written around what the business sells, but it isn’t a sales page. It earns attention first and asks for something later.

    That’s a broader category than it might sound. A one-person consultancy, a local service business, and a growing SaaS startup can all run a business blog. What they have in common isn’t size or industry. It’s that the blog exists to bring in revenue and conversions.

    How is a business blog different from a corporate blog?

    A corporate blog is a specific kind of business blog. It is usually run by a larger company with multiple departments, a legal or brand review process, and content split across thought leadership, product education, and company culture.

    A business blog is the wider term. If you’re a small business owner, a freelancer, or a team without a formal review chain, you’re running a business blog.

    The main goals a business blog usually serves

    Most business blogs are trying to do one or more of these things at once:

    GoalWhat it looks likeExample postExample blog
    Get found in searchRank for the questions your buyers type into Google“How much does [your service] cost in [city]?”How much does a locksmith cost in NYC?
    Build trust before the saleShow you know the problem better than a stranger would“The 3 mistakes we see most often with [problem].”3 common plumbing mistakes to avoid today.
    Answer questions your sales team is tired of repeatingTurn a common call question into a page you can link to“Do you offer [specific option]?”Do HVAC companies offer free estimates?
    Support existing customersReduce support load with a clear explainer“How to set up [feature] in under 10 minutes?”How to set up brand knowledge in Contentpen

    A single post can accomplish more than one of these tasks at once, but knowing which goal you’re writing toward before you start keeps the post focused.

    What a business blog actually does for your business

    A business blog works slowly. The first few posts rarely bring in leads on their own. What they do is build a library of pages that keep working for you long after you hit publish.

    Over time, that library becomes the reason a stranger finds you online and the reason an existing customer trusts your advice enough to buy the next thing you sell.

    Your business blog also does something your sales page can’t. It lets a reader get to know how you think before they’ve ever spoken to you. By the time they fill out a contact form, they’ve often already decided that you’re the right fit for their needs.

    That’s a very different kind of lead than one who found you cold from an ad.

    Writing a business blog step by step
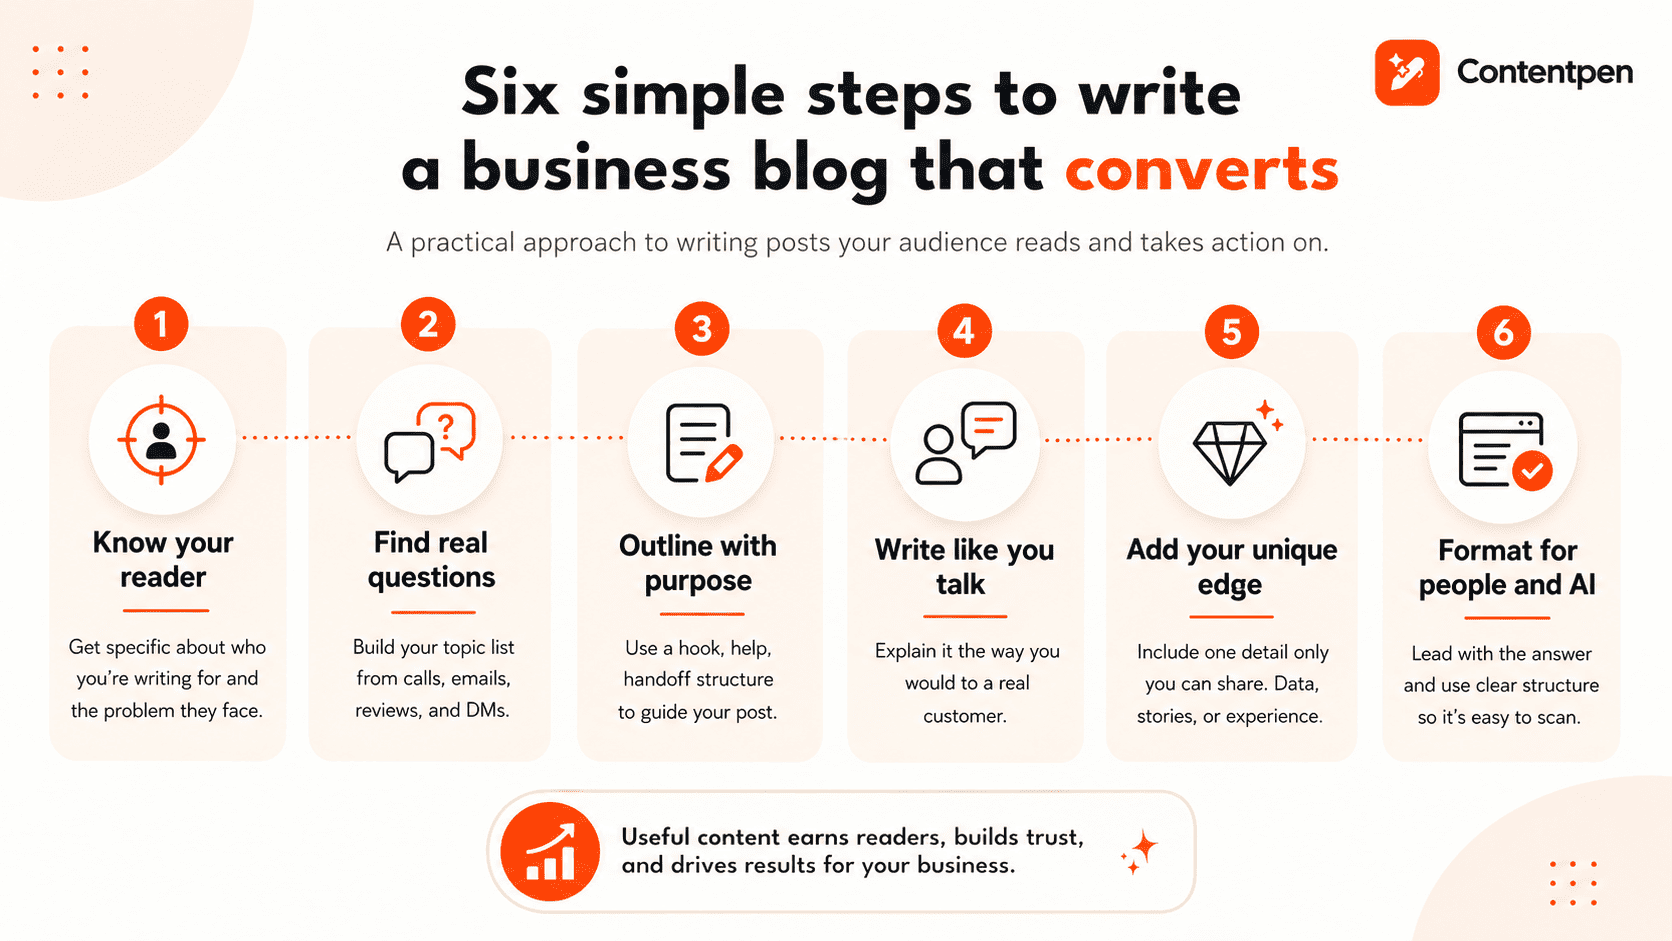
    Six steps to write a business blog in 2026.

    Business blog post writing actually comes down to six steps, and none of them require a content team to pull off.

    #1: Get specific about who you’re writing for

    Before you write anything, name the exact kind of customer this post is for. Not “small business owners” broadly, but something closer to “a restaurant owner who’s been putting off building a website for two years.”

    The more specific the reader, the easier it becomes to write something that feels like it was written just for them. This is exactly what makes a stranger stop scrolling and start reading.

    If your business serves more than one kind of customer, that’s fine. Just pick one reader per post instead of trying to speak to everyone in the same 1,000 words.

    #2: Build your topic list from real customer questions

    The fastest way to find business blog topics that actually convert is to stop guessing and start listening.

    Go through the last few weeks of:

    • Sales calls and discovery calls
    • Support tickets or emails
    • Reviews, both good and bad
    • Questions people ask in your DMs or comments

    Every recurring question in that list is a blog waiting to be written. Posts written on such query-based topics usually convert better than generic keyword-based topics because it mirrors an actual buying conversation.

    Once you have a running list, run each topic through a quick search to see if people are searching for it the way you’d expect. Check what’s already ranking. 

    If you want a longer list of starting points, our blog post ideas guide has more prompts to pull from. It pairs well with a quick look at how to start a blog if you haven’t published your first post yet.

    #3: Outline with a Hook, Help, Handoff (H, H, H) structure
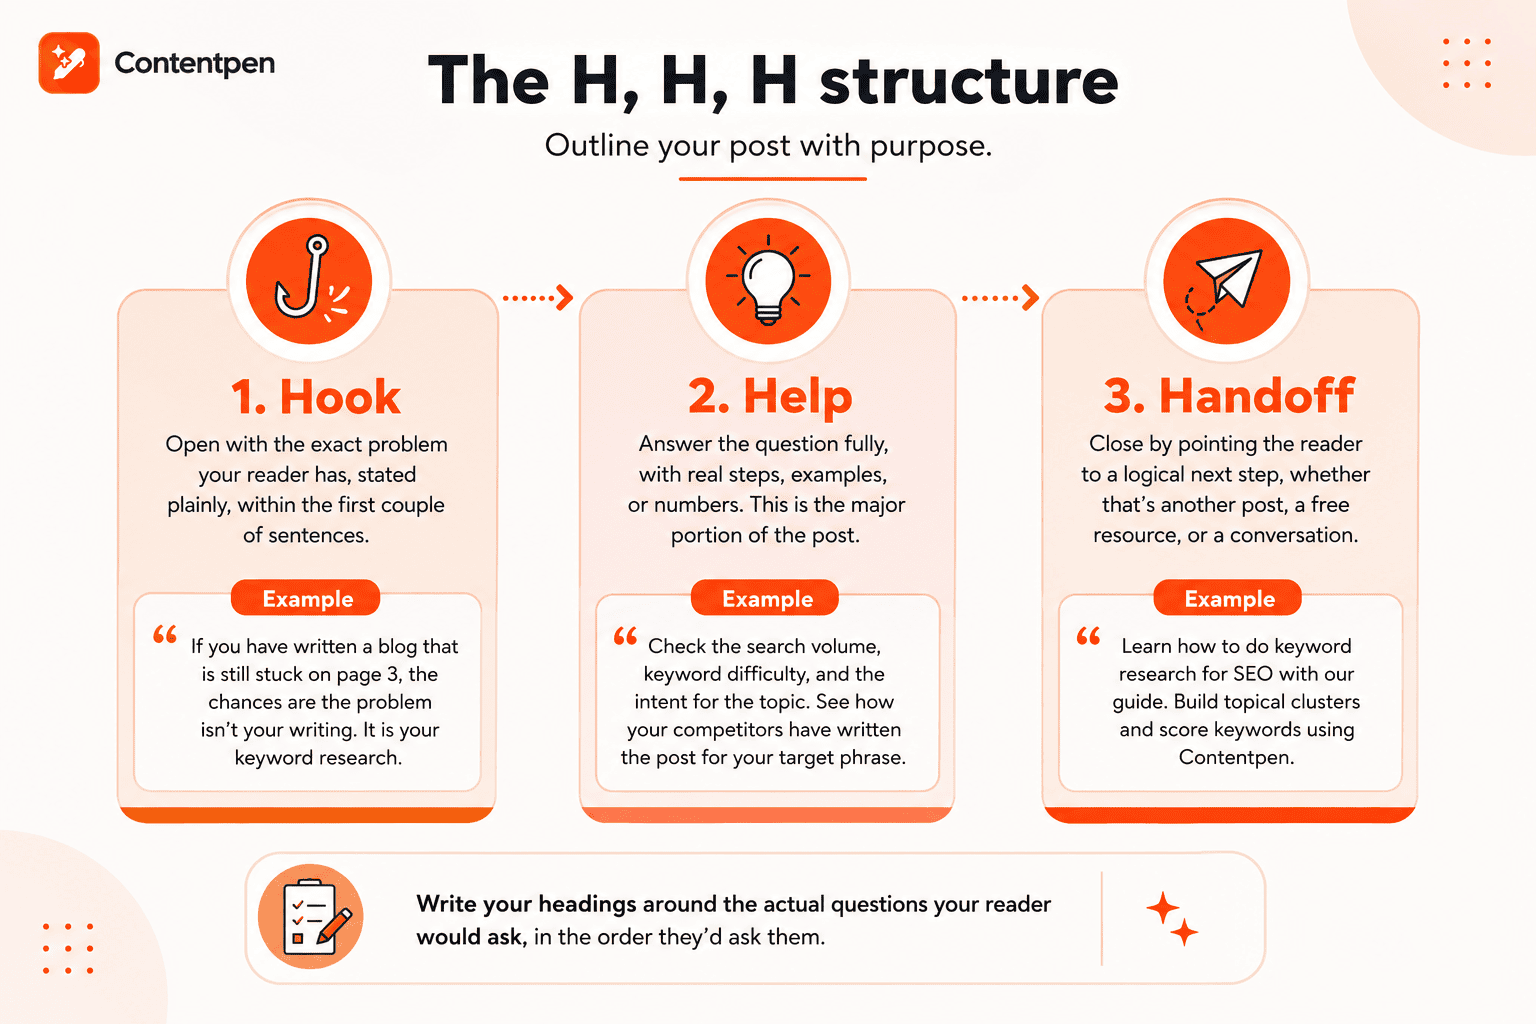
    The H, H, H (Hook, Help, Handoff) structure to create better content - Contentpen.ai.

    A business blog post has three real jobs, and a simple structure keeps you from losing track of any of them while writing.

    • Hook: Open with the exact problem your reader has, stated plainly, within the first couple of sentences. 

    Example:  “If you have written a blog that is still stuck on page 3, the chances are the problem isn’t your writing. It is your keyword research.”

    • Help: Answer the question fully, with real steps, examples, or numbers. This is the major portion of the post, and it should be genuinely useful even if the reader never buys anything from you. 

    Example: “Check the search volume, keyword difficulty, and the intent for the topic. See how your competitors have written the post for your target phrase.”

    • Handoff: Close by pointing the reader to a logical next step, whether that’s another post, a free resource, or a conversation with your team. 

    Example: “Learn how to do keyword research for SEO with our guide. Build topical clusters and score keywords using Contentpen.”

    Write your headings around the actual questions a reader would ask as they move through the post, in the order they’d ask them. If you get stuck structuring a post from scratch, check out our post on how to write a blog post that covers the basics of outlining and drafting in more depth.

    #4: Write it the way you’d actually explain it to a customer

    The biggest tell that a business blog post was rushed or auto-generated is that it sounds like nobody. No opinion, no specific detail, just safe, general advice that could belong to any business in the category.

    Picture the last time a customer asked you this exact question in person, and write the post close to how you actually answered. 

    If you run a bakery and someone asks why your sourdough takes three days, you probably don’t say “our proprietary process ensures optimal fermentation.” You say something like “we let the dough rest overnight twice because rushing it makes the crust chewy instead of crispy.”

    That second version is the one worth publishing. It sounds like a person who actually does the work, not a brochure written to avoid saying anything specific.

    #5: Add one detail a competitor’s post couldn’t copy

    Generic advice is everywhere, including in whatever an AI tool would produce on the same topic with no input from you. What makes a business blog post worth reading is the detail that only you could add.

    That could be a real number from your own business:

    • How long does a project actually take
    • What a typical client spends
    • How many revisions does a project usually need
    • A specific customer success story
    • An honest opinion on something most posts in your industry avoid.

    This is also the detail that tends to get pulled into AI-generated answers and AI Overviews, since those systems tend to favor sources with something specific to cite.

    #6: Format so both people and AI search can scan it fast

    Readers skim before they commit to reading, and AI answer engines do something similar when they’re deciding what to cite.

    Give the direct answer to the post’s main question within the first 100 to 150 words. Then, use short paragraphs, clear subheadings, and the occasional table or numbered list to break up the rest of the text. See how to format a blog post guide for a deeper look.

    Formatting isn’t just a nice-to-have for your content. It is mandatory now, especially since the rise of AI Overviews and AEO practices in the industry. A post that buries its answer under three paragraphs of fluff loses both a skimming reader and a shot at getting cited by an AI search tool.

    Business blog post types to know in 2026

    You don’t need to reinvent the format every time you sit down to write. A handful of post types cover almost everything a business blog needs to say.

    Post typeWhat is it forExample titleExample blog
    How-to guideWalks a reader through solving a specific problem“How to prep your home for a spring photo shoot”How to write a blog post on Shopify.”
    ListicleGroup practical tips or options in a scannable format“7 questions to ask before hiring a [service].”7 questions to ask before hiring a lawyer.
    Customer storyProve your work through a real result“How we cut [client]’s [metric] in 90 days”How we saved Go Smart Mortgage $1000+ per month.
    Comparison postHelps a reader choose between two real options“[Option A] vs [Option B]: Which one fits your situation”Contentpen vs. Jasper: Which is better for blog writing?
    FAQ or explainerAnswers a question your sales team gets constantly“What’s actually included in [your service]?”What is actually included in a Carnival Cruise Line fare?
    Opinion or takeShares a genuine, slightly contrarian view on your industry“Why we stopped recommending [common practice].”Why we stopped recommending STEM OPT.

    Rotating through these formats keeps the blog from feeling repetitive. It also gives you a place to cover almost any topic from your research without forcing it into the wrong shape.

    How to turn business blog readers into customers
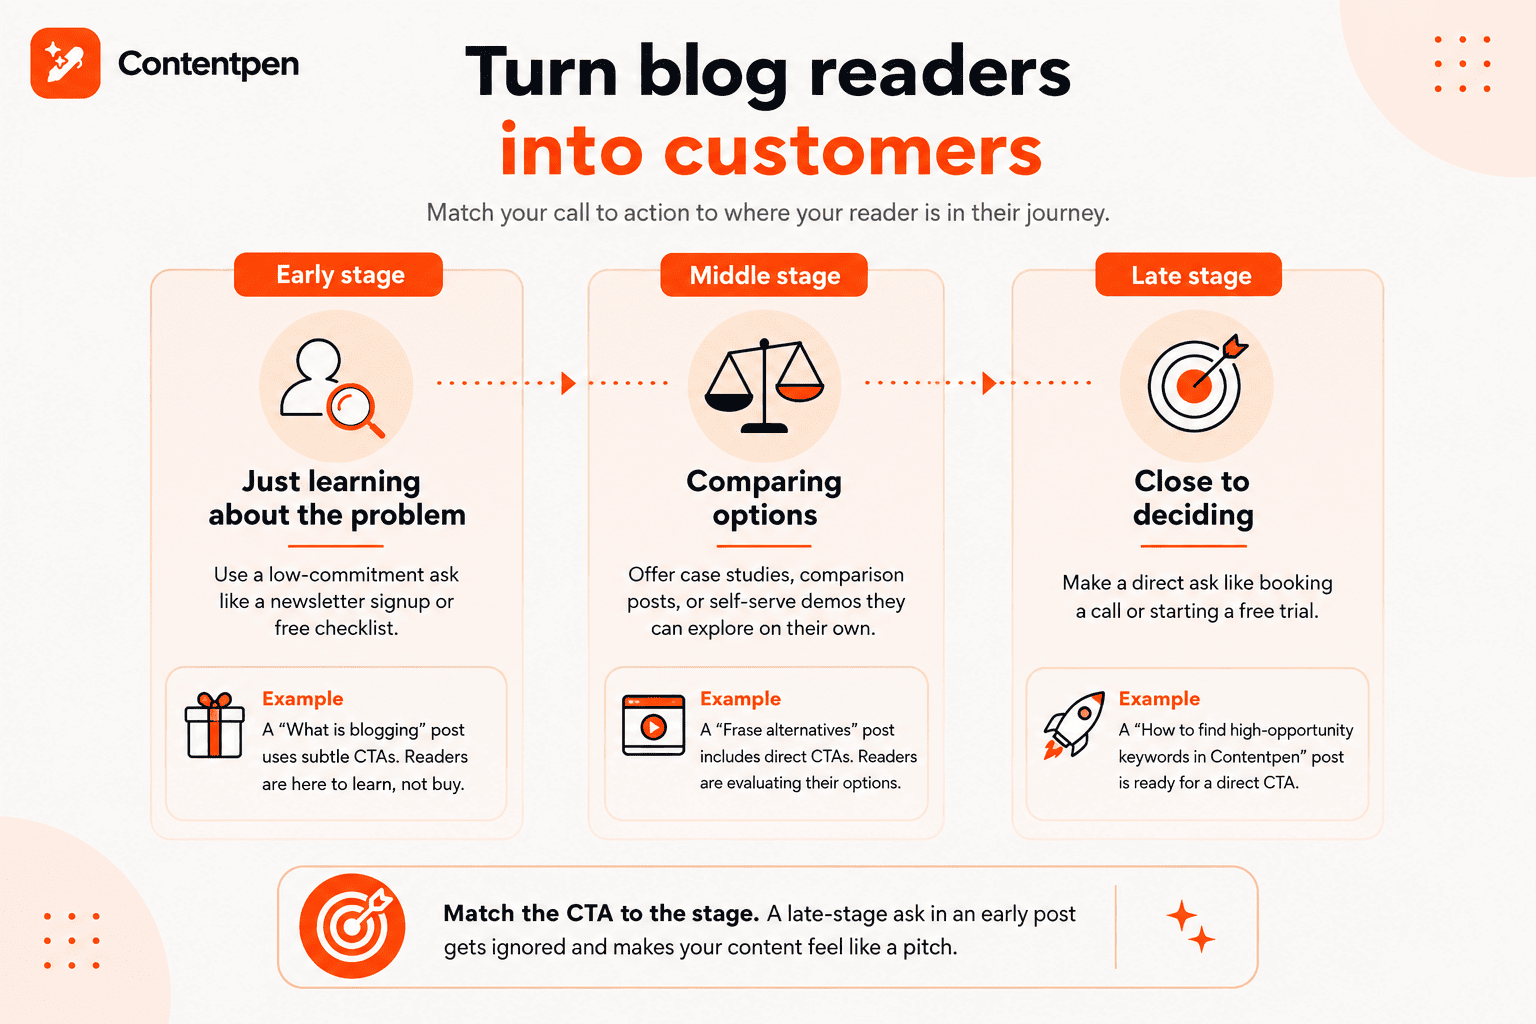
    Turning business blog readers into customers.

    A business blog post can rank well and still bring in zero customers if the call to action doesn’t match where the reader actually is in their decision.

    Someone reading an introductory “what is” style post isn’t ready to book a call yet. Someone reading a detailed comparison or pricing post usually is.

    A simple way to think about it is this:

    • Early-stage readers (just learning about the problem) respond better to a low-commitment ask, like subscribing to a newsletter or downloading a free checklist.

    Example: A business blog like ‘What is blogging’ is a simple explainer that will use subtle calls to action, but no pushers, since the audience is only here to learn. They don’t trust you well enough for a direct action right now.

    • Middle-stage readers (comparing options) respond well to a case study, a comparison post, or a demo they can watch on their own time.

    Example: You can place some direct CTAs in a blog like ‘Frase alternatives’, since it will contain some head-to-head comparisons of the best AI blog writer tools, and the user is close to an action.

    • Late-stage readers (close to deciding) respond to a direct ask, like booking a call or starting a free trial.

    Example: A user reading a post like ‘How to find high-opportunity keywords in Contentpen’ is either already committed or about to commit to the platform. They just need a push in the right direction. Therefore, it is okay to be direct in your CTAs here.

    It is important to match your CTA to the stage of the post you wrote. A late-stage ask dropped into an early-stage post usually gets ignored, and it can make the post feel like a pitch instead of help.

    Write posts that are built to convert from the outline stage

    • Get outlines structured around search intent and funnel stage
    • Draft, optimize, and publish from one place

    From outline to publish-ready content that fills them

    check

    Structured

    check

    Consistent

    check

    SEO-aligned

    check

    Fast

    Generate Outlines FREE
    AI SEO Interface

    What to do after you hit publish?

    Publishing is not the finish line. A great business blog post website that nobody sees doesn’t bring in a single customer.

    Share it where your actual customers already spend time. That might be a relevant Facebook group, a LinkedIn post written in your own words, or an email to your existing list. 

    If you run ads, a strong post is also worth testing as a landing page or a retargeting touchpoint.

    Give your sales and support teams a heads-up, too. 

    A well-written post that answers a common question is often the fastest way to close a lead who’s still on the fence. It also saves your team from typing out the same answer for the hundredth time.

    Business blog content also goes out of date faster than people expect. Prices, offers, and even your own advice can shift within a year. 

    Therefore, it is important to set a simple reminder to revisit your best-performing posts every few months and update anything that’s gone stale.

    Business blog examples worth studying

    A few business blog post examples are worth studying regardless of your industry, because they solve the same problem in different ways.

    #1: Buffer
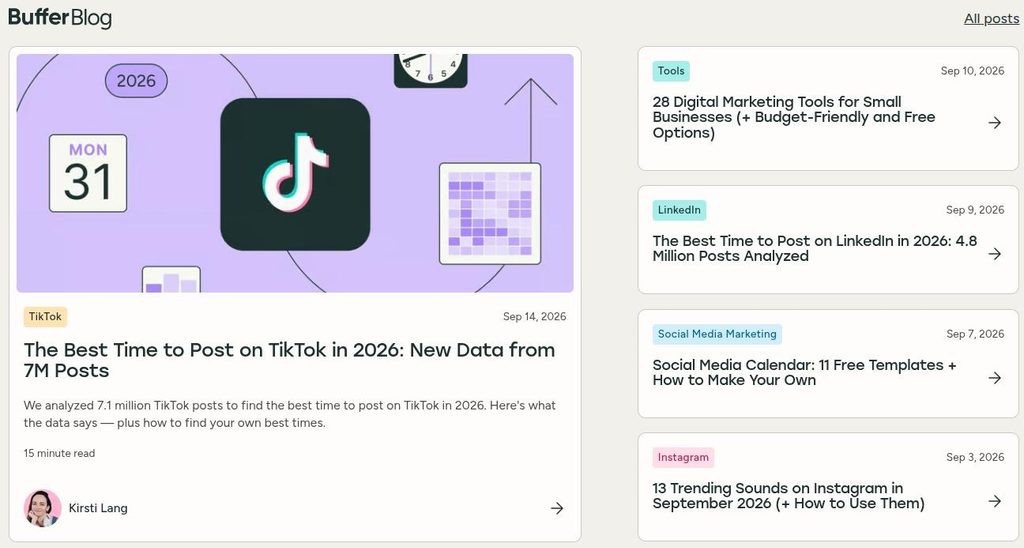
    Buffer blog page.

    Buffer’s blog mixes practical social media advice with an unusually candid look at how the company itself operates, including its approach to remote work and transparency. It reads like a team that actually believes what it’s writing, not a brand voice reciting talking points.

    #2: Beardbrand

    Beardbrand blog.

    Beardbrand, a small grooming products company, built its blog and video content around genuinely useful grooming advice long before it tried to sell anything. The content earned trust first, and the conversions followed.

    #3: Mailchimp

    Mailchimp blog posts.

    Mailchimp’s resource content stays focused on the actual questions a small business owner has about marketing, even when the answer doesn’t point straight back to Mailchimp’s product. That restraint is part of why the content works.

    What all three blogs have in common is that none of them read like they were written to hit a keyword quota. They were written with a clear audience in mind and with perfect details and formatting that readers and search engines (including AI chatbots) love to cite.

    If you want a wider set of blogs to read, check out our roundup of strong blog examples that covers a broader range of styles across industries.

    How Contentpen helps you run a business blog without a content team
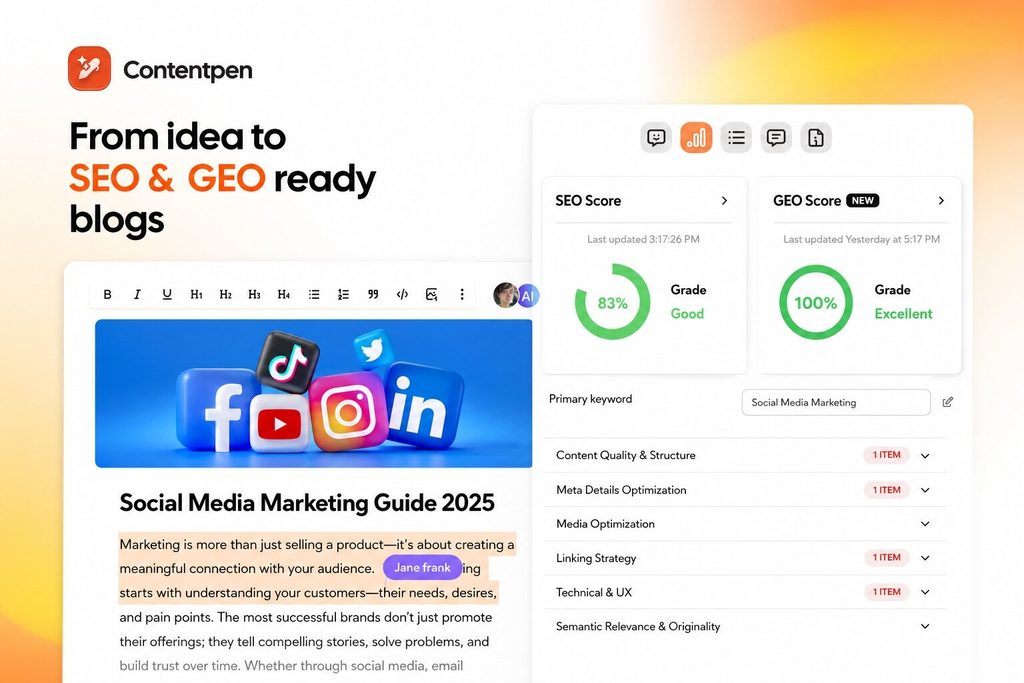
    Contentpen for SEO and AI-optimized blog posts.

    Contentpen is an AI-powered blogging system that automates finding real topics, outlining around search intent, formatting, writing, optimizing, and publishing your content. It saves your time in performing repetitive tasks, so that you can focus on the strategy part of your business. 

    Turning customer questions into a real content plan

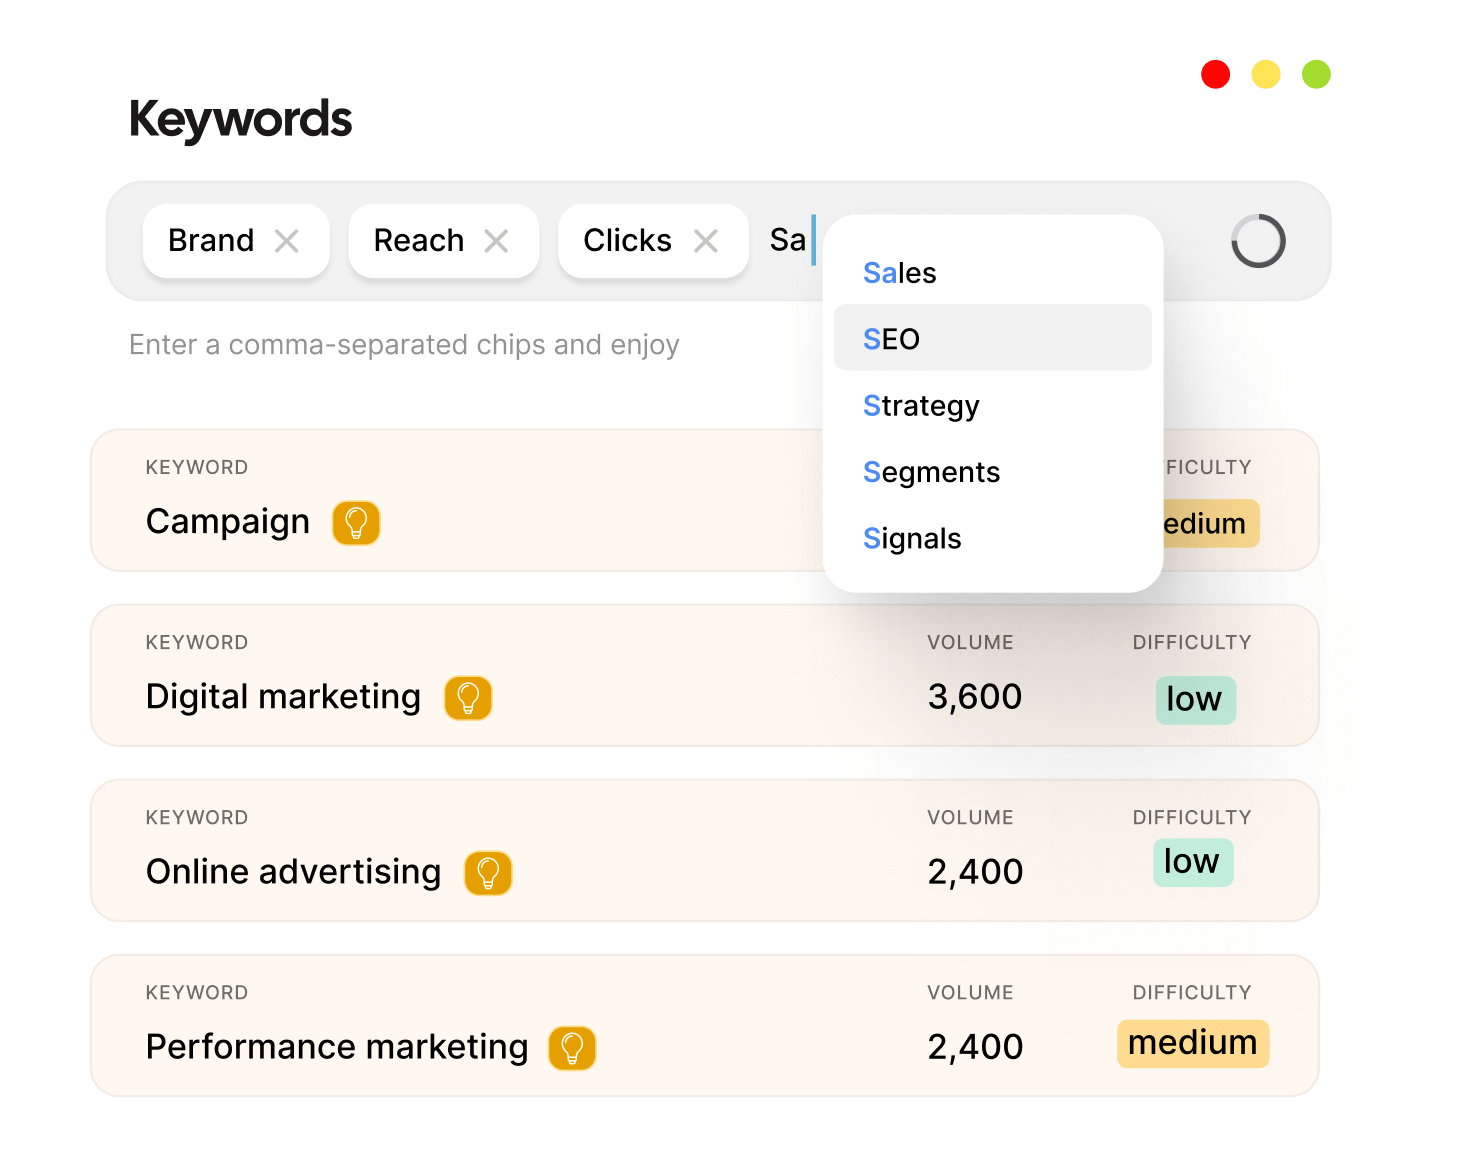
    Contentpen’s keyword research pulls in search volume, difficulty, and CPC metrics for the topics you feed it. So, you can take the list of questions your customers actually ask and quickly check which ones are worth writing first. Then, compile them into clusters to create a content plan.

    Create topical authority, not isolated posts that fills them

    check

    Group related content into SEO-friendly clusters

    check

    Strengthen rankings with internal relevance
    Try Topical Clustering
    AI SEO Interface

    SERP and gap analysis in real-time

    Contentpen’s SERP and gap analysis tool helps flag content gaps before you commit to a draft. It creates outlines for you that help you outrank your competitors for more reach and visibility.

    Drafting, optimizing, and publishing from one place

    Once you know what to write, Contentpen can generate a full draft and then score the post for SEO and AEO readiness before it goes live.

    Contentpen helps businesses and enterprises achieve more with less. It collapses the entire research, outline, draft, format, and publishing process into a single-click pass. Check out our SEO autopilot for more details.
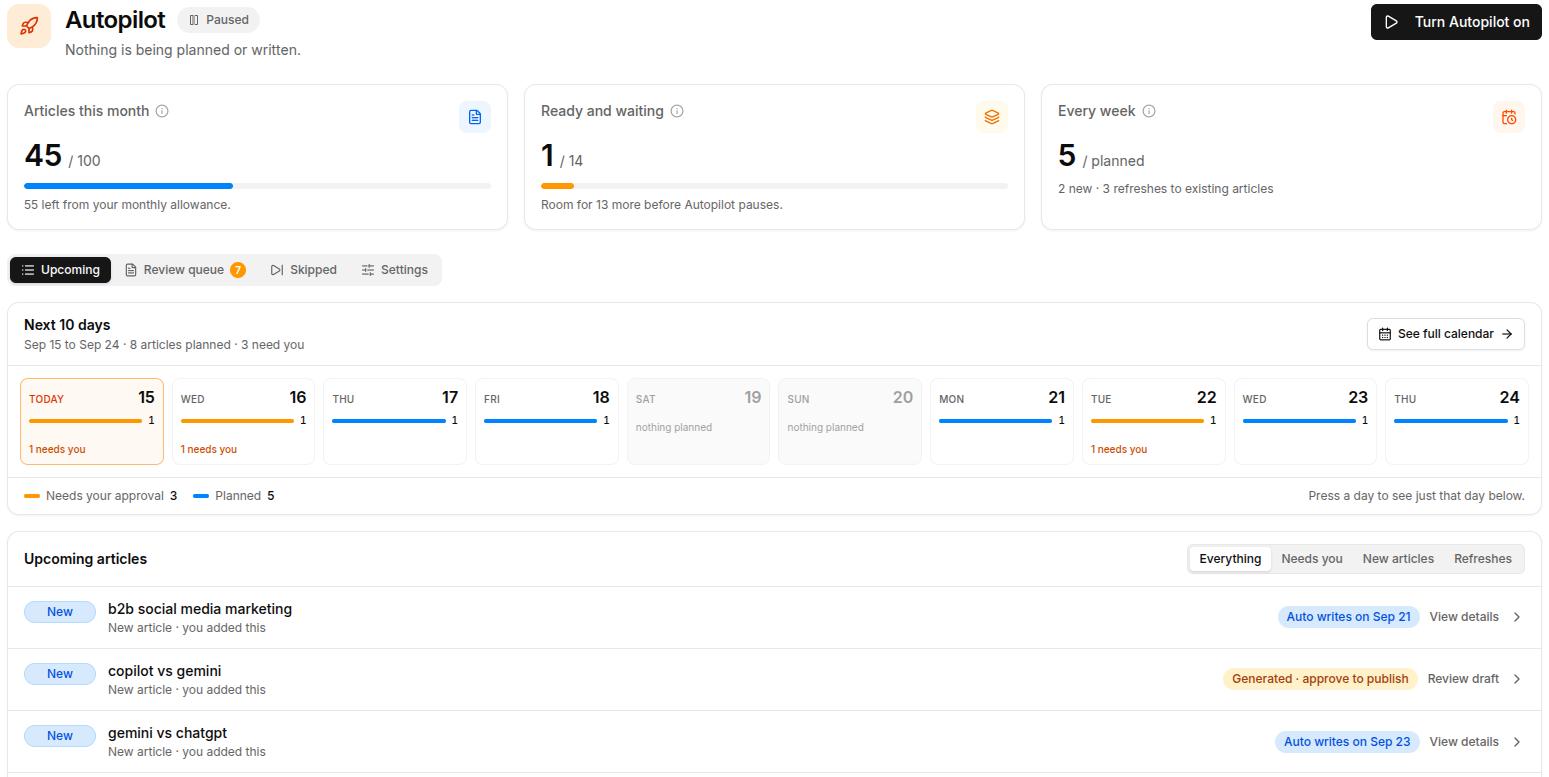
    Contentpen SEO autopilot feature.

    Final thoughts

    A business blog is essential to answer the questions your future customers are already asking, in a voice that sounds like a real person who does the work. 

    Unlike corporate blogs, business blogs don’t need a big team, a formal review process, or a huge budget to work. It needs consistency, a real understanding of who you’re writing for, and at least one detail per post that only your business could add.

    For the next steps, start with the questions your customers ask you every week. Pick one, write it using the Hook, Help, Handoff (H, H, H) structure we discussed earlier, and see how it performs before scaling up. 

    Use Contentpen to see performance post-publishing and to handle the repetitive writing, optimizing, and publishing tasks for you on autopilot.

    Frequently asked questions

    What are the four types of blogs?

    Most guides split blogs into four broad types: personal blogs, business or corporate blogs, niche blogs, and news or editorial blogs.

    How long should a business blog post be?

    There’s no fixed word count that works for every topic. A quick FAQ-style answer might only need 500 words to fully answer the question, while a detailed how-to guide or comparison post often needs 1,500 words or more to cover the topic properly.

    How often should a business post new blog content?

    Consistency matters more than frequency. Publishing one well-researched post a week on a predictable schedule outperforms publishing two rushed posts a day and going silent for the next two. Pick a pace you can realistically sustain and build from there.

    Is a business blog worth it for a very small company?

    Yes, often more so than for a large one. A small business blog can answer hyper-specific local or niche questions that a bigger competitor’s generic content won’t bother covering. This makes it easier to rank and sound like a real person instead of a brand.

    How much money can you make per 1,000 views?

    Google AdSense typically pays $3 to $12 per 1,000 pageviews. However, a business blog is built for leads and sales rather than ad revenue. That said, if earning directly from content is the actual goal, then learn how you can earn money from blogging on this blog.

    Do I need to be a good writer to run a business blog?

    No. You need to know your customers and your business better than anyone else does, which is the part AI tools can’t do for you. The actual writing, structure, and polish can be handled with the right blogging system, like Contentpen, and a decent final editing pass done by a human.
  • How to write a blog on Facebook: Easy step-by-step guide

    How to write a blog on Facebook: Easy step-by-step guide

    There was a time when blogging required a website domain and hosting to start. Now, all you need is your Facebook account to get started.

    According to DataReportal, the USA alone had 254 million social media users in late 2025. This number indicates the massive potential for small businesses to earn online visibility and traction through Facebook and other Meta platforms.

    Learning how to write a blog post on Facebook comes down to a handful of moves. You create a dedicated Page instead of using your personal profile, fill in your bio and visuals, then use the “What’s on your mind” box to write a post.

    From there, you schedule future posts, add photos or videos, and reply to the people who show up in your comments. 

    In this guide, we’ll walk you through every one of those steps in order. We’ll also see how a tool like Contentpen can speed up the entire process for your convenience.

    Key takeaways

    • Set up a dedicated Facebook Page, not your personal profile, and choose the “Blogger” category so readers can find your content easily.
    • Write posts with a clear subject, strong headline, hook, problem, and takeaway, prioritizing brevity of the copy to drive more engagement.
    • Schedule posts through Meta Business Suite so your Page stays active and consistent even on days you’re not online.
    • Promote new posts on Instagram, LinkedIn, Pinterest, and YouTube, then check Insights regularly to see what your audience actually responds to.
    • Tools like Contentpen can draft a full blog post in minutes, which you can then trim into a shorter, punchier Facebook update and publish automatically.

    What is blogging on Facebook?

    Blogging on Facebook follows the same principles as blogging on a website: you choose a topic, write helpful content, and share it with your audience online. It is a good way to start expanding your social media presence without any cost.

    However, you may not have the same control over your blog pages on Facebook as you’d have with your blog pages on your site. 

    There are limited designs you can choose from on Facebook, and the space is rented to you by Meta. Meaning, their algorithm, rules, and term changes can affect your ability to appear in front of your audience directly.

    But, all things considered, starting to write blogs on a Facebook Page is not an all-out bad idea. You can write for free and even earn from your blogs later once your engagement signals grow to a significant threshold (more on this later).

    How do you set up a Facebook page for your blog?

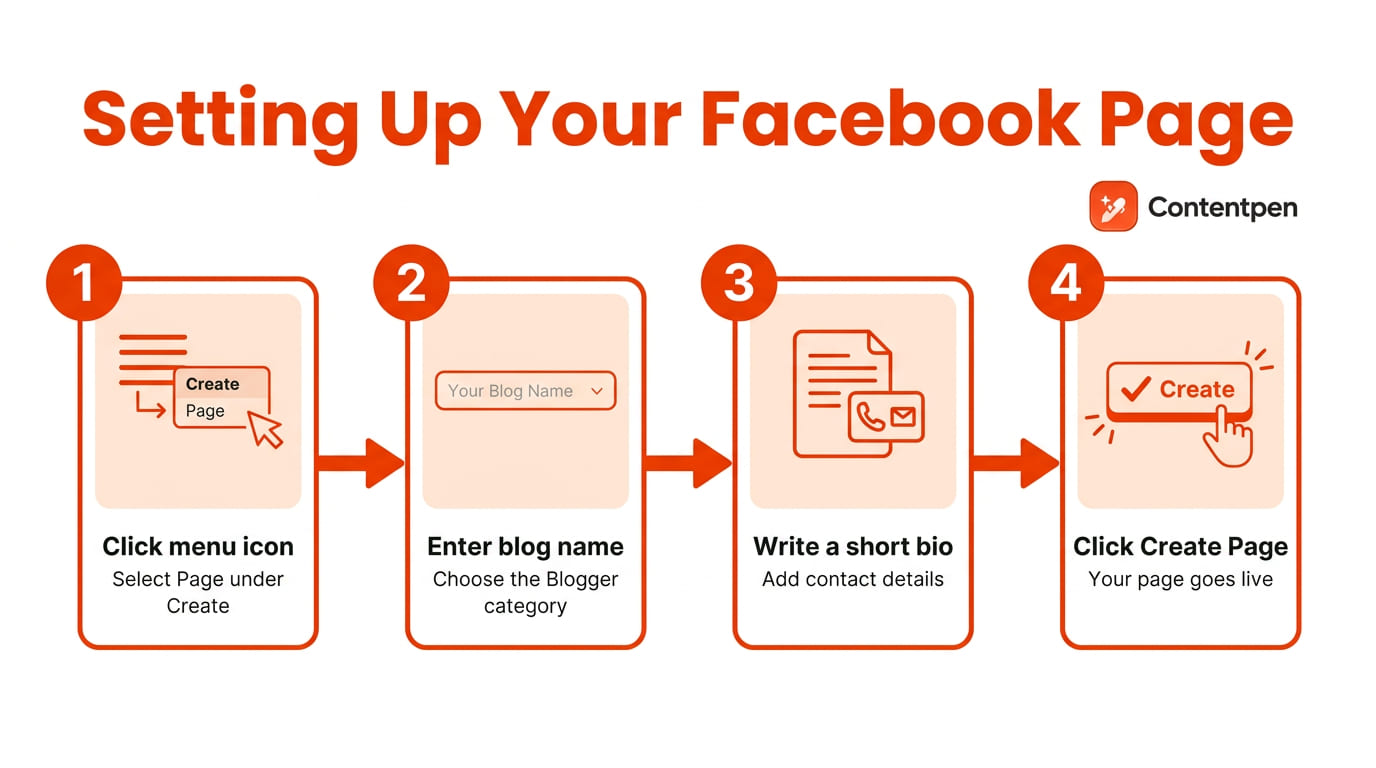
    Facebook Page setup process.

    Setting up a Facebook Page means creating a dedicated business or creator Page instead of posting from your personal profile.

    The reason for creating a separate Page is that Facebook Pages come with analytics and settings that a profile simply doesn’t offer. This separation keeps your blog looking professional and gives readers one clear place to follow, comment, and return to for new posts.

    Facebook Page creation

    Creating your Page takes only a few minutes once you know where to click. 

    Start by logging in or creating your Facebook account. It doesn’t matter if it’s a personal or business account.

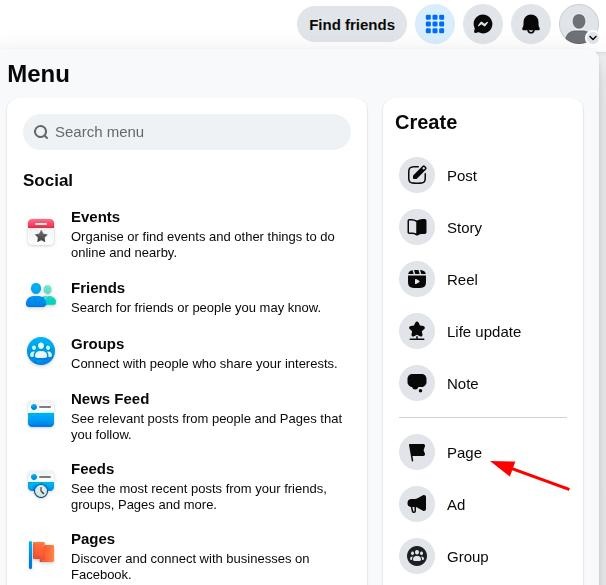
    Then, click the menu icon in the upper right corner and select Page under the ‘Create’ option. 

    Creating a new Page on Facebook.

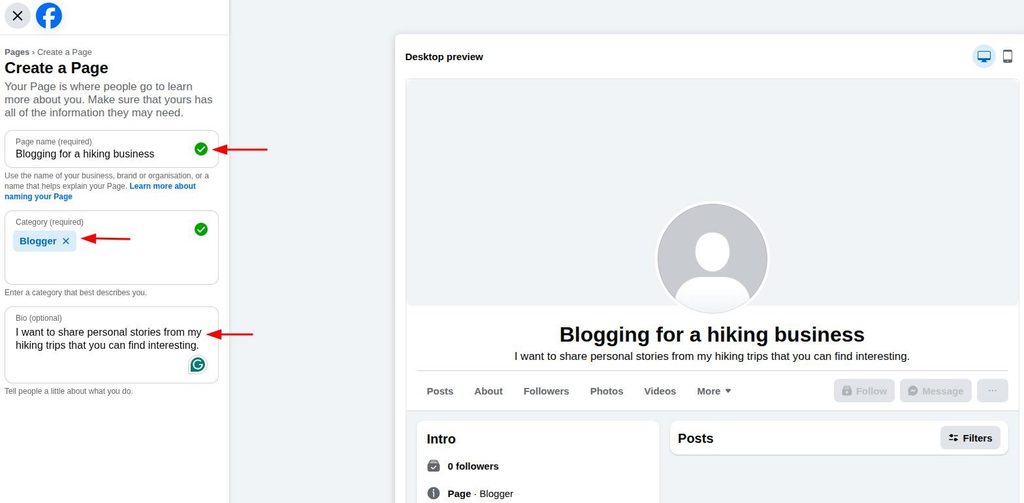
    Enter your blog’s name, choose the ‘Blogger’ category so readers recognize it as a content-focused page. Then, write a short bio explaining what types of blogs or stories you’ll cover, and hit ‘Create Page’.

    Adding business details for your Facebook Page.

    Customizing your Page profile and settings

    Once your Page exists, add your business details, such as your website, contact number, email, and physical address, to set up the profile.

    After this, give your Facebook Page a visual identity that matches your blog’s tone. 

    Upload a cover photo sized ideally at 820 by 360 pixels to display the image perfectly on both mobile and desktop. Then, choose a profile photo of size 320 x 320 pixels

    Please remember that choosing your profile picture is important, as this image will show up in the comments you reply to and the Facebook search results.

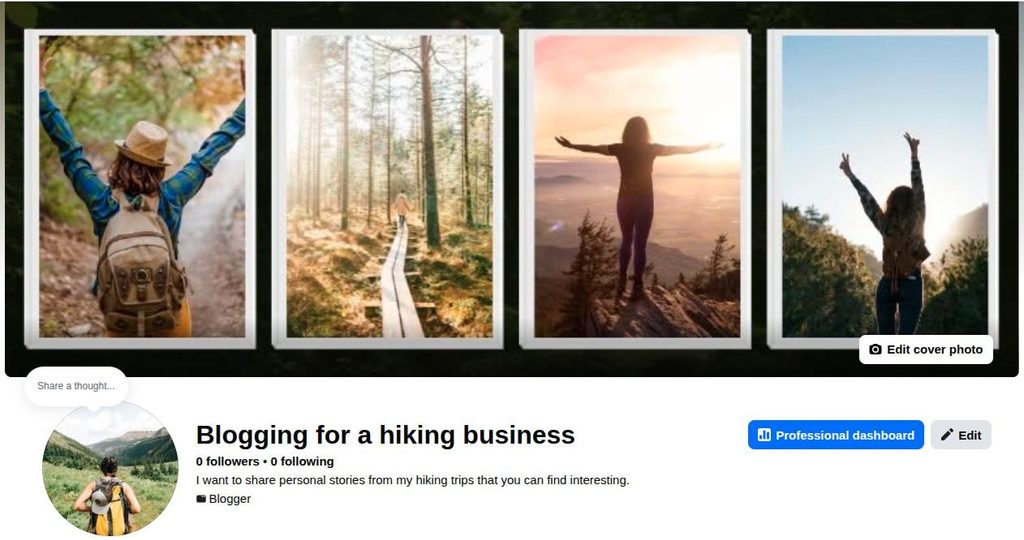
    A finalized Facebook Page for a hiking business with cover and profile photo uploaded.

    For our hiking blog example, we picked a cover photo of 820 x 304 pixels and a profile picture of size 320 x 320 pixels.

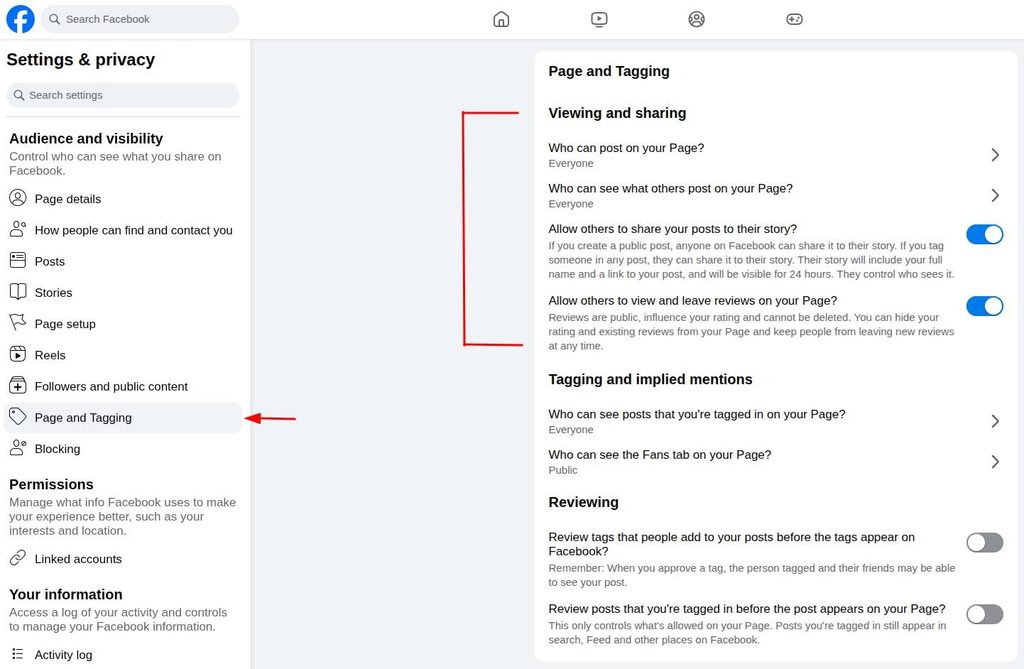
    Under Page and Tagging, restrict who can post on your Page. If you want followers to comment freely but not clutter your blog feed, turn the ‘Who can post on your Page’ setting to Only Me.

    Facebook Page and Tagging settings.

    You can also turn off tags or restrict users from sharing your blogs on their feeds by turning off the ‘Allow others to share your posts on their story?’ slider.

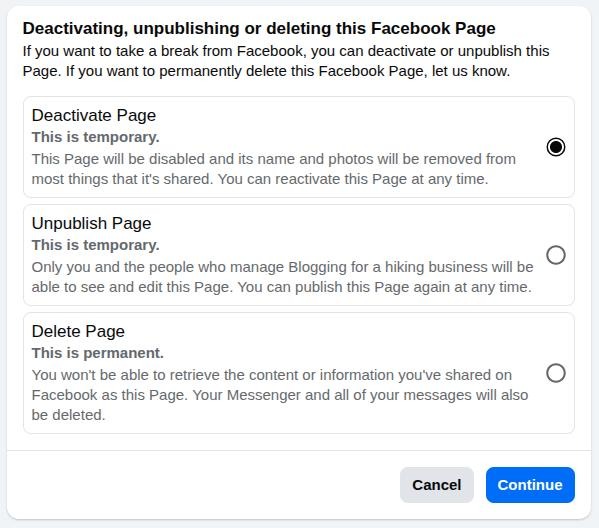
    Note: If you think you still need time before making your Facebook blog public, head to the ‘Access and Control’ settings under the ‘Your information’ tab.

    Deactivate, unpublish, or delete your Page from the 'Access and Control' settings.

    Here, you can ‘Unpublish Page’ temporarily so that only the users with admin access to your blog can access it. Once you are confident enough to go live, publish the page again using the same settings.

    How do you write and publish your first blog post on Facebook?

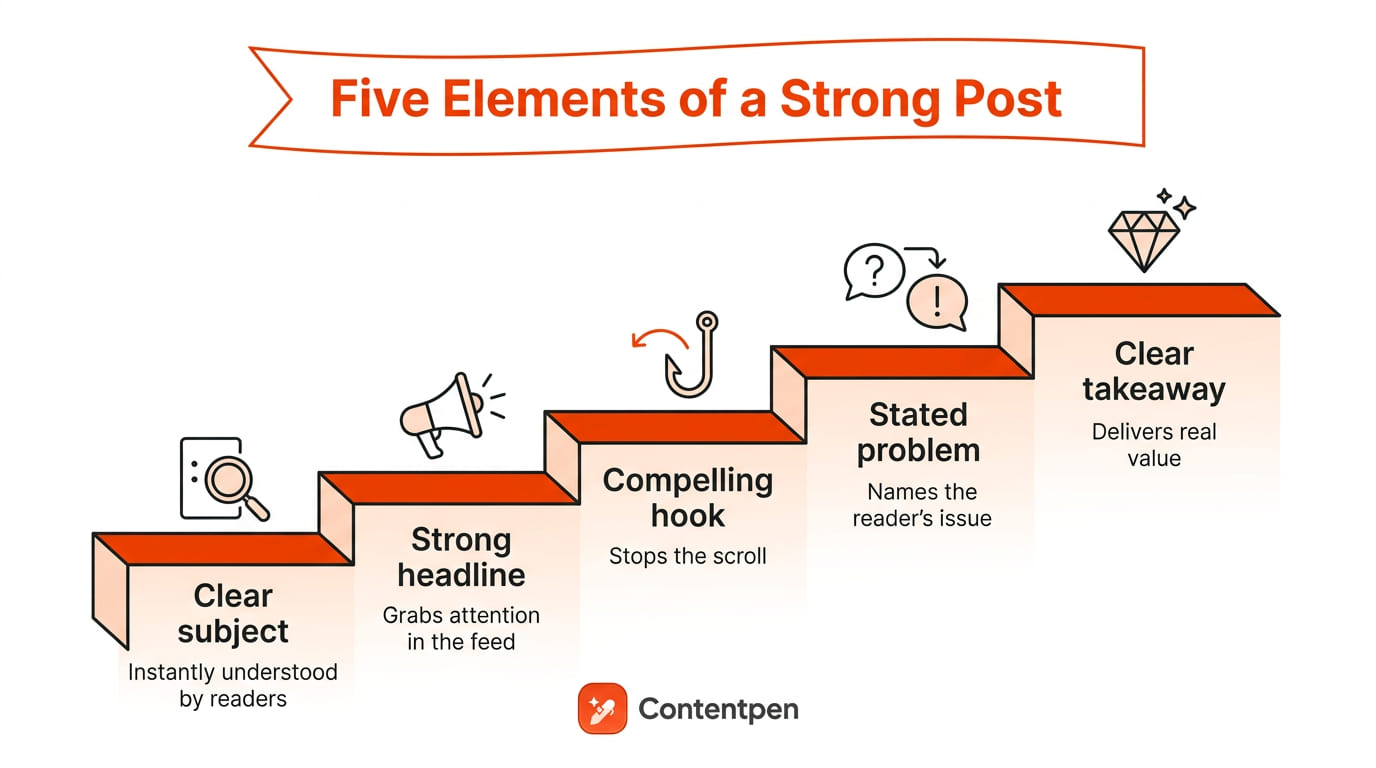
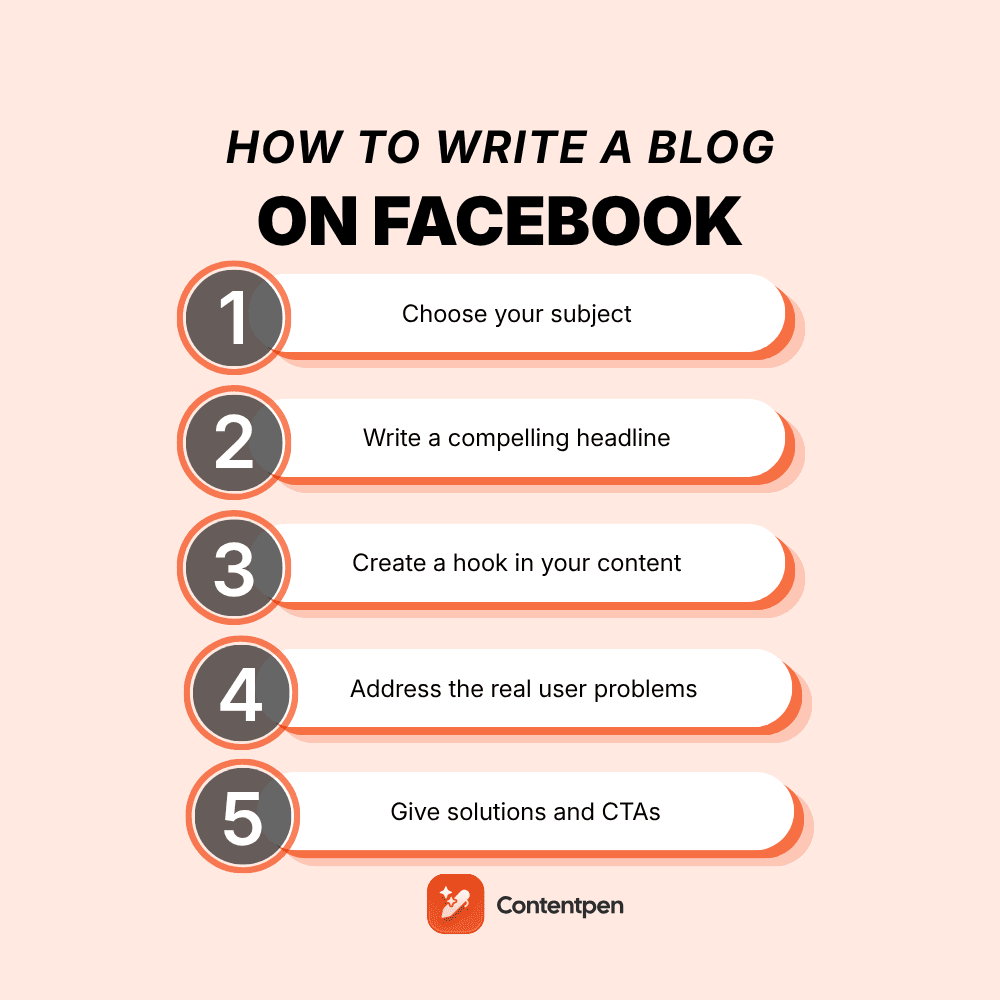
    Writing a blog post on Facebook means typing your content into the ‘What’s on your mind’ box on your Page, then shaping it into valuable content in 5-steps.

    The five-step framework to add a blog post on Facebook - Contentpen.ai.

    #1: Start with a clear subject

    Starting with a clear subject means essentially explaining to the audience:

    • What’s the content about?
    • Who is it for?
    • What will the audience get in return?

    If you can answer these questions, you can create worthwhile content for your readers without getting stuck at any point.

    For instance, the subject of our blog post on Facebook in the hiking group is Hiking failures caused by bad preparation.”

    The idea is to warn the people about what can go wrong on a hike and what they can do instead for a pleasant experience.

    #2: Write a strong headline

    A headline is what kicks off your blog on Facebook. It is usually a one-liner, but can be up to 2 lines long, depending on the subject.

    Headlines must be highly catchy, punchy, and relatable for the audience you’re writing for.

    If we continue our example of a hiking business Facebook page, a headline like ‘Why I almost threw my hiking boots away’ is perfect for a new blog post. 

    It is not only relatable for amateur hikers, but also for professionals who were once on the verge of giving up on a mountain (quite literally!)

    #3: Craft a compelling hook

    A hook is a statement, a paragraph, or a line that stops scrolls. It can be melodramatic, shocking, or an infamous hot take in the middle of the post that holds the audience and urges them to read more.

    Building on our previous example, we can write something like this in our post as the hook:

    “I was shivering, completely out of water, and staring down a trail sign that definitely was not there two hours ago. My brand-new boots gave me blisters by mile two. To make things worse, the easy loop my friend recommended turned out to be a steep, rocky vertical climb. Let’s be honest: hiking isn’t for everyone. At least, it is not for everyone the way most people attempt it.”

    If we write something like ‘hiking isn’t for everyone,’ the statement will surely turn some heads. Later, you can elaborate on your point by giving real-life examples, Do’s and don’ts, or experiences from your life.

    #4: Talk about the real problem

    So far in your post, you’ve contained the reader with your headline and hooked them into reading more. Now, get to the main problems or pain points of the post.

    If we’re on to the subject of hiking failures, let the readers know that most people fail because:

    • “❌ They trust unreliable phone apps for navigation.
    • ❌ They wear gear that is not suitable for the weather.
    • ❌ They underestimate how much water and fuel their body actually needs.”

    Once you put a finger on the problems, start putting solutions to them.

    #5: Provide solutions and CTAs (takeaways)

    Finally, look to solve the problems and pain points your audience goes through. Give them clear takeaways and next action steps so they are not stuck pondering over the solution themselves.

    For instance, we can highlight the following solutions to the problems we highlighted earlier:

    1. “Always download offline maps before you leave because cell service drops fast.
    2. Pack 250 calories for every single hour you plan to be on the trail.
    3. Layer up with wool or synthetics. Avoid cotton because it holds sweat and freezes you.”

    Since we created the Facebook Page for an imaginary hiking business, we need to leave the audience with a fitting CTA as well.

    Example: 

    “Want to skip the struggle and actually enjoy the views? We are hosting a Live Trail-Readiness Workshop this Saturday at [XYZ Company]. 

    We will help you prep your pack, map your routes for the [X] trail, and ensure your next hike is memorable for the right reasons.

    👉 Click the link in our comments to grab a free spot!”

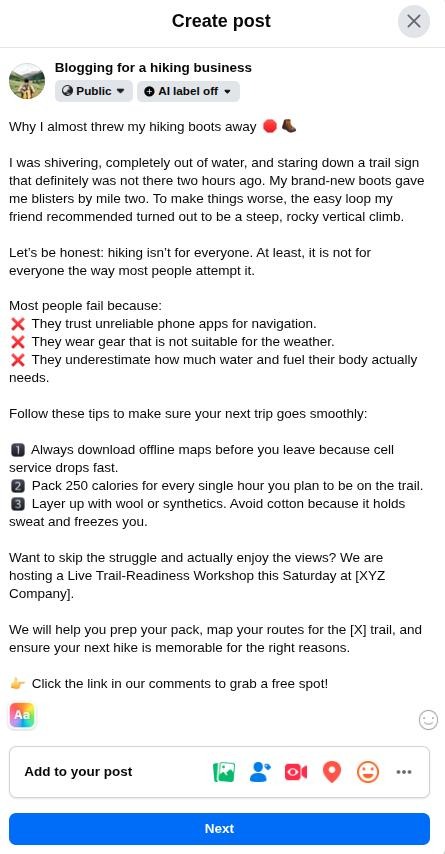
    The finalized post will look like this:

    Finalized post on Facebook for 'hiking failures.'

    And voila! This is how you’ll properly close your Facebook blog post without sounding too salesy and by providing helpful content to the audience.

    Publishing your post step by step

    To publish, paste in content you drafted elsewhere, since Facebook’s text box offers little editing power and many writers prefer drafting first in Google Docs or Microsoft Word. 

    For short posts (under 80 characters), try the colored background option and add emojis through the smiley icon to give the copy some personality. Add relevant hashtags to help readers discover your post through Facebook’s search and topic feeds.

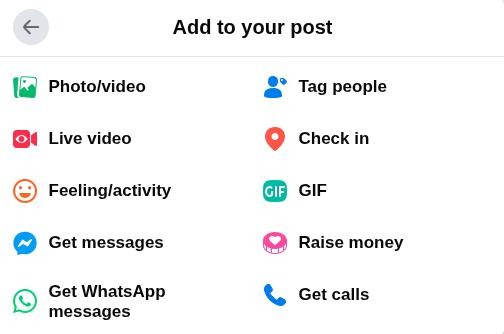
    Then, click the three-dot menu next to the Add to your post option to unlock more features. These include photo or video uploads, GIFs, Go Live, Get WhatsApp messages, Raise money, and Get calls options, acting as built-in CTAs for the post.

    Add different elements to your post - Facebook.

    Note: Adding visuals to your post significantly increases scroll-stop potential and boosts engagement. Use them whenever possible for maximum results.

    After finalizing your text and media, click Post, and your content is published immediately to your Page and into your followers’ feeds.

    How can you write a blog on Facebook faster using Contentpen?

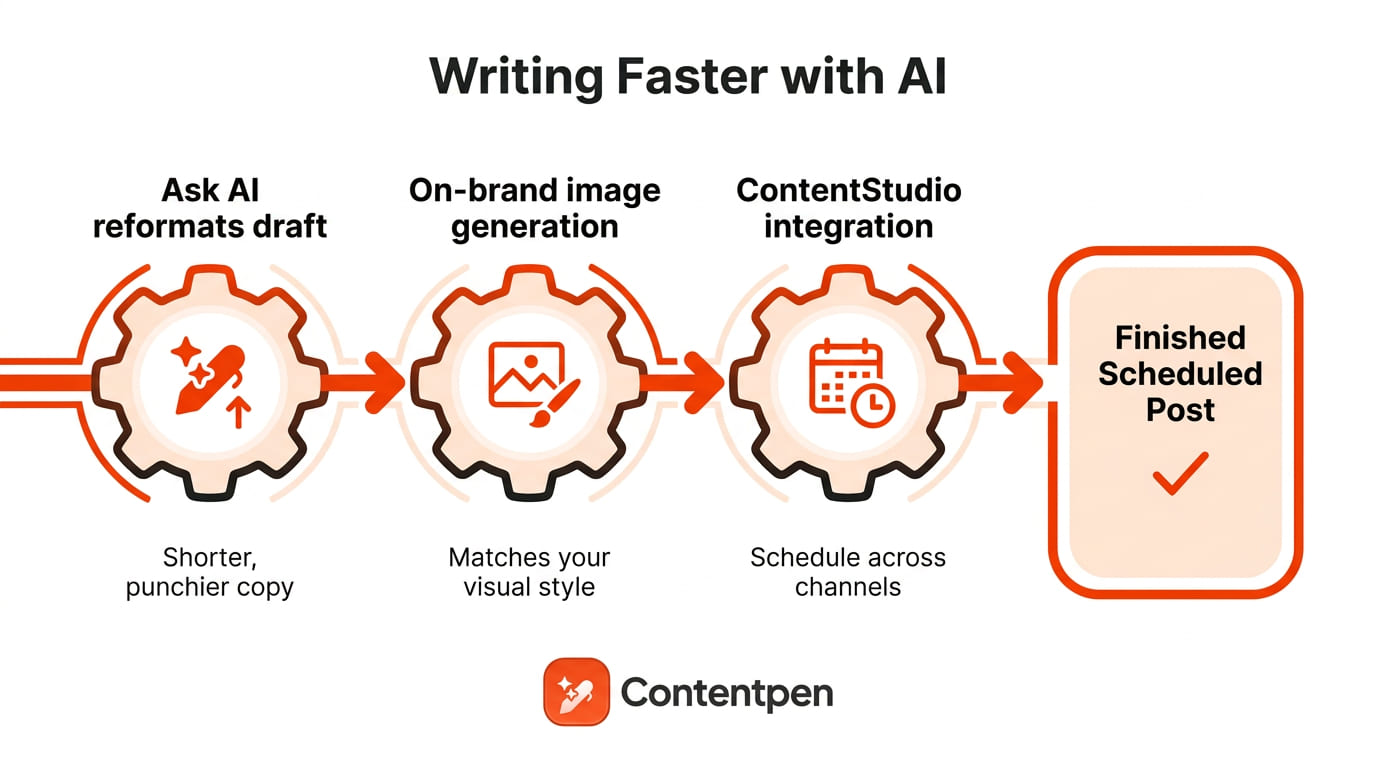
    How to write Facebook posts faster with Contentpen.

    Writing a blog on Facebook gets a lot faster when an AI writing tool like Contentpen handles the first draft. It moves you from research and planning through drafting, optimizing, refining, and finally publishing or scheduling the post within minutes. 

    Because the platform pulls from a saved brand knowledge base, a full blog draft and a shorter Facebook adaptation of that same post both sound consistently like your brand.

    The on-brand image generation produces visuals that match your style, covering the visual side that drives so much engagement on Facebook.

    Finally, the tool’s ContentStudio integration lets you adapt finished blog content and schedule the post for Facebook from a single dashboard.

    Some teams that switch to this kind of workflow report cutting a full day of writing and publishing content down to under an hour, with steadier organic traffic rolling into their platforms.

    Check out Contentpen testimonials from tech, real estate, travel, and other industries. See how it helps achieve a much faster writing workflow with less effort.

    Write content that’s built to rank, not just read

    Create search-optimized blogs aligned with SEO and GEO signals, so your content performs well across search and AI-driven discovery.

    Try SEO Blogging FREE
    AI SEO Interface

    What should you post, and how do you grow your Facebook blog?

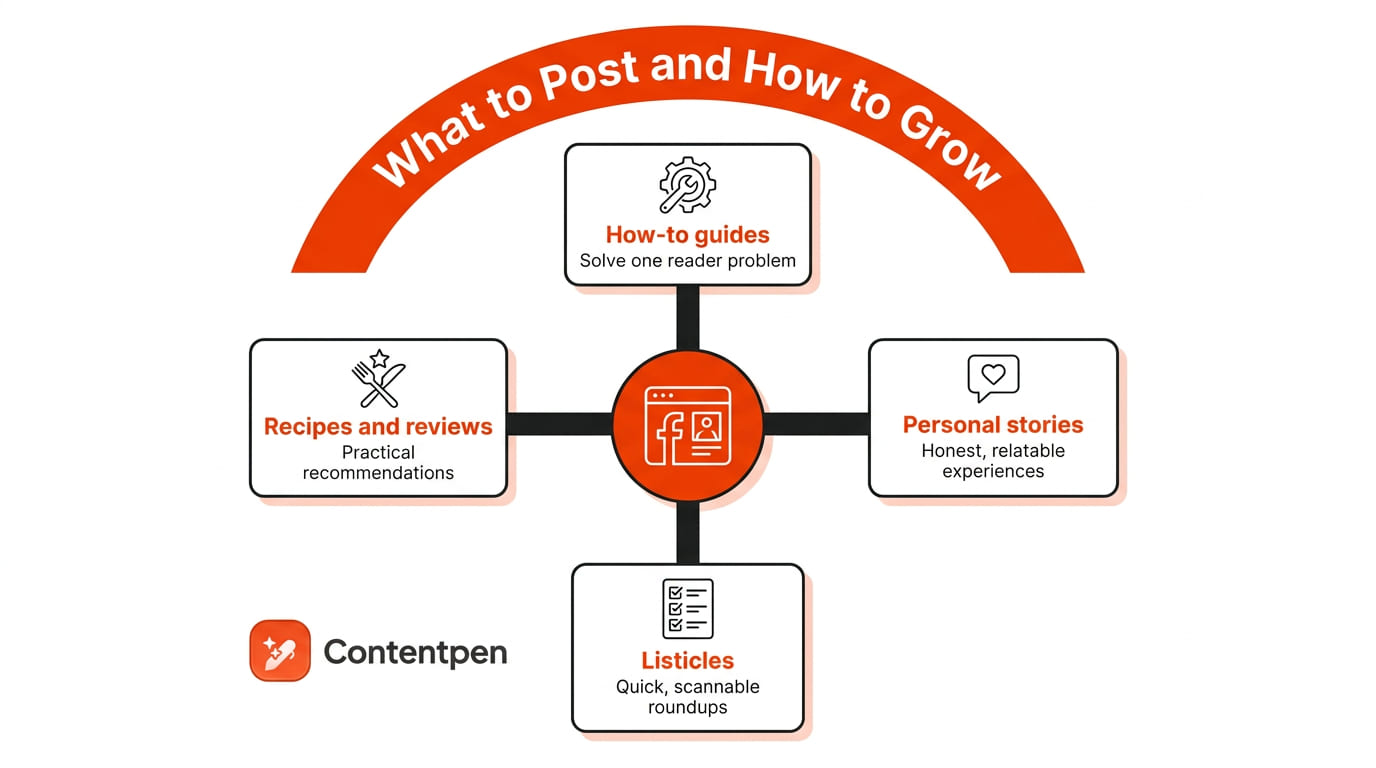
    What to post on Facebook?

    Choosing what to post starts with picking one niche you can stick with, since a blog that jumps between topics confuses readers and stalls growth over time. 

    High-performing categories on Facebook include how-to guides, personal stories, listicles, recipes, and product reviews.

    • How-to guides and tutorials that solve one specific reader problem.
    • Personal stories and relatable, honest experiences.
    • Listicles and quick, scannable roundups.
    • Recipes, product reviews, and practical recommendations.

    That said, the topics that work best ultimately depend on your specific audience and what Meta Insights shows you week to week.

    Once you know what to post, schedule it through Meta Business Suite by creating a post, adding photos or videos, setting a date and time, adjusting privacy, and then clicking Schedule.

    Then, cross-promote new posts on Instagram, LinkedIn, Pinterest, and YouTube to reach readers who don’t already follow your Page. Check Insights often and put more effort into whatever format keeps people engaged.

    Can you make money blogging on Facebook?

    Making money through Facebook blogging.

    Yes, you can make money blogging on Facebook, though income depends on building an engaged audience first rather than posting alone. 

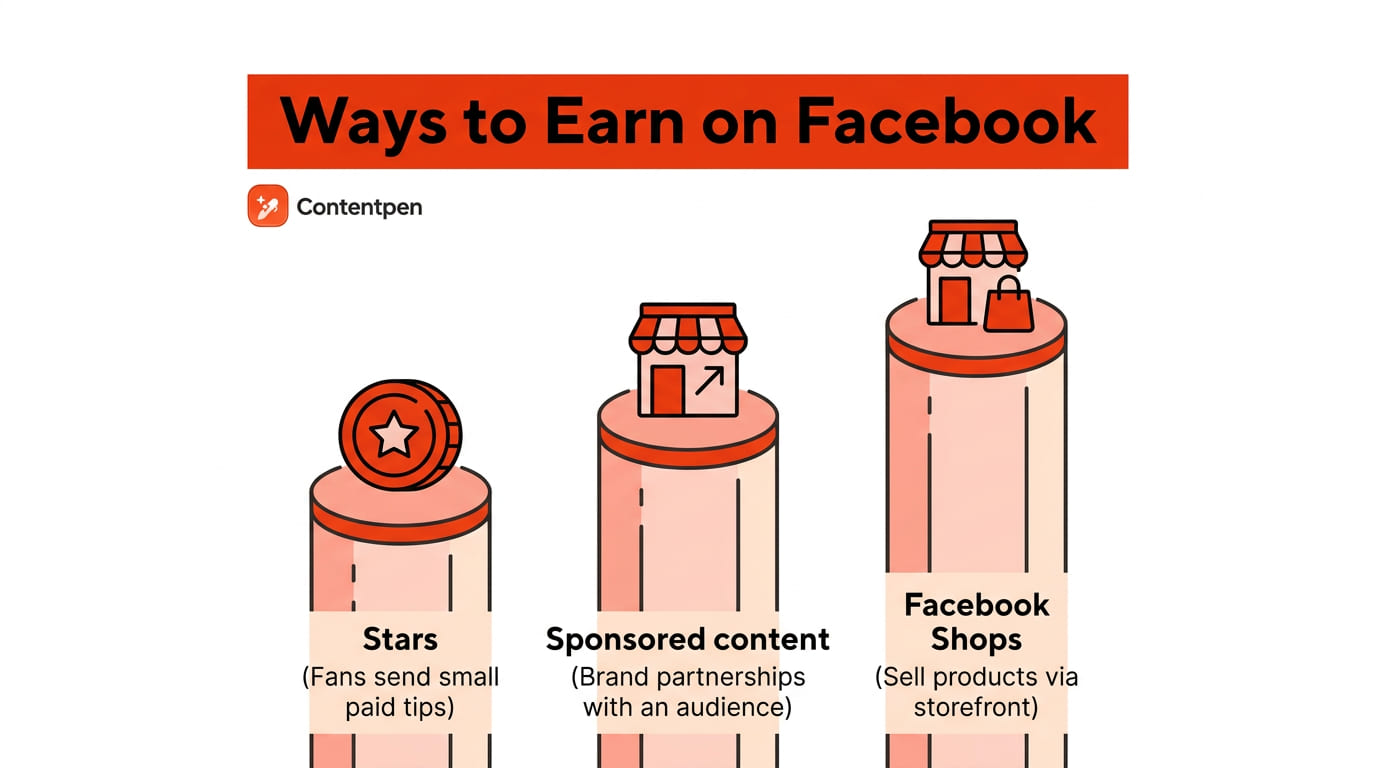
    Once your Page qualifies for Facebook’s monetization tools, a few options open up.

    OptionWhat it offers
    StarsIt lets fans send small paid tips during posts or live videos
    Sponsored contentBrand partnerships, once you have an audience worth paying for
    Facebook ShopsSell products directly through your Page storefront
    Affiliate marketingEarn a commission by linking to products from other brands in your posts

    The threshold to start earning on Facebook varies on the monetization option. For instance, you can get Stars by retaining at least 500 followers for 30 consecutive days.

    The payouts generally depend on your geographical location, niche, and type of blog.

    Note: You must reach at least $100 in earnings before getting a payout from Facebook.

    None of these options pay meaningfully without consistent posting and real engagement. Combining 2-3 of these income streams tends to work better than relying on just one.

    Most bloggers who do earn from Facebook also cross-promote rather than relying on just one channel.

    The takeaway

    Writing a blog on Facebook really comes down to four moves you repeat consistently: setting up a proper Page, writing posts with the five-element formula, scheduling content through Meta Business Suite, and promoting what you publish on other social channels.

    None of it requires expensive tools or a website, just a Page, a clear niche, and a habit of showing up consistently.

    If writing day after day feels like the hardest part, a tool like Contentpen can draft a full post in minutes so you spend your time editing and posting instead of staring at a blank screen. Open a Facebook Page today, write your first post, and publish with Contentpen now.

    Frequently asked questions

    Can you edit or delete a Facebook blog post after publishing?

    Yes. Click the three dots in the top corner of any published post to edit the text, swap out photos, or delete it entirely. Facebook keeps an edit history visible to readers on some posts, just worth knowing before you hit publish.

    Should you post the same blog content on your personal profile and your Page?

    Keep them separate. Your Page is the professional home for your blog, while your personal profile is meant for friends and family. Sharing an occasional Page post to your own profile can help with early reach, but posting full blog content there regularly blurs the line readers rely on.

    How often should you post to keep a Facebook blog growing?

    3-4 posts a week tend to keep a Page active without burning out your content ideas. Consistency matters more than volume, since Facebook’s algorithm favors Pages that post on a predictable rhythm over ones that post in bursts and then go quiet for weeks.

    How much money can you make blogging on Facebook?

    There’s no reliable average. Earnings range from a bit of pocket money to a full-time income. It comes down to how large and engaged your audience is and how many of the monetization options above you’re using at once.

    Does Facebook penalize posts that link out to another website?

    Facebook doesn’t ban outbound links, but posts with links sometimes get less organic reach than native text, photo, or video posts. Many bloggers post the full piece natively on Facebook and save the outbound link for a comment or a separate post, which tends to protect reach.

    Can you turn a Facebook blog page into a real website later?

    Yes. Many creators start on Facebook to test whether an audience exists, and then move that content to a proper website once the Page gains traction. Facebook Insights provides data on which posts performed best, giving you a head start on what to publish.

  • How to write a blog post on Shopify in 7 easy steps

    How to write a blog post on Shopify in 7 easy steps

    Figuring out how to write a blog post on Shopify can feel confusing the first time you open the admin panel and see every setting field staring back at you. 

    Between blog setup, content editors, SEO listings, and visibility toggles, it’s easy to lose track of what actually needs your attention before a post goes live. The good news is that publishing a blog post on Shopify is easier than it sounds.

    This guide walks through that process in 7 steps. It covers how to write a blog on Shopify, draft and format your post, add images, set the author, add SEO data, and publish.

    Along the way, you’ll pick up practical Shopify blog tips and see how a tool like Contentpen can speed up research, drafting, and publishing. By the end, you’ll have a workflow you can repeat for every new post.

    Key takeaways

    • Shopify includes a built-in blog editor under Content -> Blog posts, so no third-party app is required to publish your first post.
    • Setting up a blog and writing an individual post are two separate steps inside the Shopify admin.
    • Set SEO titles, meta descriptions, tags, and images for every single post.
    • AI tools such as Contentpen can speed up drafting, image creation, and publishing.

    Is Shopify a good place to start a blog?

    Shopify is a genuinely capable place to start a blog, mainly because the tool sits inside the same admin panel you already use to run your store. 

    Every store ships with a default blog category called News. You can rename it, add more categories, or leave it as is. 

    You can see the exact procedure for setting up your Shopify blog in this video by Hogan Chua on YouTube:

    Because posts live on the same domain as your product pages, blog content can send direct traffic to the items you sell, creating a close-knit ecosystem.

    Can Shopify handle everything related to blogging?

    While you can publish blogs directly to Shopify, the platform does lack some features necessary to stay competitive in highly populated niches. For instance, Shopify lacks built-in SERP analysis and support for other SEO/AEO processes. 

    It does give you an editor and basic SEO fields, but it doesn’t run keyword research, competitor analysis, or track how posts perform months after publishing.

    Therefore, the best idea is to use a content system and an SEO analytics tool like Contentpen to keep posting to Shopify consistently and efficiently.

    Publish content directly to your CMS, without copy-pasting

    Move from draft to live post in a single step. No hassle, no errors!

    Try One-click Publishing
    AI SEO Interface

    How to write a blog post on Shopify in 7 steps

    Writing and publishing a blog post on Shopify comes down to 7 steps that you have to take inside the Shopify admin panel.

    Each step below maps to a specific screen inside Shopify, so you can follow along inside your own store as you read.

    Step 1: Set up your Shopify blog

    Before you can write a single post, you need a blog to publish it to, and Shopify makes this step quick. 

    From your admin panel, go to Content -> Blog posts and click on the ‘Add blog post’ button. 

    Then, you would have to choose a blog template or theme, according to the type of blog you are trying to post. For example, listicle, How-to guide, informational post, etc. If there’s nothing else besides the default template, you should create ones specific to each format later.

    After these settings are done, you will add everything about your blog in the designated fields. This includes your title, body content, images, links, excerpt (summary), meta title, description, and slug. Make sure to click ‘Save’ to lock in the details for the post.

    One thing that people skip is adding the new blog to your store’s main navigation menu. Because a blog nobody can find won’t get read, no matter how good the content is.

    To do this, go to Sales Channels -> Online Store. From the top drop-down list of menus, click the ‘Create template’ button. We will create a template for a page where our blogs will be shown to the users.

    Add a ‘Hero’ image and style the page however you want. You can also use the built-in Shopify AI assistant to help you with the design and look. 

    After you’re done, link up your saved blog posts on this page to help your audience discover your content with ease.

    Step 2: Choose a topic that supports your products

    Pick organic keywords before you create content and copy-paste it inside the Shopify editor.

    There are two ways to find your perfect topic:

    #1: Search for phrases relevant to your product

    Use a simple Google search for phrases that discuss something related to your product or service. Make notes of the content already posted: What type of blogs (listicles, comparisons, How-to guides) are they making? How are they structuring their topics?

    #2: Capture keywords from competitors

    The best way to write blogs on Shopify (that we’ve personally followed) is to see what your competitors are doing. Try to match them with blog topics that contain lucrative keywords for your field.

    Use a dedicated competitor analysis tool like Ahrefs to dig out keywords your rivals are using. 

    For instance, Maui Jim is a big sunglasses brand. If you are in that niche, you can paste Maui Jim’s site’s URL inside Ahrefs and go to Site Explorer -> Organic Search -> Top organic keywords to analyze what terms they’re ranking for.

    Ahrefs competitor keyword analysis example.

    Looking at the analysis, pick whichever non-branded keywords you can find.

    The reason this approach works well for small businesses is that branded phrases like “Maui Jim Warranty” are already authority-owned and, naturally, would be difficult to rank for.

    Therefore, using generic, educational keywords like “how to measure PD” (short for pupillary distance) is actually a better idea.

    Any optician or glasses brand looking to capture organic traffic and improve share of voice in that niche can write a comprehensive guide on this topic to build online authority.

    In general, your content marketing strategy should be built with different types of blogs. These may include buying guides, step-by-step how-to posts, and seasonal or gift guides tied to your catalog.

    This approach ensures the maximum semantic coverage and captures all types of audiences for your platform.

    Step 3: Write the post title and content

    With a blog ready, go to Content -> Blog posts and click Add blog post. Enter a title first, since Shopify won’t let you save a post without one, and titles can run up to 255 characters. 

    Keep your main keyword near the front of the title for readers and search engines.

    Then, enter your body content in the ‘Content’ field using a rich text editor similar to a word processor. 

    Use your primary keyword in the first 100-150 words of the blog post (in the introduction). If your blog title is question-based, start by answering it first. 

    For instance, for the title, ‘How to cook a zucchini pasta’, throw in glimpses of the actual procedure first. Tell the audience that you need to sauté the zucchini in a hot skillet with a little oil for 2 to 3 minutes until tender before going into the post.

    CTA placement approach

    Place CTAs (calls to action) inside the body content, preferably at the 40-50% content mark or the 75% mark. These placements are important for two reasons:

    • If the user is nearly halfway through your post, you’ve already established some sort of authority and trust with them. They are likely to take an action if you give them one to take.
    • If the user is nearly done with the content, they’re looking to take an action. Give them a button they can click on to land on your Shopify store or your newest catalogue.

    Users won’t take an action if the CTA is right at the start, too detached from the context of the post, or too “loud” (e.g., annoying pop-ups on scrolls).

    For example, if you are writing a post on ‘How to cook a Zucchini Pasta’, you can ask the users to check out your canned Zucchini Pasta offering right in the Shopify store. The CTA is relevant, and if placed correctly, it entices the users to click through.

    Besides writing the post, don’t forget to format the post properly. Use headers to break up sections, bold sparingly for emphasis, and utilize internal linking to product pages so readers can find their way around your store.

    Step 4: Add a featured image and format visuals

    Every post benefits from a featured image, which shows up on the blog landing page and often in social previews. 

    Shopify recommends the JPEG file format for blog images. Click the image icon in the toolbar, choose to upload or select an existing file, then click Done.

    Don’t stop at the featured images. Break up long stretches of text with in-content images throughout the post, which can be your product showcase.

    Readers scan online content quickly, and a well-placed photo or product shot gives their eyes a place to rest before they keep reading.

    Step 5: Set author name, tags, and excerpt

    Blog organization settings in Shopify.

    Scroll to the Organization section to handle a few details that shape how your post is categorized and previewed. 

    The Author dropdown only shows the store owner or staff members with admin access, so POS-only staff and outside collaborators won’t appear as options.

    Confirm the correct Blog is selected too, especially if your store runs more than one.

    Besides this, set the following things before posting the blogs:

    • Use tags and group posts into browsable categories to help matching posts surface in on-site search results.
    • Enter an excerpt for the blog, which is a short, custom summary shown on the blog landing page instead of an automatic text snippet.

    Depending on your blog theme, you will see an option to link to other written blogs or blog categories at the end of the post. Select them in the order you want the user to preview your content.

    Step 6: Optimize the search engine listing

    Before publishing, click the pencil icon in the preview section to control how the post shows up on Google.

    This is where you set the page title, meta description, and URL handle, and Shopify shows a live preview as you type each field.

    FieldRecommended limitWhat happens if you go over
    Page title60 charactersGets cut off in search results
    Meta description160 charactersGets truncated in search results

    Edit the SEO keywords carefully, using dashes instead of spaces between words. Review all the settings before hitting post.

    Step 7: Publish or schedule the post

    In the Visibility section, choose the ‘Visible’ option to publish the blog right away, or click the calendar icon to schedule posts for a future date and time. Click Save to lock in your choice.

    How can Contentpen make Shopify blogging faster?

    Contentpen for AI- and SEO-optimized blogs.

    Contentpen is an AI writing tool built to take a Shopify post from an idea to a published page without switching between different tools. 

    Instead of manually researching keywords, drafting in Shopify’s editor, and separately checking SEO fields, it handles everything for you to ensure faster blogging.

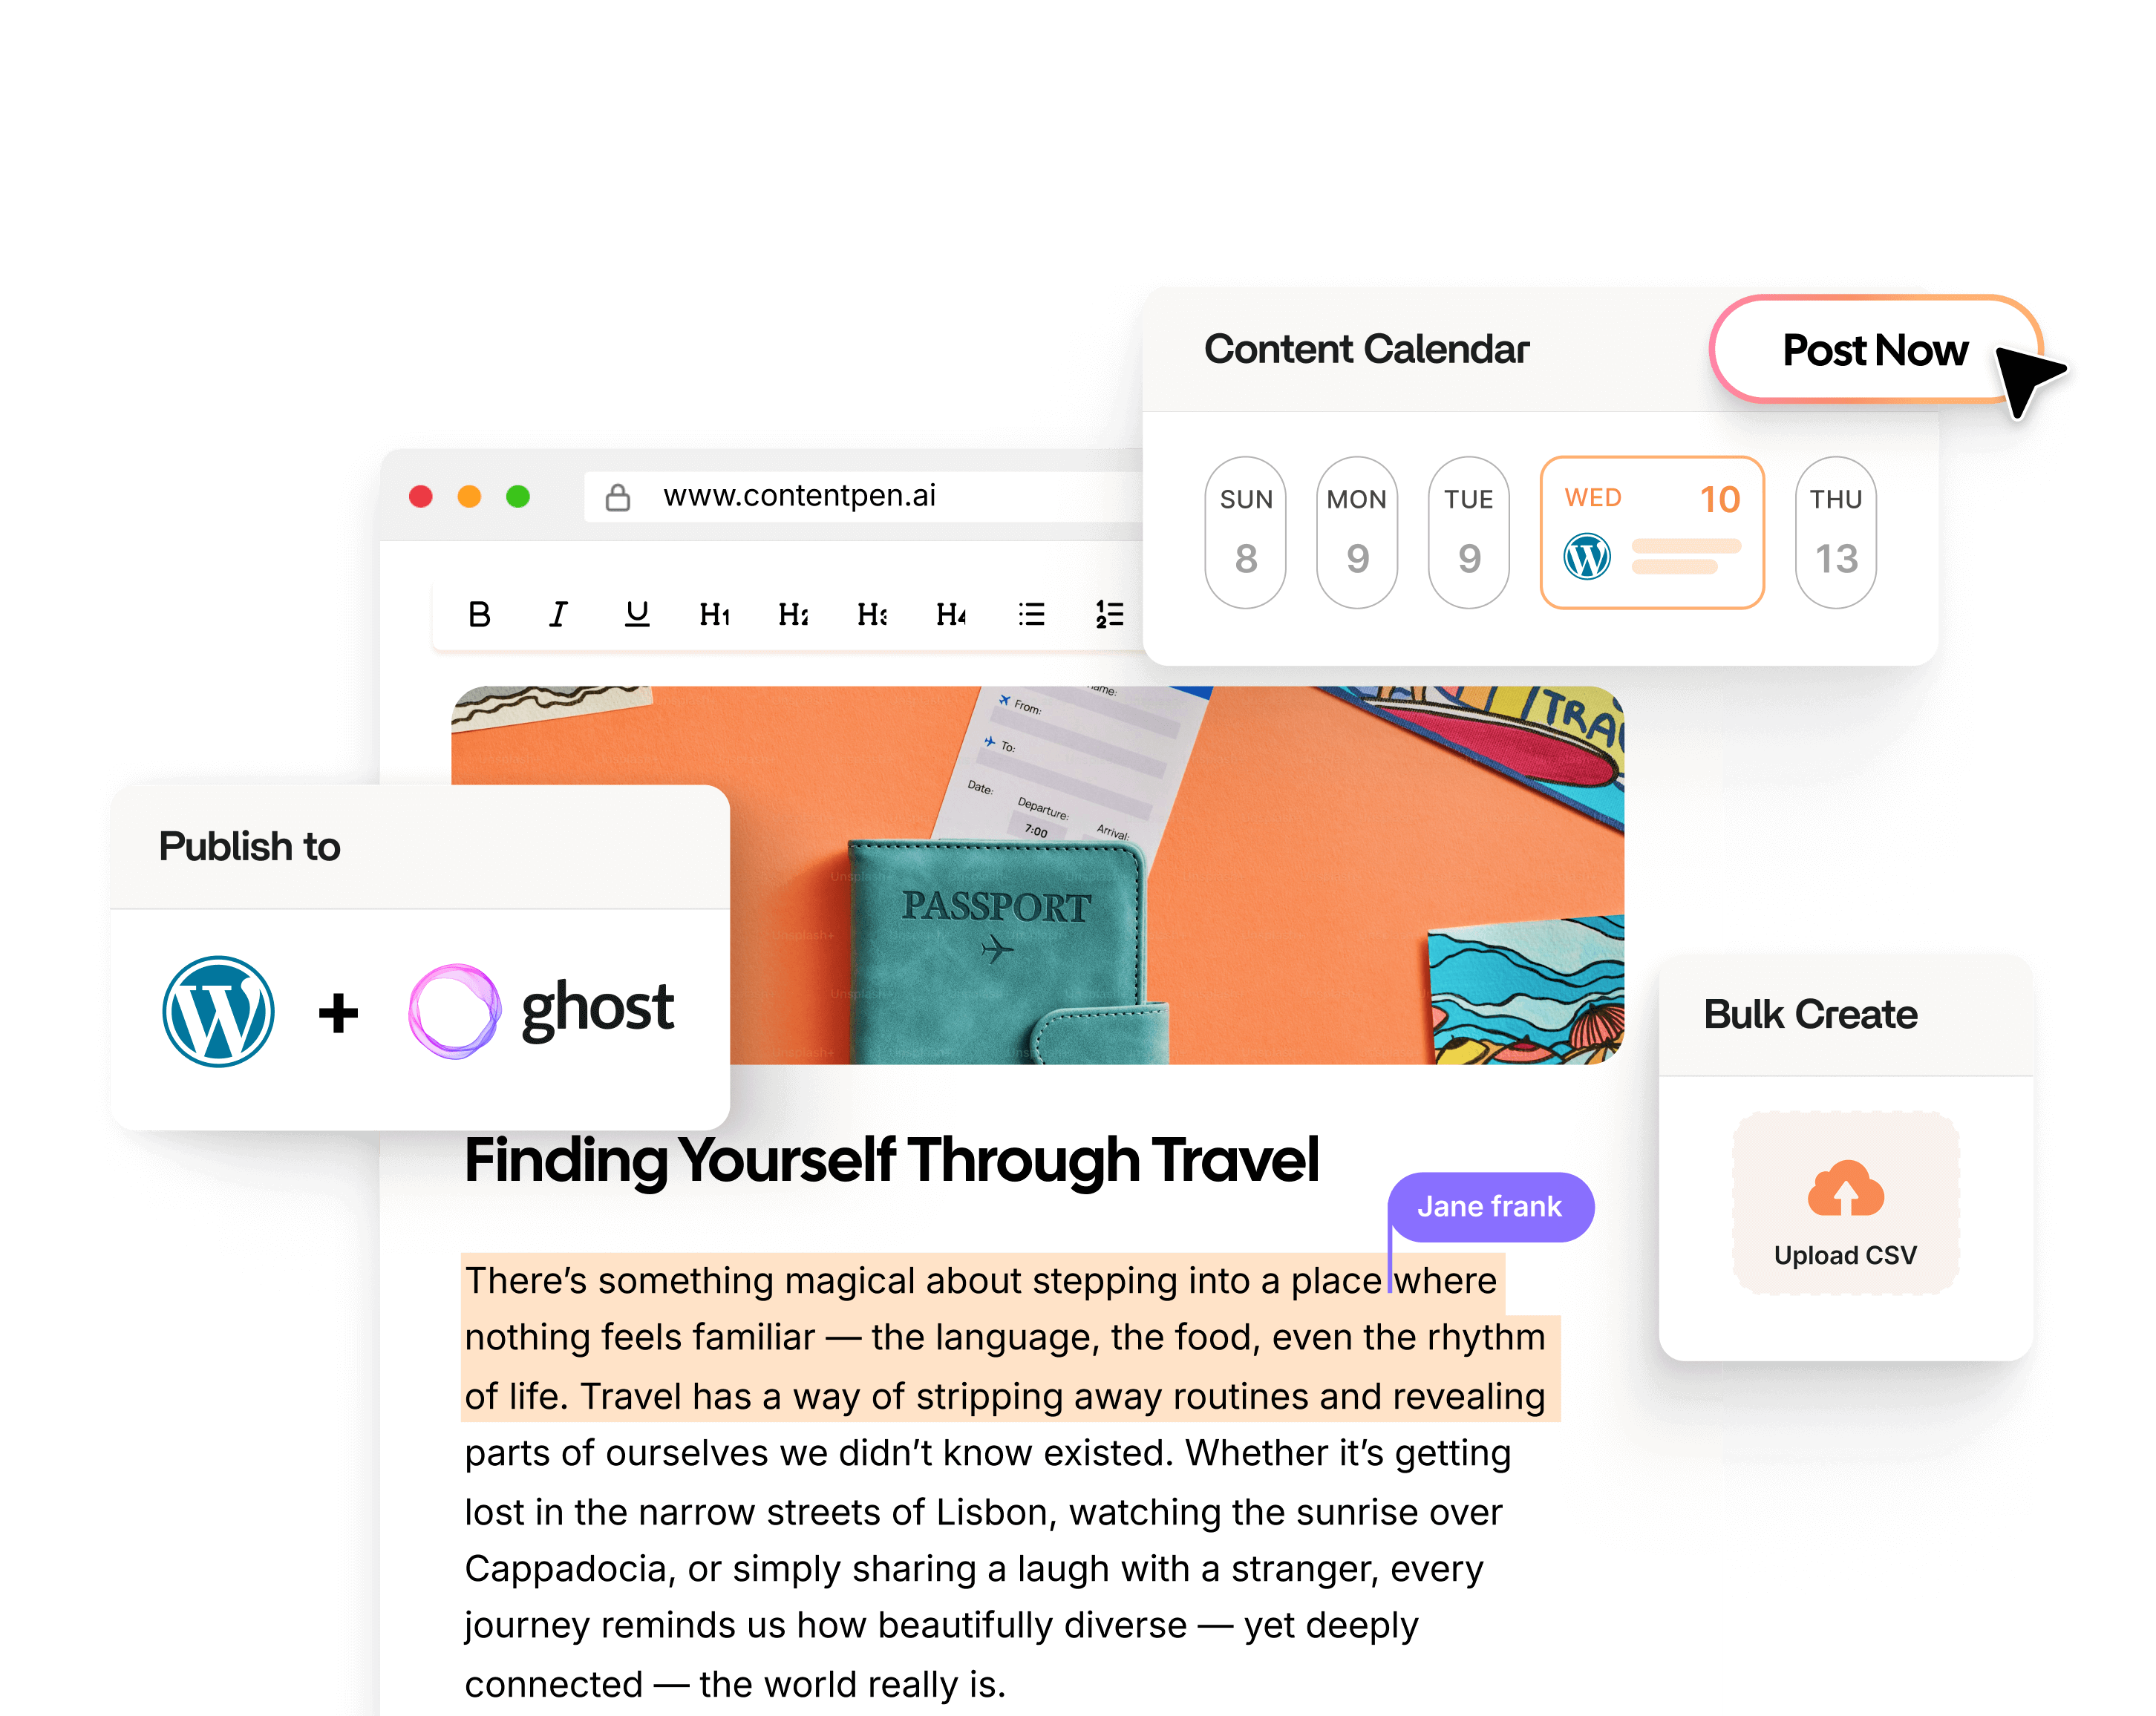
    The Shopify integration ensures that your content is published with all the necessary details (author name, tags, keywords, etc.) with a full GEO-pass inside one workspace.

    That direct integration removes the copy-paste step most Shopify blog apps still require, helping boost your workflow efficiency.

    Besides all this, Contentpen also takes care of your visuals. You can select your brand colors, style, and logo settings, and the AI image generator will ensure to create featured and in-article images that reflect your brand. 

    Branded imagery settings - Contentpen.ai.

    The built-in media assistant also stores all generated visuals for your brand in one place, so that you can reuse visuals whenever needed.

    Contentpen also provides a post-publish layer. The SEO opportunities feature helps you track posts that quietly lose traffic over time, surfaces changes needed to grab quick wins, and does those fixes for you with a one-click content refresh.

    SEO opportunities feature updated - Contentpen.ai.

    SEO opportunities are a great way to increase traffic to your Shopify blogs after publishing. You can also promote your posts to social media using our ContentStudio integration. You can also run newsletters to get more audiences to your platform.

    For content growth teams and agencies juggling several Shopify stores, bulk generation and multi-language output also help keep a consistent publishing cadence going without adding headcount to the team.

    Summing it up

    Writing a blog post on Shopify comes down to a repeatable sequence. Start by setting up your blog, picking a topic that supports your catalog, and drafting the title and body in the rich text editor. Then, add images, fill in the organization settings, and publish or schedule the post.

    Shopify’s built-in editor genuinely covers everything needed to get a post live, from formatting to SEO settings, without installing a single app.

    However, pairing Shopify’s native tools with a platform like Contentpen for research, drafting, direct publishing, and post-publish tracking can significantly simplify your workflow. This frees up more resources for you to invest in product hunting, creation, and strategizing.

    Frequently asked questions

    Can you write blog posts on Shopify?

    Yes, Shopify includes a built-in blog editor under Content -> Blog posts, so you can start a blog without installing any third-party app. The rich text editor supports headers, images, links, and tables, but a dedicated content platform like Contentpen can simplify your blogging workflow.

    How do I add a blog post to my Shopify store?

    Go to Content -> Blog posts, click Add blog post, then enter a title and write your content in the editor. A title is required before Shopify will let you save the post, so fill that in first, then click Save once you’re ready.

    What image size works best for Shopify blog posts?

    Shopify recommends JPEG files with dimensions 1200 x 800 pixels (3:2 ratio) for blog images. Aim for images that are not too bulky (maximum 200-300KB) for fast loading, since large files slow down your blog page, and keep dimensions consistent across posts.

    What’s the difference between a Shopify blog post and a product page?

    A blog post educates or tells a story, targeting informational searches like buying guides or how-to questions. A product page exists to convert, with pricing, specs, and a direct add-to-cart button, so the two work together rather than competing for the same reader intent.

    Which Shopify blog apps can help with SEO?

    Shopify’s native apps cover the blogging basics for every post. Dedicated platforms like Contentpen build on that foundation with keyword research, competitor analysis, and AEO scoring for AI search engines, which native fields alone don’t provide.

    How often should I post on my Shopify blog?

    Favor a consistent, sustainable cadence over bursts of several posts. One well-researched post every week tends to outperform daily posting, so match frequency to the resources and quality you can maintain long-term.

  • How to write a guest blog post that gets accepted (easy guide)

    How to write a guest blog post that gets accepted (easy guide)

    Getting a “thanks, but this isn’t a fit” reply after hours of writing is one of the most frustrating parts of guest blogging. Most rejections don’t happen because the writing is weak. They happen because the pitch was generic, or the draft ignored the publisher’s rules from the start. 

    Learning how to write a guest blog post that editors actually want means treating the whole process as a system. 

    You need to understand that you are competing against dozens of other guest posts sitting in that editor’s inbox right now. Editors skim fast, so a post that feels useful and on-brand for their site wins over one that reads like a sales page.

    This guide covers how to write a guest blog post from start to finish, including finding the right sites, pitching, structuring the draft, adding links, and proofreading before you hit send.

    So, let’s get to it, shall we?

    Key takeaways

    • Find crossover opportunities where your niche and the publisher’s audience genuinely overlap.
    • Pitch with two or three specific headline ideas instead of one vague, generic request.
    • Write for the publisher’s audience and follow their editorial guidelines to the letter.
    • Make the post actionable and editorial, never promotional or sales-focused.
    • Use tools like Contentpen to speed up research, outlining, and drafting processes across multiple pitches.

    What is a guest blog post?

    Defining a guest blog post.

    A guest blog post is an article you write and publish on someone else’s website instead of your own. It is usually accompanied by a short bio attached to your name to earn backlinks to your site or social profiles over time. 

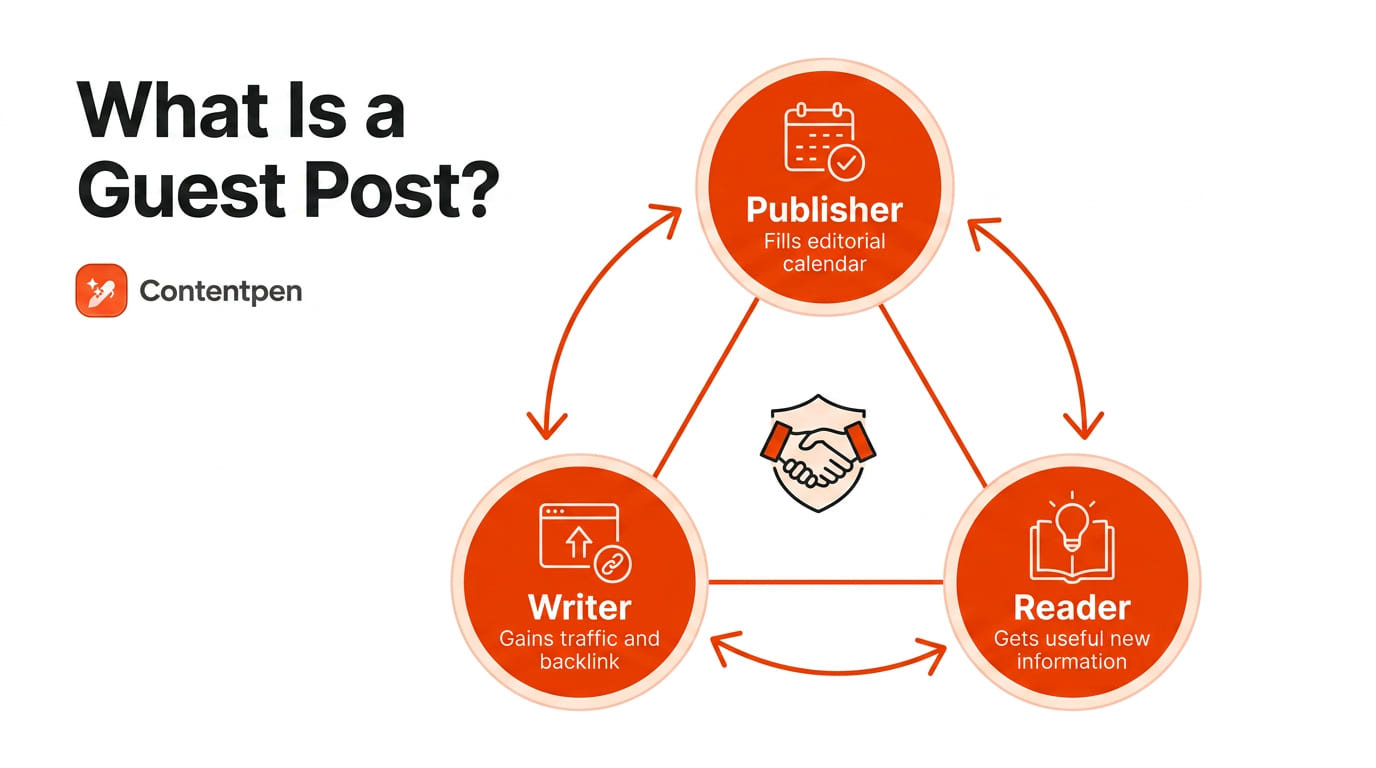
    Guest posting lets you reach an audience you haven’t built yourself, in exchange for giving that site fresh, useful content. The arrangement works because it creates a genuine three-way benefit:

    • The publisher fills their editorial calendar
    • You gain traffic and a backlink
    • Readers get information they wouldn’t have found otherwise

    That backlink also carries brand association. When a reader already trusts the publisher, some of that trust transfers to you the moment your byline appears next to theirs. 

    Guest posting is still one of the strongest ways to boost your off-page SEO efforts, but only if done right.

    How to find the right guest blogging opportunities

    Finding the right guest blogging opportunities starts with matching audiences, not chasing the biggest blog you can find. 

    Look for guest posting sites where your expertise and the publisher’s readership genuinely overlap. Before pitching, spend a few minutes reading their recent posts to confirm there’s room for your angle and that you won’t just repeat what’s already been covered.

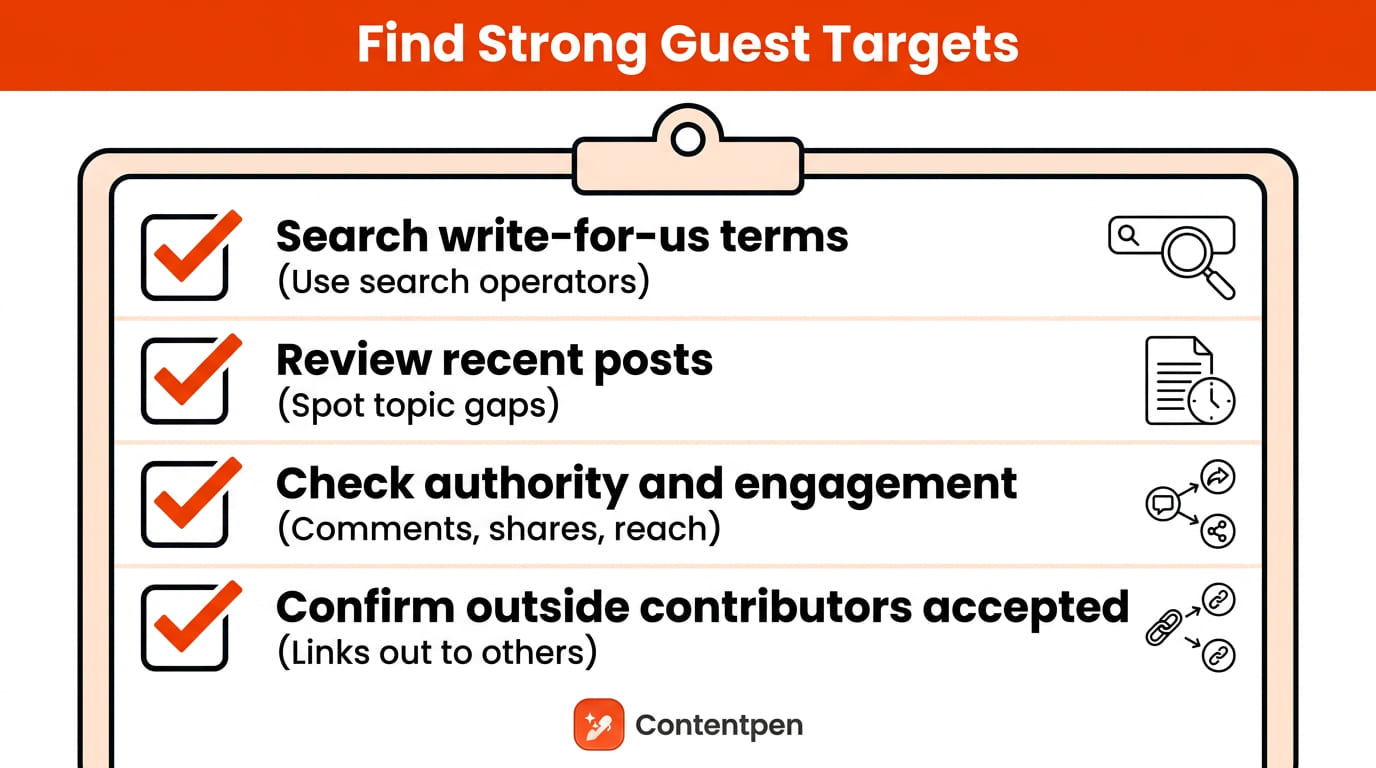
    Identifying strong guest targets

    Finding strong guest targets - Contentpen.ai.

    Run through this quick checklist before you send a single pitch:

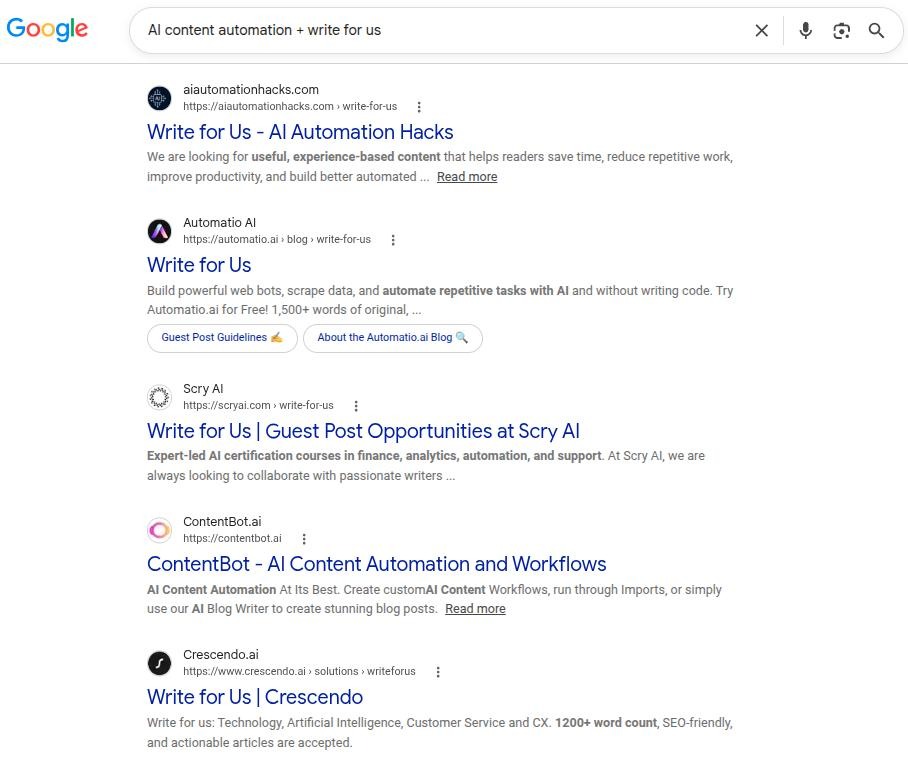
    1. Search for terms like “your niche + write for us” or “guest post guidelines” on Google to surface sites that openly accept outside contributors. Take the example of the “AI content automation + write for us” phrase that we typed into Google.
    Searching for guest posting sites with the search operator on Google.

    As you can see from the search results, these sites do accept guest content. However, there’s always a risk involved in link collaborations.

    If a publisher’s “write for us” page feels more like a sales pitch than an editorial invitation, be cautious. Having a contributor page isn’t a red flag on its own, but if selling placements seems to be the site’s main business, it may be a private blog network (PBN).

    1. Review the blog’s recent posts for topic gaps your specific expertise could fill.
    2. Check domain authority with a trusted tool and engagement signals like comments and social shares to understand if guest posting on the site is going to be worth it or not. 
    Looking for ideal guest posting sites by checking DR and traffic by location using a dedicated tool like Ahrefs.

    Look for a site with DA higher than yours, preferably in the range of 50-60 or more. Also, check the traffic by location for the guest posting site. 

    For example, if you are a service-based business (HVAC, plumbing) in the United States, you should prefer US traffic since those are the people you’d naturally want to sell to.

    1. Check if the site advertises a price for the post. If they do ask for money to put your link up, it’s better not to indulge in this activity, since Google penalizes paid link exchange, according to the Link Spam update. 

    Remember, the more natural and organic the guest posting process is, the better. Sure, approval times may be significantly higher when guest blogging on actual sites, but it’s surely worth the wait.

    Once you’re done with these steps, you are ready to pitch your guest post to the editor.

    How to pitch a guest post that gets a yes

    Landing the placement is often harder than writing the post itself, since popular blogs get more pitches than they could ever accept. 

    A pitch that gets a yes shows real familiarity with the hosts’ blog and proves to them that you understand their niche well.

    Generic spam pitches and hollow “give back to the community” messages get deleted within seconds, because editors can spot a template from the first line.

    Build rapport before you pitch

    Cold pitches convert far better once the editor already recognizes your name from somewhere else. For that to happen, you should already have some published samples that either rank on Google or have won AI citations.

    You can also follow this exact routine before pitching to build the rapport you need with editors:

    1. Spend a couple of weeks commenting thoughtfully on their recent posts.
    2. Reply to the hosts’ newsletter with genuine feedback.
    3. Engage with the publisher on LinkedIn or Instagram.
    4. When you eventually pitch, reference one of those specific articles by name, since it proves you actually read the site instead of mass-emailing every blog in your niche.

    Spending time to learn about the hosts’ blog builds trust with the editors. You genuinely start on the right foot with them, giving you the leverage to add quality links back to your site with the least hindrances.

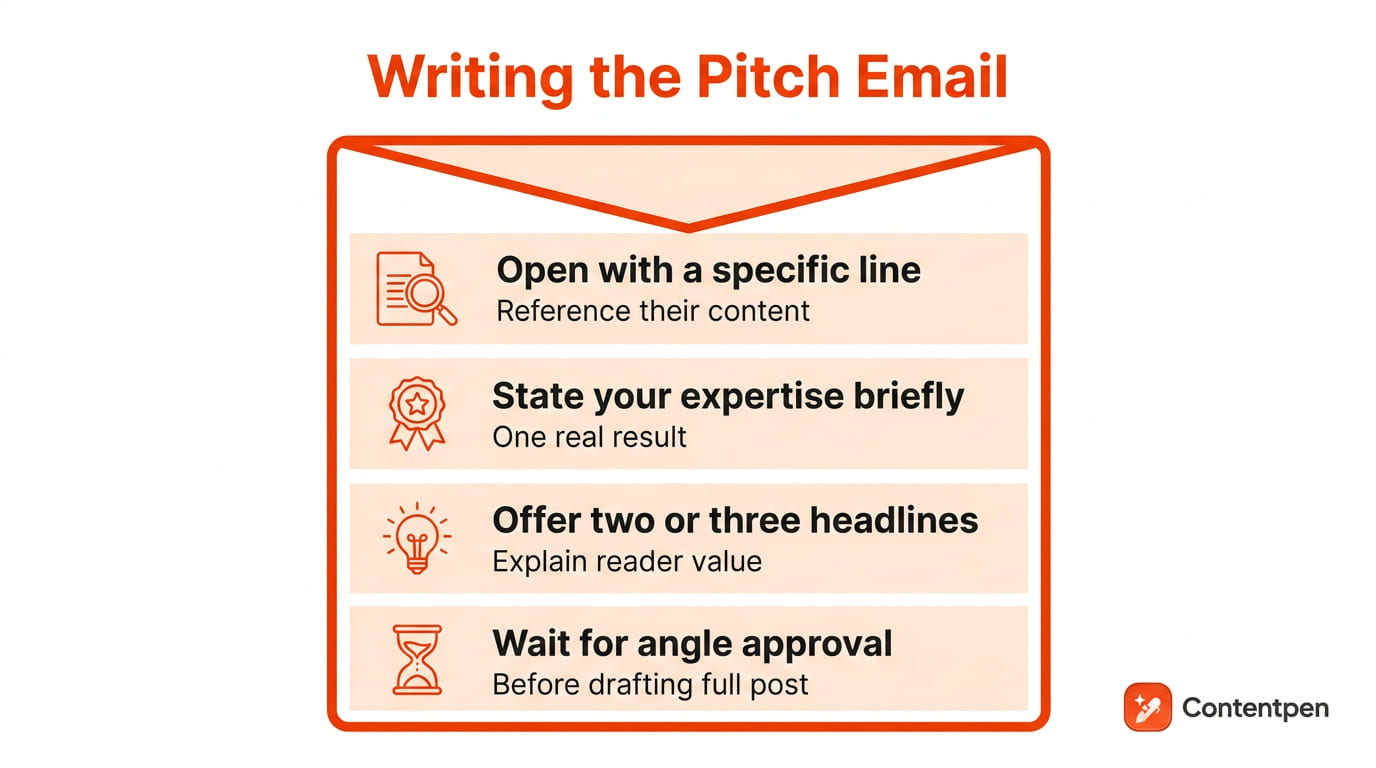
    Write the pitch email properly

    Email structure for guest posting pitch - Contentpen.ai.

    Follow this structure when drafting the email itself:

    1. Open with a specific line about their content. For instance, “Hey, I read about your AI visibility blog and loved how you explained the query-fan-out process.” This immediately grabs their attention. 
    2. State your expertise in a sentence or two, backed by a real result or credential. For example, “Hey, this is Alex, founder of XYZ marketing (Forbes Unicorn Company).”
    3. Offer two or three headline ideas, each with one line explaining what it covers and why their readers would care.

    Note: Never write the full guest post draft before you get approval on the angle. You can, however, do so if the publisher is reputable enough and you’re a beginner guest blogger with no online footprint to showcase your rapport. In that case, this could be your Hail Mary.

    How to write a guest blog post step by step

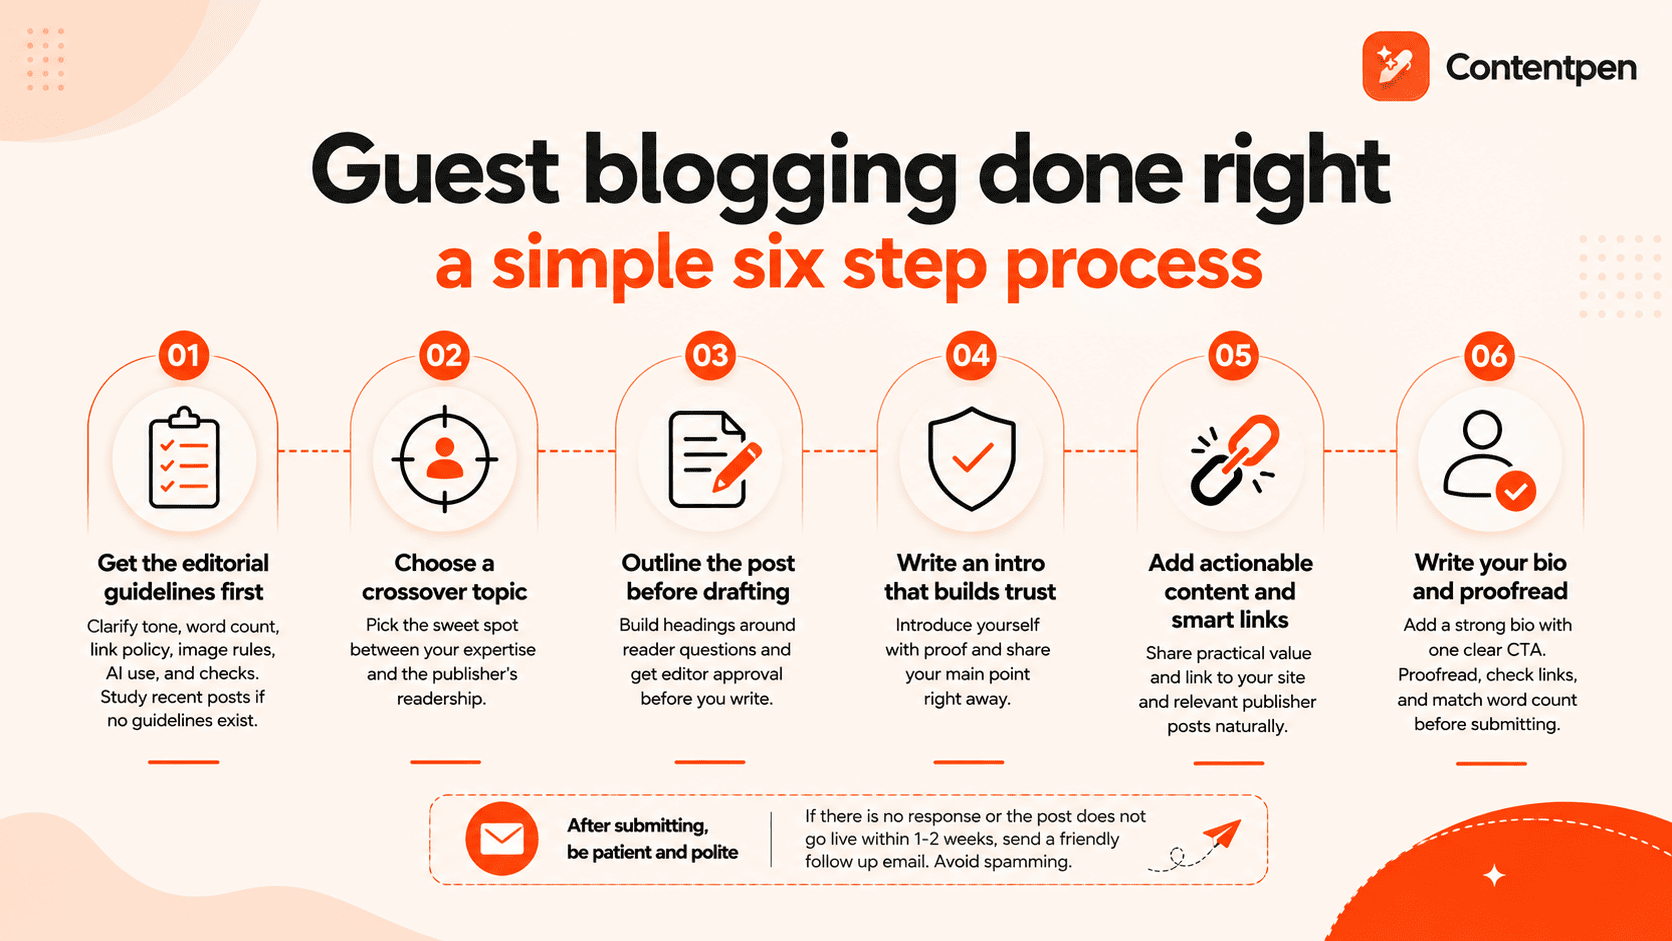
    Steps to write a guest post blog.

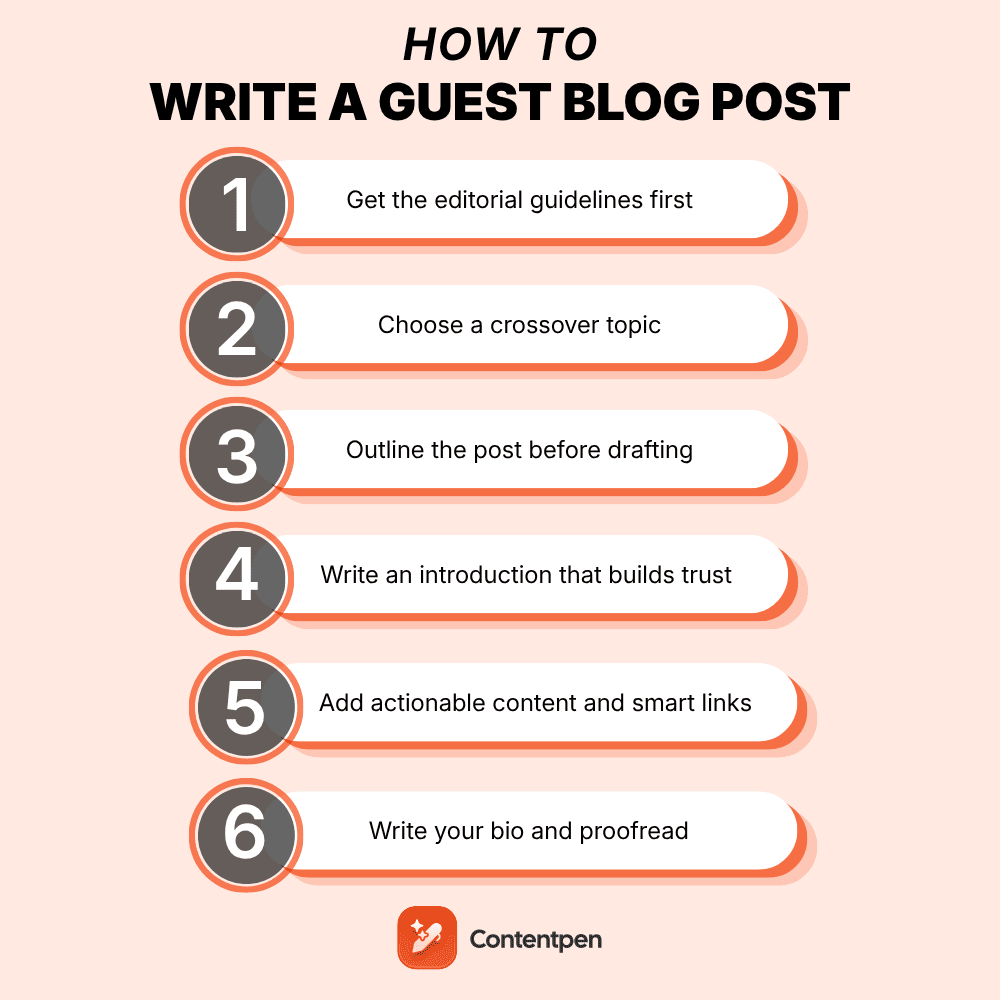
    Writing a guest blog post that gets accepted follows a repeatable sequence, from research through final proofreading. 

    Each step below affects whether an editor publishes your draft as submitted or sends it back with a rejection, so skipping ahead usually backfires later in the process.

    Step 1: Get the editorial guidelines first

    Before you draft a single line, ask the publisher for the following details:

    • Their preferred tone and voice.
    • Expected word count.
    • Link policy, including how many links are allowed and where.
    • How many branded images are allowed per article.
    • Rules on AI-assisted writing.
    • Any plagiarism or readability checks that they look for.

    If they have no formal guidelines, which is common for smaller blogs, study 5-6 recent posts to infer the voice, structure, and typical length they use instead of guessing. After a while, you will eventually see the pattern in the content they post, and all you have to do is follow it.

    Step 2: Choose a crossover topic

    Pick the topic sitting at the intersection of your expertise and the publisher’s readership, not just whatever ranks well for your own site. 

    Writing a topic that only serves the publisher’s audience might drive plenty of clicks back to your site. But those visitors won’t stick around if your own content won’t match what drew them there in the first place.

    Step 3: Outline the post before drafting

    Map your headings around the exact questions the publisher’s readers are typing into Google, rather than a generic list of talking points. 

    A tool like Contentpen can be a great help here to generate a detailed outline, tailored to your needs in minutes. It saves you from staring at a blank page while still matching the publisher’s expected structure and depth.

    Once the outline is ready, get approval from the editor before proceeding to the next steps. If they’re out of office or unavailable for any reason, you may write the draft, but please be prepared to make any changes if requested later by the publisher.

    Step 4: Write an introduction that builds trust fast

    Introduce yourself in one sentence with a real proof point, such as “after ten years building outdoor furniture, here’s what actually holds up outside.” 

    Lead with your main point right away instead of a slow windup, since readers decide within a few seconds whether to keep scrolling or click away.

    Keep the overall introduction of the article about 100-150 words (maximum) so that you can provide enough details to gauge the reader and also encourage them to read on.

    Step 5: Add actionable content and smart links

    This step matters more than any other in the entire process, since editors reject drafts here more often than anywhere else. 

    Always keep these rules in mind:

    • Give readers concrete steps, checklists, or numbers they can use right away instead of abstract advice they’ll forget by lunch.
    • Add a link to your own site early, tied to your name or brand, plus another one in your bio. Readers don’t scroll till the end, so it’s better to utilize the starting space of the blog for your own good while providing value to the publisher’s audience.
    • Add links to the publisher’s existing posts, or internal links. This signals real research to the editor and also keeps your external links balanced in the article. 

    As a general rule of thumb, keep every sentence editorial rather than promotional, from the opening line to the final paragraph.

    Step 6: Write your bio and proofread before submitting

    Pair one strong trust statement with a single clear call to action, whether that’s your website, a landing page, or a free resource. Then proofread the bio several times before submitting.

    Run through this final checklist before hitting send:

    1. Read the draft out loud once to catch awkward phrasing.
    2. Confirm every link works and points where it should.
    3. Match the word count against what the publisher requested.
    4. Double-check your bio and call to action are both included.

    Once you send your guest post and bio details to the publisher, wait. If you don’t get a response or your post doesn’t go live within 1-2 weeks, you can remind them again with an email. 

    However, if you keep spamming their email, you can blow away the chance of your collaboration. Remember that all great things take time.

    How to get a guest post accepted and boost your results

    Getting a guest post accepted the first time matters, but the writers who keep landing placements are the ones editors genuinely want to work with again. 

    Promote the piece after it goes live, tag the publisher across social platforms, and reference it in your own newsletter. Editors notice who actually helps distribute the content instead of disappearing right after publication.

    Common mistakes that get guest posts rejected

    Guest post rejection - mistakes to avoid.

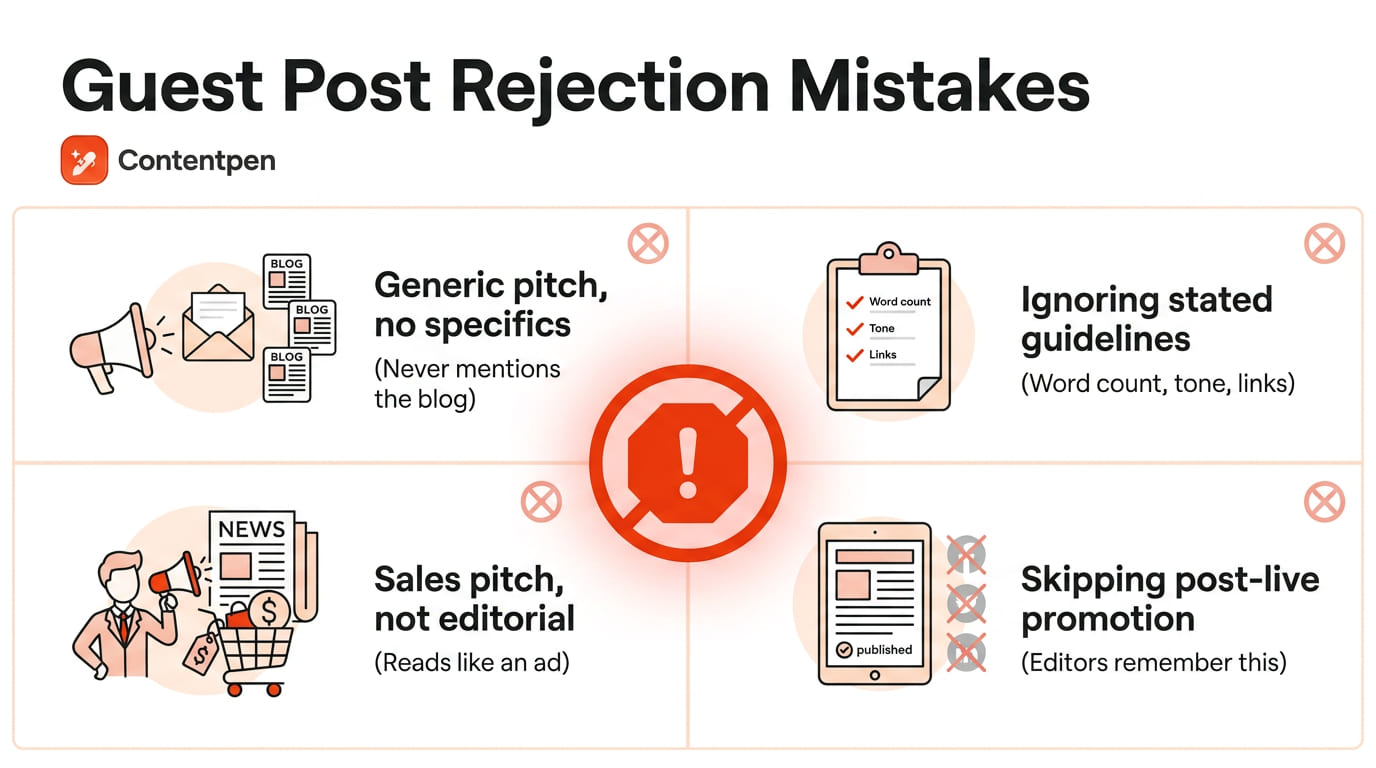
    A handful of avoidable mistakes account for most of the rejections editors send out:

    • Sending a generic pitch that never mentions a specific post, angle, or detail from the blog.
    • Ignoring the publisher’s word count, link, or tone guidelines after they’ve already been provided.
    • Turning the post into a sales pitch instead of genuinely useful, editorial content.
    • Skipping promotion once the post is live, which editors remember before the next pitch arrives.

    In general, ensure that your content is according to the EEAT guidelines with helpful links (besides your own), images, and video embeds where necessary.

    Contentpen helps you with this process by taking you from an outline to a complete, SEO and GEO-optimized article.

    From outline to publish-ready content that fills them

    check

    Structured

    check

    Consistent

    check

    SEO-aligned

    check

    Fast

    Generate Outlines FREE
    AI SEO Interface

    The tool also takes care of alt text for your images and ensures that everything is according to the publisher’s needs.

    The takeaway

    Guest blogging success comes down to research, following the publisher’s rules, and delivering real value. 

    Every step, from finding a crossover topic to writing a bio with one clear call to action, either builds an editor’s trust or loses it.

    Platforms like Contentpen can handle the heavy lifting on research, outlining, and drafting, freeing up your time for the personal outreach.

    Now that you know how to write a guest blog post that fits an editor’s exact expectations, pick one site this week and send a specific, well-researched pitch. Follow it up by sending a complete, SEO-optimized guest blog post that helps you capture the right audience.

    Frequently asked questions

    Is guest posting worth it in 2026?

    Yes, when you target relevant, quality sites, since backlinks and audience overlap still drive real SEO and referral value. Low-quality mass guest posting on irrelevant or spammy sites has diminishing returns and can even hurt your reputation with search engines and readers.

    How long should a guest blog post be?

    Most guest posts run 1000 to 1,500 words, though the exact length depends entirely on the publisher’s own guidelines. Always check their submission requirements first and treat their stated minimum or maximum as the final word.

    Do you need a website to write a guest post?

    No, a website isn’t strictly required, but having one maximizes the backlink and lead-capture value of the post. Without a site, you can still direct readers to a social profile, a newsletter signup, or a portfolio page as your call to action.

    Can you use AI to write a guest blog post?

    It depends entirely on the publisher’s policy, so always ask before submitting an AI-assisted draft. In most cases, the editor may require you to run extra plagiarism or readability checks, regardless of how you created the content.

    How do you find guest posting sites for free?

    Search operators like “your niche + write for us” on Google surface sites that openly accept outside contributors at no cost. You can also check competitors’ backlink profiles for sites that have already published similar guest content, since that usually means they’re open to more.

  • How to write a corporate blog: A step-by-step guide for teams

    How to write a corporate blog: A step-by-step guide for teams

    Most corporate blogs fail for the same reason. Too many people touch the draft before it goes live, and by the time all stakeholders have made their edits, the post reads like nobody in particular wrote it.

    Writing a corporate blog means setting goals tied to the business, building a repeatable structure for every post, and getting approvals without losing the point of the article.

    This guide walks through each of those steps, plus a framework for getting corporate content through legal and brand review without watering it down. You’ll also see where a platform like Contentpen fits into the workflow.

    So, let’s get started.

    Key takeaways

    • A corporate blog is written for and reviewed by a company, so it needs a repeatable structure and should follow a specific voice guideline.
    • Build a content mix across thought leadership, product education, customer proof, and company culture, so the blog doesn’t turn into one long product pitch.
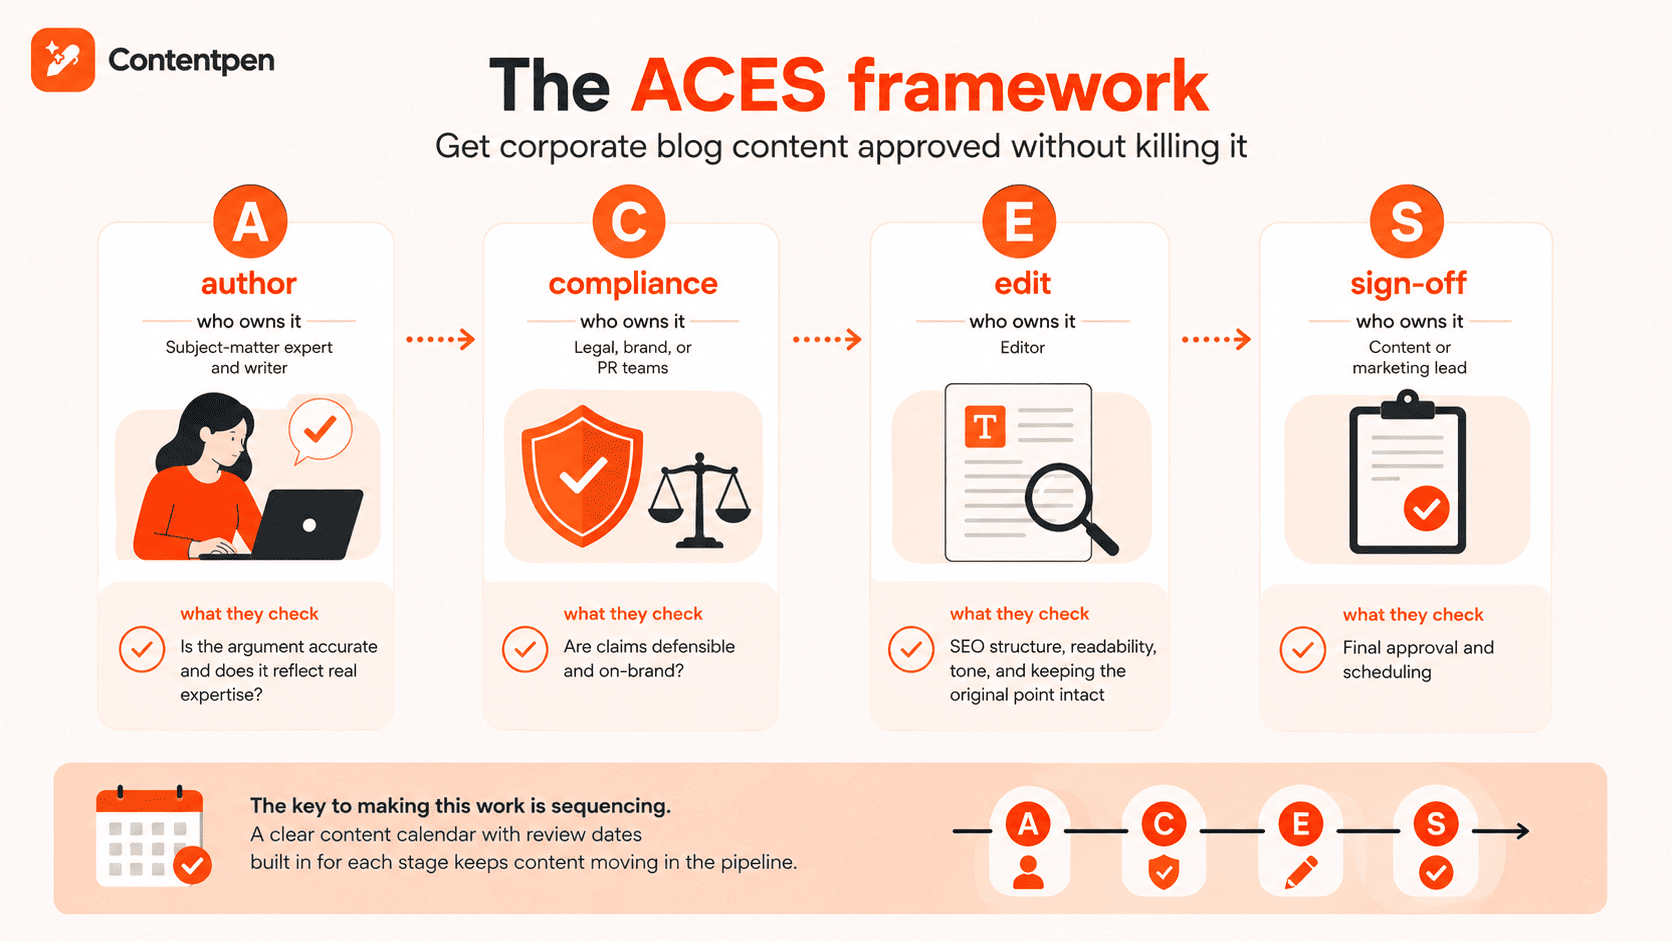
    • Use an approval framework like ACES to move drafts through legal, brand, and leadership review without losing the writer’s original point of view.
    • Study a handful of strong corporate blogs for structure and tone, then adapt what works to your own industry.

    What is a corporate blog?

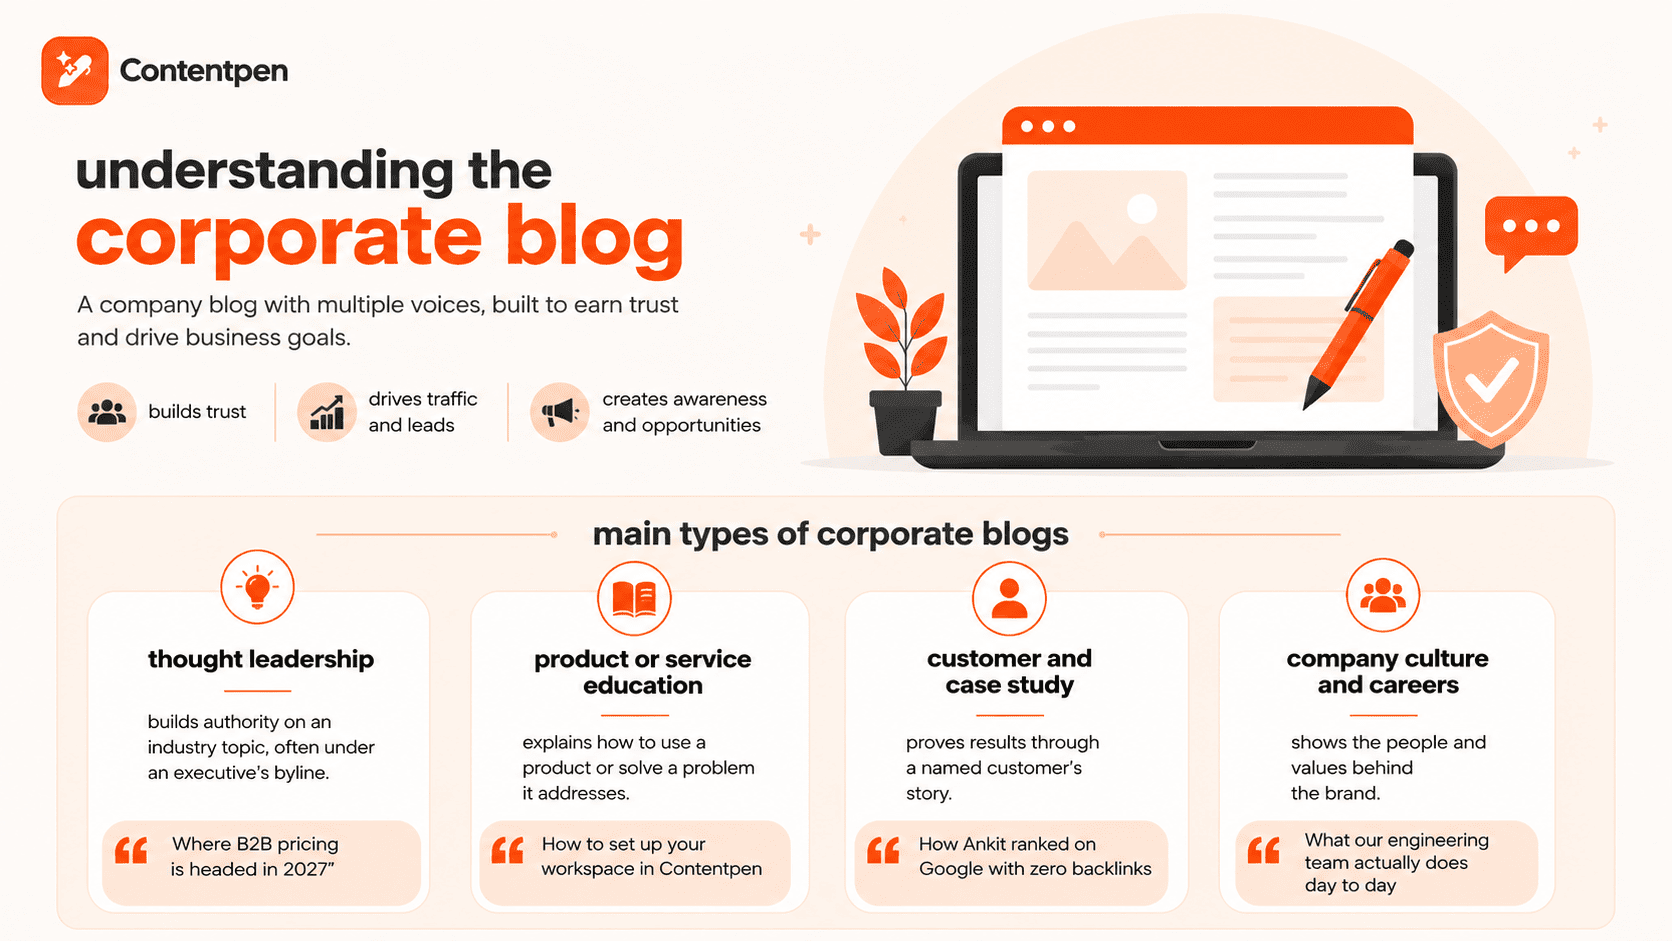
    A corporate blog is a blog published by a company, usually with multiple contributors, that’s written to build trust with an audience. It also supports a business goal like gaining organic traffic, leads, or spreading awareness about open positions for hiring.

    What is a corporate blog? Explained.

    That sounds close to any other blog, and structurally it is. The differences show up in who writes it, who approves it, and what it’s allowed to say.

    A blog about yourself or a niche blog like a travel blog answers to one voice and one set of opinions. A corporate blog answers to a brand. Every post has to sound tonally consistent, and every claim has to survive a legal or compliance read before it goes live.

    The main types of corporate blogs

    Most corporate blogs fall into one of four main categories, and knowing which one you’re writing helps you set the right tone before you draft anything.

    Blog typeWhat it doesExample topic
    Thought leadershipBuilds authority on an industry topic, often under an executive’s byline“Where B2B pricing is headed in 2027”
    Product or service educationExplains how to use a product or solve a problem it addressesHow to set up your workspace in Contentpen
    Customer and case studyProves results through a named customer’s storyHow Ankit ranked on Google with zero backlinks
    Company culture and careersShows the people and values behind the brand“What our engineering team actually does day to day”

    A healthy corporate blog usually runs a mix of all four rather than leaning entirely on one. A blog that’s only product education starts to feel like a help center. A blog that’s only thought leadership starts to feel disconnected from what the company actually sells.

    How do you set goals and structure for a corporate blog?

    Setting goals for a corporate blog means defining what the business wants from it before anyone writes a single post. Then, you build your content plan backward from that goal.

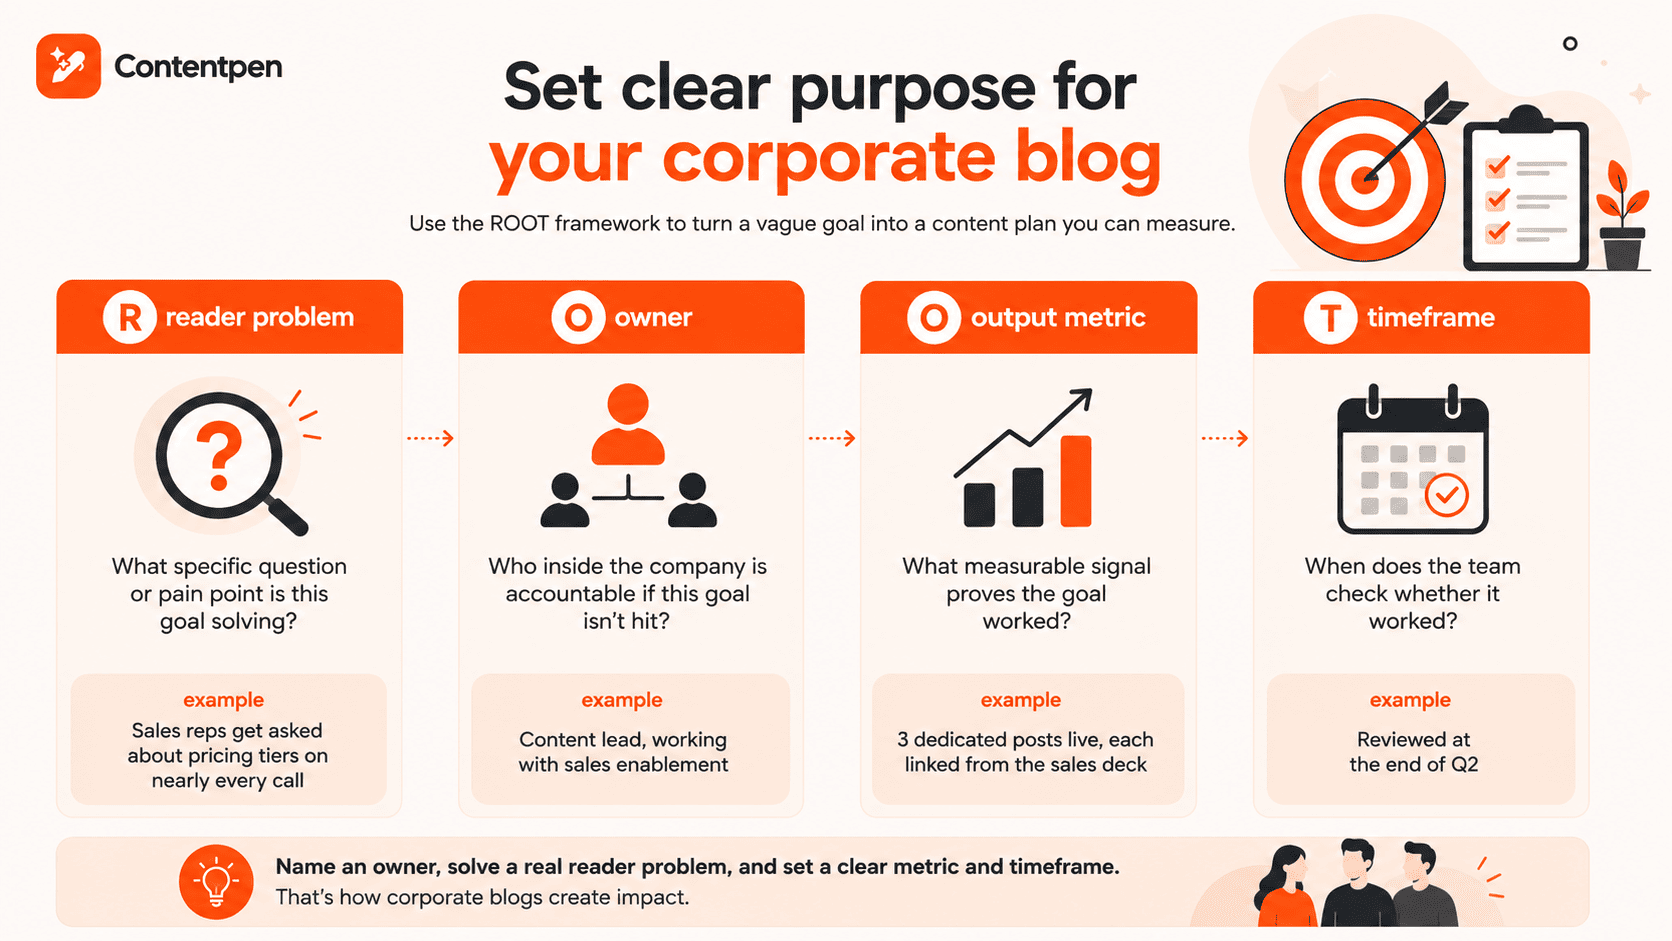
    Use the ROOT framework to define what the blog is actually for

    Many companies have vague goals like “grow brand awareness”, which are hard to plan content around and impossible to report on later.

    The ROOT framework - Contentpen.ai.

    The ROOT framework covers that gap. It asks four questions before a single post gets written: Reader’s problem, owner of the content, output metric, and timeframe.

    Let’s understand it in more detail below:

    ROOT elementWhat it answersExample
    Reader problemWhat specific question or pain point is this goal solving“Sales reps get asked about pricing tiers on nearly every call”
    OwnerWho inside the company is accountable if this goal isn’t hit“Content lead, working with sales enablement”
    Output metricWhat measurable signal proves the goal worked“3 dedicated posts live, each linked from the sales deck”
    TimeframeWhen the team actually checks whether it worked“Reviewed at the end of Q2”

    The owner column is what most goal-setting advice skips, and it’s the one that matters most for a corporate blog specifically. 

    A goal with no named owner tends to survive the first round of edits and quietly disappear by the third, since nobody’s job depends on the post actually shipping.

    Once the goal has a reader problem attached, the content mix from the table above becomes easier to plan. 
    For example, a blog built to support sales needs more product education and customer proof. Similarly, a blog built to support hiring and PR efforts leans harder on culture and thought leadership.

    Build personas around the departments the blog serves

    A corporate blog usually has more than one reader to satisfy. A prospect researching your product, a journalist looking for a quote, and a candidate deciding whether to apply to your company are all reading the same blog for different reasons.

    Instead of one broad persona, map 2-3 reader types to the departments that care about the blog’s success, such as sales, PR, and talent. 

    Ask each department what question they wish the blog answered, and you’ll have a running list of post ideas that ties directly to a business need instead of a guess.

    How do you write a corporate blog post step by step?

    Writing a corporate blog post well comes down to the same core mechanics as any SEO-friendly post, applied with a bit more discipline before it goes live.

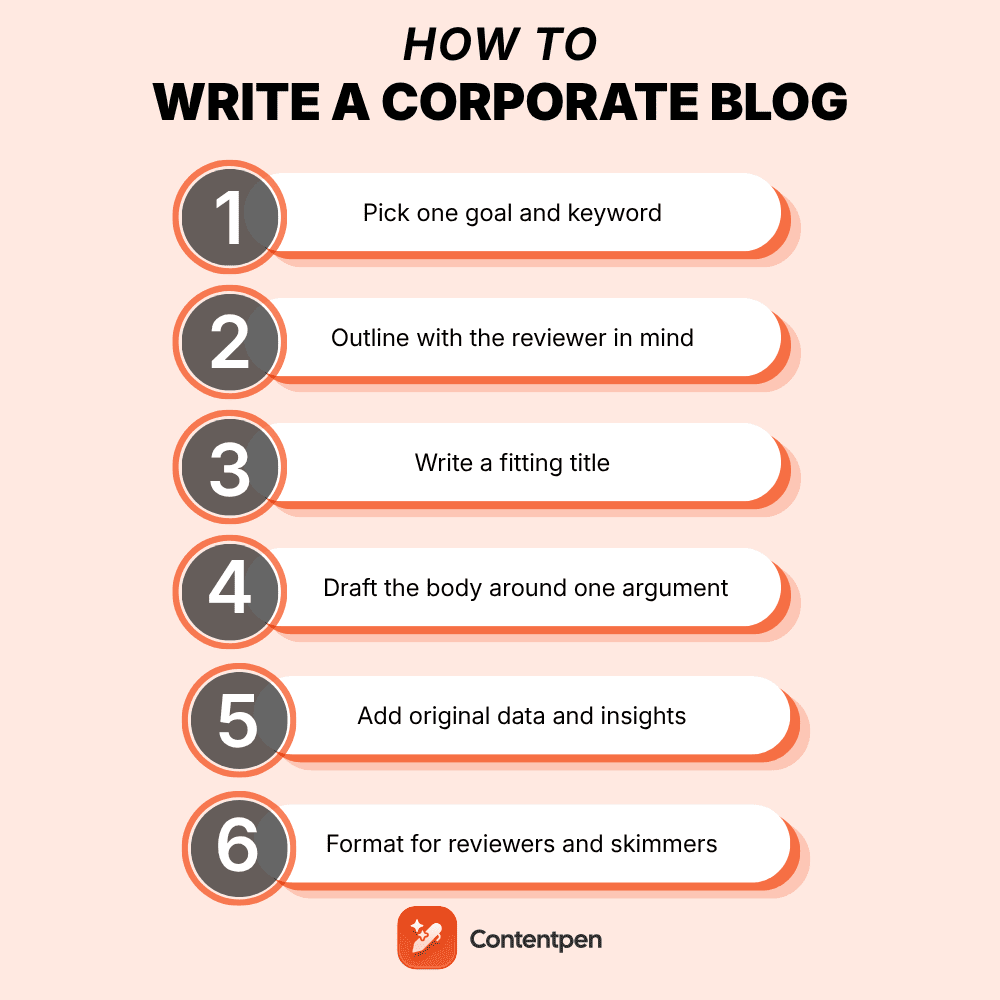
    #1: Pick one goal and one keyword per post

    Before you outline anything, decide what this specific post is for. Once the goal is clear, pick one primary keyword and do a quick pass of keyword research to confirm real people are searching for it. 

    Corporate blogs often skip this step and write about whatever the executive team wants to say that week, which is how you end up with posts nobody ever finds.

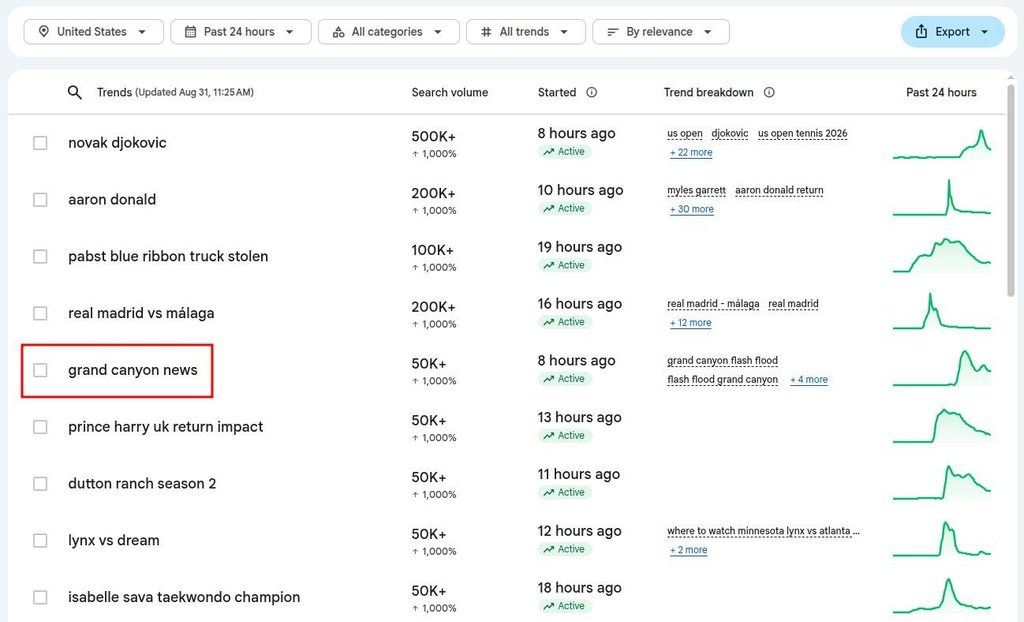
    You can use many different strategies to complete this step. For instance, search for terms trending right now in Google Trends for your niche. This tool will help you get a piece of content that quickly climbs rankings, even if only temporarily.

    For instance, if you are a touring company in Arizona, you may create an awareness guide about the Grand Canyon floods (trending as of writing this post).

    'Grand Canyon news' example on Google Trends.

    Why? Because it is already a trending topic, and if you tell people about this news, you might also build trust with them that you actually care about their safe travels. Win-win.

    Mix trending pieces with evergreen content, such as ‘HowTo guides’, ‘What is [X]’ articles, and other learning blogs that keep bringing in valuable traffic for your business over time.
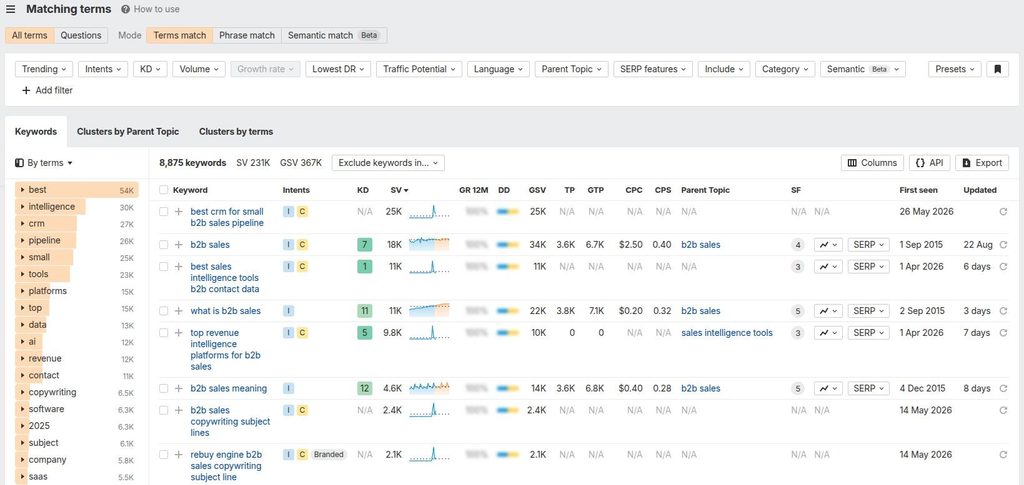
    For instance, as a B2B consulting agency, you can search for head terms, such as “B2B content marketing”, “B2B sales”, etc., on a dedicated keyword research tool like Ahrefs.

    Ahrefs example for keyword 'What is B2B sales.'

    Immediately, you can see that keywords like “what is B2B sales” show promising keyword volume, less KD, and higher traffic potential.

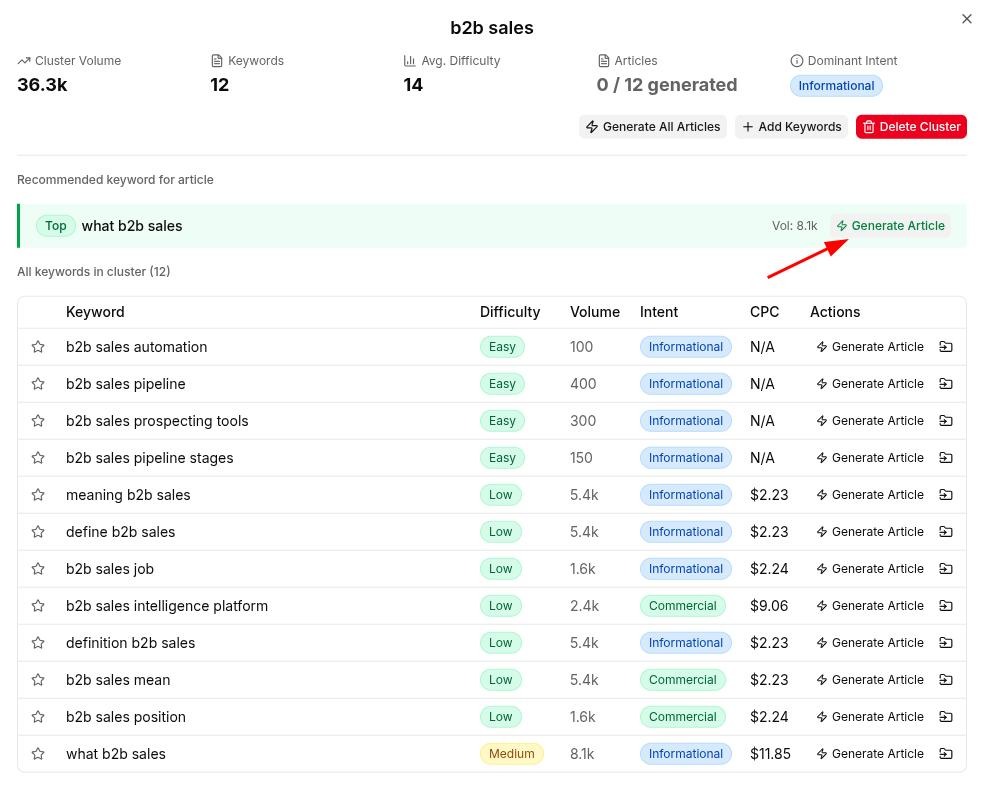
    Later, you can plan your content around either of the topical clusters mentioned earlier, or use Contentpen to make your topic keyword into a complete, SEO- and GEO-optimized blog.

    Contentpen keyword clusters to article generation workflow.

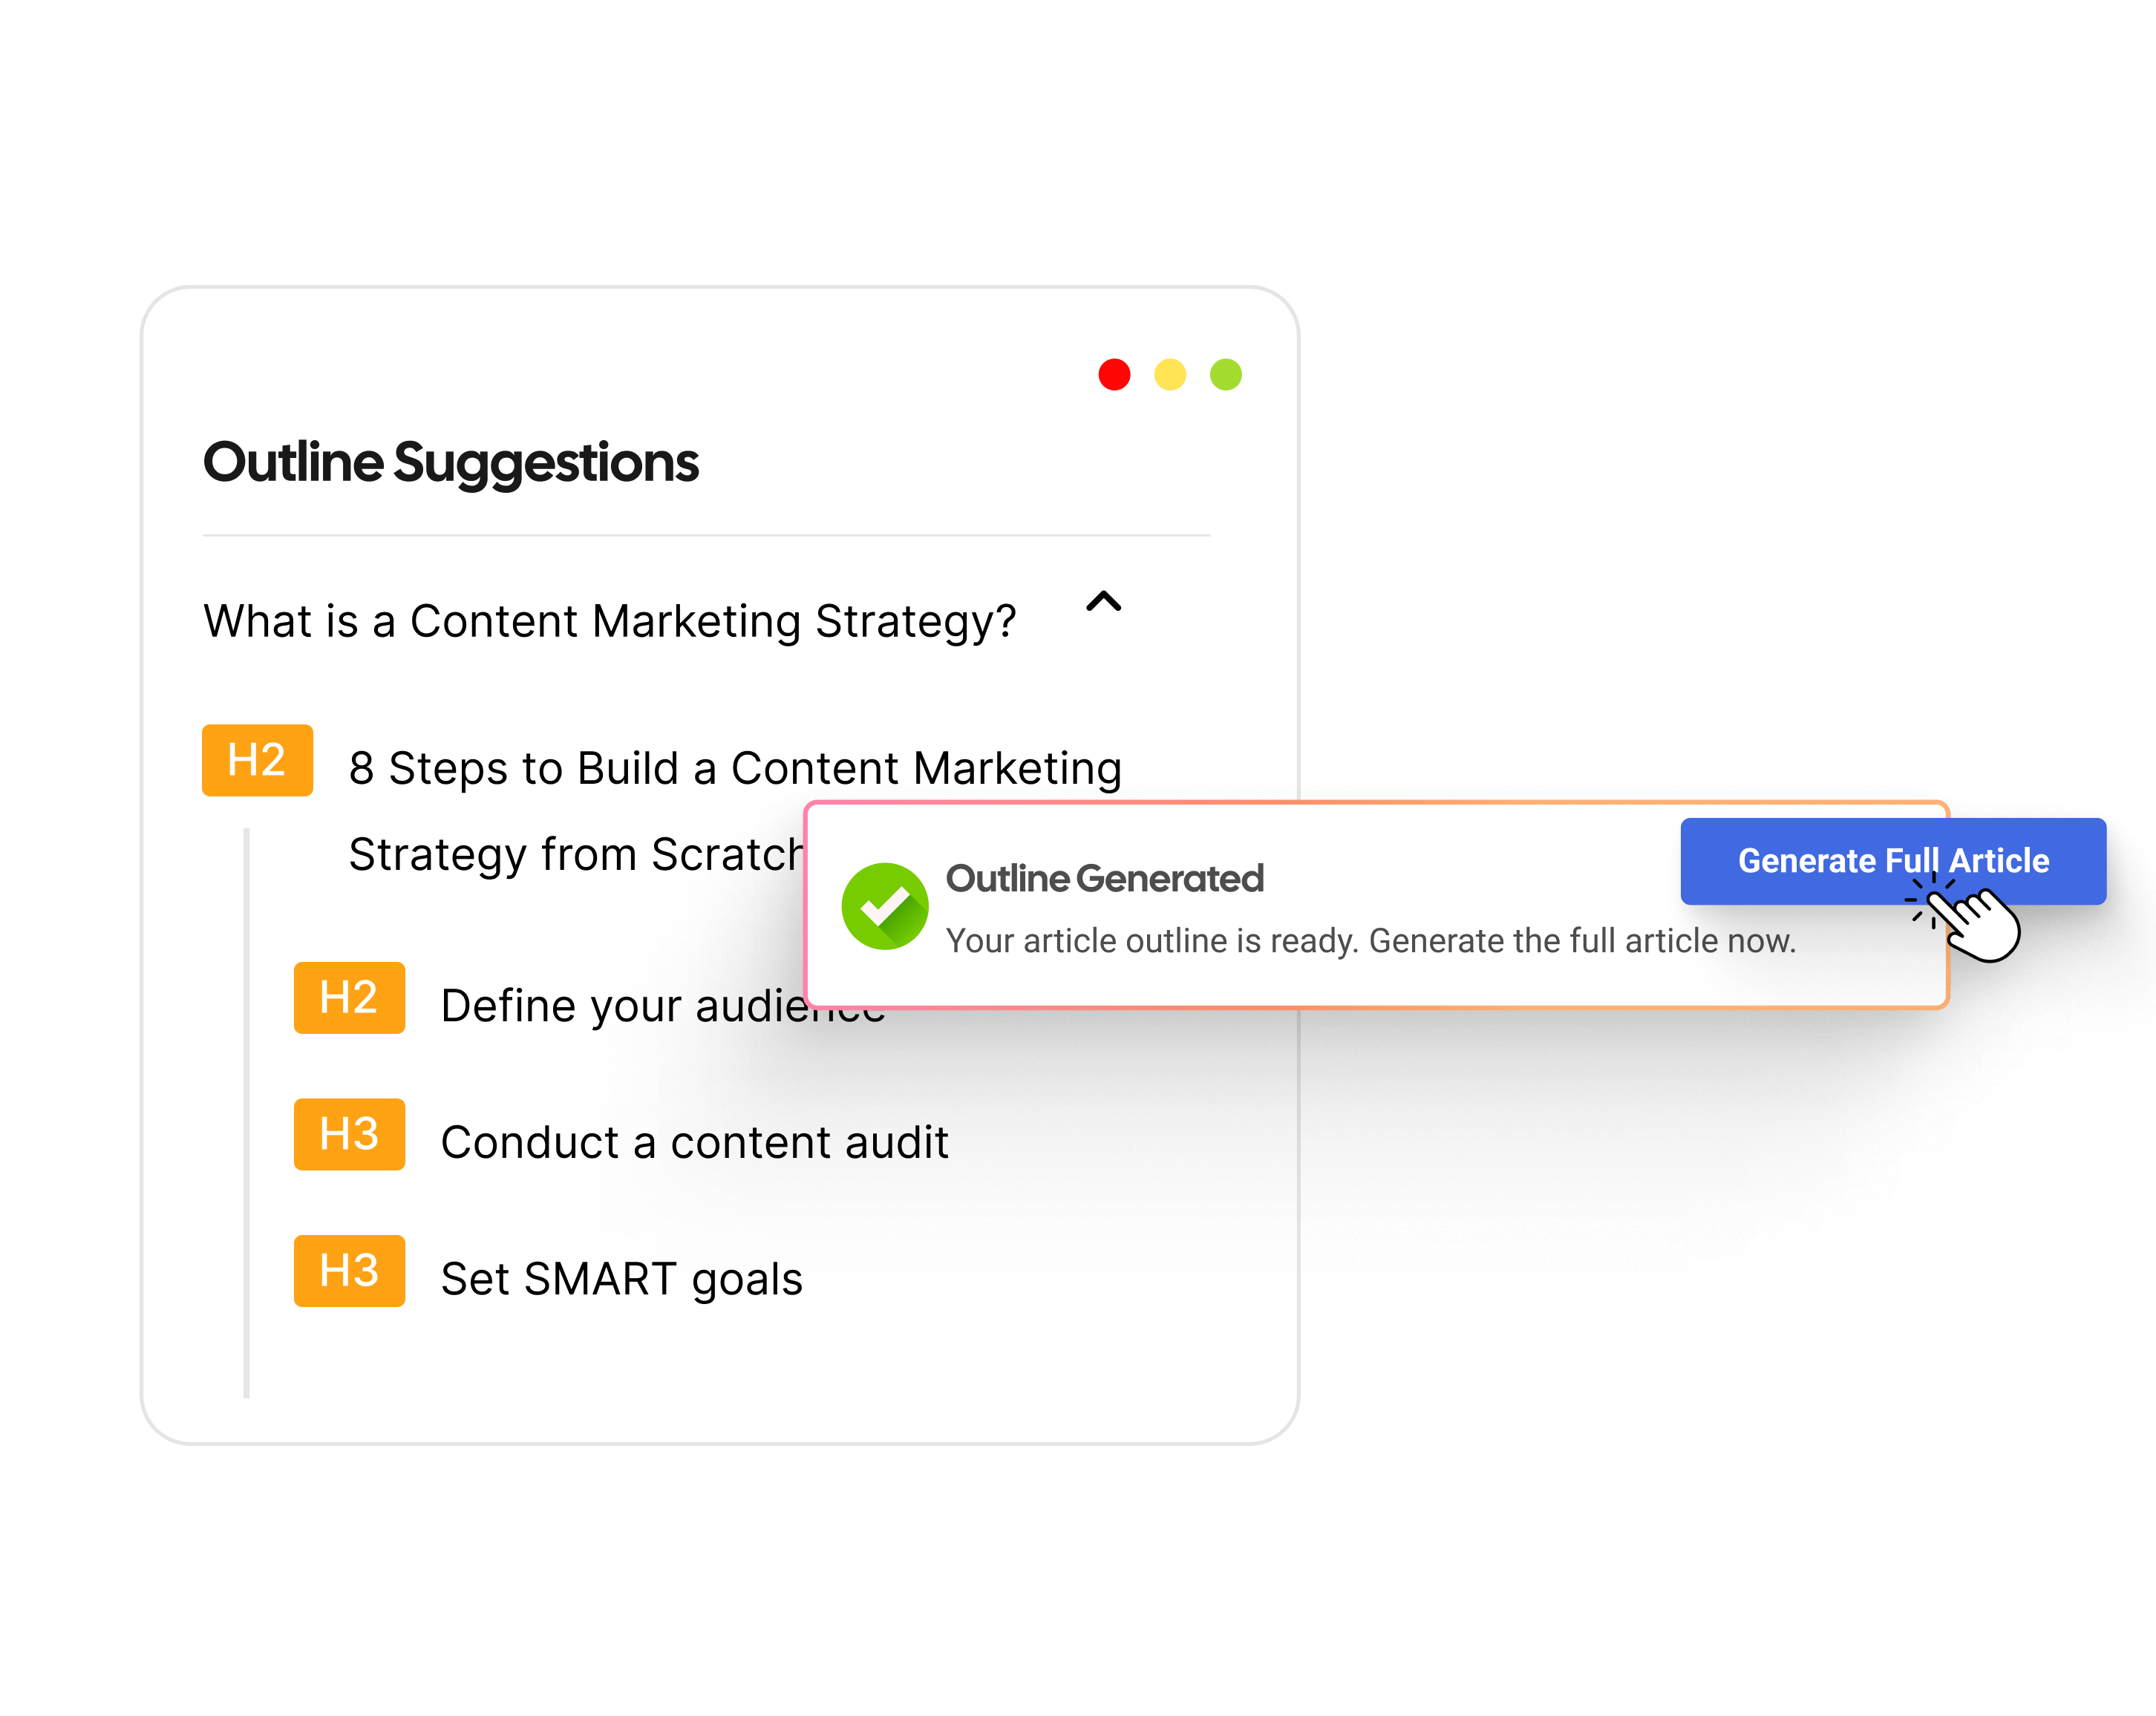
    From there on, generate outlines and blog content directly with a click of the ‘Generate Article’ button.

    #2: Outline with the reviewer in mind

    A corporate blog outline needs one extra column that a personal blog outline doesn’t: who has to approve this section.

    Some of the aspects of your corporate blog that need attention:

    • Title and keyword intent
    • H2 and H3 headings, with any sections that need a legal, brand, or subject-matter-expert review flagged early
    • Internal links, data points, and any claim that will need a source
    • The one CTA this post is building toward

    Flagging the sensitive sections in the outline, not after the draft is written, saves the most time. If legal is going to want to soften a claim about a competitor or a specific number, better to know that before a writer spends three hours drafting around it.

    #3: Write a title that survives brand review

    A strong corporate blog title includes the primary keyword, makes a real promise, and stays under 60 characters so it doesn’t get cut off in search results.

    Brand teams tend to push corporate titles toward something safe and generic. The way to keep a title sharp is to make the promise specific instead of vague.

    For instance, “how to cut onboarding time in half” instead of “improving your onboarding process.” Specific claims are also easier for legal to fact-check quickly, which speeds up the approval process instead of slowing it down.

    #4: Draft the body around one clear argument

    Every strong corporate blog post makes one main argument and supports it, followed by a list of supporting arguments, all backed up with clear data points.

    Open with a real problem the reader actually has. State the primary keyword naturally within the first 100 words, then let the argument unfold through headings that mirror how someone would search for the answer.

    Here, it is also important to understand the “query-fan-out” process that AI answer engines use to understand and cite content.

    As a hypothetical example, consider the blog title “how to write a corporate blog that converts.” This can be broken down into three important parts: A) how to write a blog, B) understanding the corporate part of a blog, and C) conversion optimization.

    You can use tools like AnswerThePublic to grasp all variations and subquestions a user will search for given a topic.

    AnswerThePublic by Neil Patel, keyword research example.

    If you want to skip using tools, you can directly search your topic in a Google search. Look for “People Also Ask” search boxes and autocomplete queries to learn about subqueries you need to target for one clear argument in your post.

    Where the company’s product genuinely solves part of the problem, say so plainly and once. Readers and reviewers trust a post more when the pitch shows up in one clear place instead of being sprinkled through every paragraph.

    #5: Add proof a competitor’s post skipped

    The posts that outperform in this category almost always include something a generic AI-written explainer can’t: A real number from the business, a quote from an actual employee, or a specific customer example.

    If your company has performance data, a survey result, or even an internal benchmark that isn’t confidential, that’s worth more than another paragraph of general advice. 

    It’s also the detail that tends to get pulled into AI Overviews and other answer engines, since those systems favor content with something unique and specific to cite.

    #6: Format for reviewers and skimmers at once

    Corporate blog posts get read twice, once by the audience and once by everyone who has to approve it. 

    Therefore, it is important to use short paragraphs, clear subheadings, and a bolded takeaway to make both of those readers move faster through the content.

    Break up long sections with a table, a short list, or a quote from a subject-matter expert (SME). 

    It’s the same on-page readability advice that applies to any blog post. But it matters more here because stakeholders can easily skim past important claims in the text if it isn’t formatted properly.

    How do you write corporate content that doesn’t read like a press release?

    Writing corporate content that doesn’t sound corporate means writing like the specific person who knows this topic best, then editing for clarity later.

    Most companies follow the instinct of “softening” every sentence until nothing can be misread.

    That instinct is what turns a useful post into something that reads like a professional blog post written by a committee instead of a person.

    Write the first draft with one named voice in mind

    Before a writer starts drafting, pick one real person at the company who actually knows this topic, and write the post in their voice and opinions.

    The reason this matters comes down to what happens in review. A generic post is easy for a reviewer to edit further into blandness, since there’s no specific person’s judgment being overwritten. 

    However, a post that clearly reflects one expert’s actual POV is harder to soften, because doing so means contradicting a named person’s stated opinion.

    Compare these two openings for the same section:

    Generic company voice: “Our team believes that customer onboarding is a critical part of the user journey and should be given careful consideration.”

    One named voice: “Our head of customer success has run onboarding for over 200 accounts, and her take is blunt: most companies over-explain the product in week one and under-explain it in week three, right when people actually start hitting friction.”

    The second version has a specific claim, from a specific person, that a reviewer would have to actively argue to cut. The first version has nothing to defend, so it gets cut the quickest.

    Cut the words that only exist to sound safe

    Phrases like “leading provider,” “best-in-class,” and “innovative solution” don’t tell a reader anything, and they’re usually the first thing an editor would cut from the draft.

    Replace a vague claim with a specific one wherever you can. For instance, “we cut support tickets by a third with our XYZ system” says more than “we significantly improved customer satisfaction.” 

    Specific claims are also easier to fact-check for both reviewers and audiences, which improves your TAT (turnaround time) for blogs and instills trust with the audience.

    Let the company’s real opinion show up somewhere

    A corporate blog post doesn’t have to be neutral on every topic. 

    If your company has a genuine point of view on where the industry is headed, or disagrees with a common piece of advice, that opinion is often the most shareable part of the post. 

    It shows that the corporate blog has real “spine” to stand out from the pack, given that the advice given or the disagreement isn’t entirely on false grounds.

    For example, disagreeing on the fact that page speed affects rankings is indefensible, since it’s a known fact for a long time now, as confirmed by Google.

    But one could argue about the statement “gated content converts better”, since it is a debatable topic, especially as its interpretation changes from niche to niche.

    Either way, neutral, safe content rarely seems to earn its place. It barely gets any backlinks, quotations, leads, or conversions. Meanwhile, a clear, defensible opinion does stir things up and can help you build a trusted following online and establish yourself as an authority.

    The ACES framework: Getting corporate blog content approved without killing it

    The step that’s unique to corporate blogging is getting a draft through everyone who has a stake in it without losing its original voice or meaning.

    The ACES framework - Contentpen.ai.

    The ACES framework breaks that process into four main stages:

    StageWho owns itWhat they check
    AuthorSubject-matter expert and writerIs the argument accurate and does it reflect real expertise?
    ComplianceLegal, brand, or PR teamsAre claims defensible and on-brand?
    EditEditorSEO structure, readability, tone, and keeping the original point intact
    Sign-offContent or marketing leadFinal approval and scheduling

    The key to making this work is sequencing. Giving each stage one owner also helps avoid the problem of all stakeholders editing the same document at once, which helps simplify the writing workflow. 

    A clear content calendar with review dates built in for each stage keeps content moving in the pipeline.

    Corporate blog examples worth studying

    Good corporate blog examples share a few habits worth borrowing regardless of your industry.

    #1: HubSpot blog

    HubSpot corporate blog example.

    HubSpot’s blog stays organized around clear reader problems instead of company news. They offer many learning resources and free templates for their users on their blog for social media scheduling, email writing, etc.

    #2: Basecamp blog

    Basecamp blog example.

    Basecamp’s blog leans on strong, specific opinions from its founders rather than neutral advice. They share unique frameworks, like “Getting real”, and playbooks that software developers, marketers, and sales professionals can use to sell better and more efficiently. 

    #3: Slack blog

    Slack’s blog mixes product education with genuine workplace culture writing that doesn’t feel like a pitch.

    Slack corporate blog.

    None of these blogs read like they were written by committee, even though every post almost certainly went through a review process. 

    The posts that hold up are the ones where a real opinion or a real detail survived that process instead of getting edited out.

    If you want a broader set of formats to study beyond corporate blogs, our roundup of strong blog examples covers a wider range of marketing and content blogs across industries.

    How can AI tools like Contentpen help teams run a corporate blog?

    Contentpen for AI and search-optimized content.

    AI tools help corporate blogging teams the most in the parts of the process that don’t need a human opinion, research, outlining, and formatting. They help you spend your time on the parts that do matter, like the SME’s actual argument and the review process.

    This is where Contentpen fits in. It is an AI-powered blogging platform that owns the entire keyword research to content creation, optimization, and publishing pipeline.

    Workflows and content planning

    It also offers editorial and approval-based workflows to keep everyone in the loop and a content calendar that helps you plan and publish posts regularly.

    Automated interlinking

    Once a draft is written, the built-in AI linking assistant connects new posts to existing product pages, use case pages, and past articles automatically. This helps a growing corporate blog stay connected internally without any disjoints.

    Improve SEO with automated linking that fills them

    check

    Adds context-aware internal and external links automatically

    check

    Uses relevant anchor text to improve SEO and content flow

    Try Auto-Interlinking
    AI SEO Interface

    SEO opportunities to fix rankings

    Find what blogs are losing rankings, clicks, and engagement with the SEO opportunities feature. Fix decaying posts with one click instead of a full rewrite.

    Turn existing content into growth opportunities

    check

    Identify pages losing traffic or CTR

    check

    Find quick wins to improve clicks and rankings

    Find Content Opportunities
    AI SEO Interface

    SEO opportunities also surface cannibalization issues, competitor gaps, and pages that need slight editing to regain top search positions.

    Bulk content creation for enterprises

    Larger teams and enterprises managing content across multiple departments also get more out of bulk content creation for producing several posts at once without disrupting brand voice.

    AEO dashboards for PR and brand teams

    PR and brand teams tracking how the company shows up across AI search results can use Contentpen’s AI visibility tool. They can see their brand sentiment, share of voice in the niche, and source gaps against rivals within one dashboard.

    None of this replaces the ACES review process above. It just removes the busywork around it so the review process has more time to focus on the one thing that actually matters, whether the argument in the post is any good or not.

    What happens after you publish?

    Publishing a corporate blog post is the start of the work, not the end of it. Most teams promote and distribute a new post externally and stop there. But the sales, PR, and customer success teams inside your own company are often the fastest way to get it in front of the right people.

    Share the post internally so sales can use it in outreach and customer success can link it in support conversations. 

    Once the post is live, share it the same way you’d share any other blog post, on social, in email, and in relevant communities. If the post is driving real results, consider putting paid budget behind it too.

    Corporate blogs also go stale faster than personal blogs. Product details, pricing, and quotes from executives change more often than general advice does. 

    Set a simple review cadence, so your team catches outdated claims before a customer or journalist does.

    Final thoughts

    A corporate blog isn’t just a personal blog with a bigger budget. It’s a company asset, and it has real stakeholders who expect it to be treated that way.

    Set goals with something like the ROOT framework and build a content mix that serves more than one department. Use a clear approval process like ACES so review strengthens a post instead of flattening it.

    For the next step, start with one post, run it through this process end to end, and adjust the framework to fit how your team actually works. 

    If you want help managing the research, structure, and scheduling side of that process, a platform like Contentpen is ideal to handle the repetitive parts of that pipeline.

    So your team’s time goes toward strategizing, writing, and reviewing the posts, instead of mundane tasks.

    Frequently asked questions

    Is a corporate blog the same as a company newsletter?

    A corporate blog and a company newsletter are two different terms. A newsletter is an email usually sent directly to an existing contact list on a schedule. While a corporate blog lives on the website and is built to attract new readers through search and AI answer engines over time.

    What are some of the top corporate blogs to study?

    Beyond the examples covered earlier, you can follow Zendesk, Mailchimp, Notion, and Ahrefs corporate blogs. For example, Ahrefs provides original data-backed posts that provide valuable insights to marketers and SEO professionals. Studying a mix of these examples across different industries tends to surface usable blog ideas.

    How long should a corporate blog post be?

    No fixed word count guarantees rankings. But most corporate blog posts that perform well in competitive B2B categories run somewhere between 1,500 and 3,000 words. They are long enough to cover the topic fully and short enough to stay tightly argued.

    Who should actually write a corporate blog: Employees, an agency, or AI?

    The strongest corporate blogs usually combine all three rather than choosing one. Subject-matter experts inside the company supply the insight and opinions, and a writer (in-house or agency) shapes that into an SEO-friendly post. AI tools handle research, outlining, and formatting to speed up the parts that don’t require a human perspective.

  • How to write a blog about yourself that people love to read

    How to write a blog about yourself that people love to read

    Staring at a blank “about me” page and typing “Hi, I’m [name]” is the fastest way to write a blog about yourself that nobody finishes reading. 

    The real problem usually isn’t a lack of things to say. It’s not knowing which details matter to a stranger scrolling through your site for the first time. 

    Writing about yourself feels harder than almost any other blog post because it asks for honest self-reflection and a clear strategy at the same time. 

    The way to start writing a blog about yourself without sounding boring is to lead with what your reader expects from you. Then, let your personal details support that value instead of replacing it. 

    This article walks through that process step by step, from defining your value and audience to writing your origin story, structuring the blog, and adding a call to action that keeps readers coming back. By the end, you’ll have a working framework instead of a blinking cursor.

    Key takeaways

    • Lead with the value you offer readers before you get into your personal history.
    • Name your target audience directly so the right readers feel like they’ve found their place.
    • Connect your personal story to your blog’s purpose instead of listing random facts.
    • Close with a clear call to action and keep photos to two or three at most.
    • Revisit your blog as your focus and life keep changing.

    What does it mean to write a blog about yourself?

    What to include when crafting your personal blog.

    Writing a blog about yourself means answering four questions for a stranger in as few words as possible: 

    1. Who you are
    2. What you do
    3. Why you do it
    4. What they gain by sticking around

    It has nothing to do with cataloging your entire life story in order, and everything to do with giving a reader a reason to trust you and keep reading. 

    Whether you’re drafting a dedicated about-me page using a proven step-by-step framework, a two-line bio for a guest post, or a full personal narrative, the same expectation applies. 

    Readers arrive curious about you, but they stay because they see something useful for themselves.

    This holds true across formats. A short bio needs the same clarity as a full about-me page, just condensed into two or three sentences instead of several paragraphs. 

    A personal blog post about a career change or a big life event still has to explain why it matters to the reader, not just to you. Once that idea settles in, the rest of the writing gets a lot easier.

    How to write a blog about yourself step by step

    Five stages to write a blog about yourself.

    Learning how to write a blog about yourself step by step means breaking the task into stages instead of trying to draft your whole story in one sitting. Each stage builds on the one before it, moving from strategy into storytelling and ending with a clear next step for the reader. 

    The five stages below cover what a strong about-yourself page or post needs from start to finish:

    1. Value: what your blog offers readers
    2. Audience: who you’re writing for
    3. Site bio: why someone should read your blog
    4. Personal bio: your story and credibility
    5. History and CTA: Blog history and a call to action

    Now let’s discuss them in further detail.

    #1: Start with the value you give your readers

    Before writing about yourself, get clear on the value your blog gives readers: what makes it useful, who it serves, and what problem or experience it offers. 

    Skip the generic opener like “Hi, I’m Sam, and I love coffee and travel.” Instead, introduce your name and then instantly frame your next lines around the benefit readers get from following you.

    For example, “Hi, I’m Priya, and I help people plan a week-long trip on a normal paycheck, without draining their savings or spending a year stockpiling airline points to afford it.”

    #2: Define who your blog is for

    Naming your audience directly, rather than trying to appeal to everyone, makes your writing land harder with the people who actually matter. 

    A line like “if you’re a busy parent trying to cook faster dinners, you’re in the right place” filters visitors instantly. Losing readers who aren’t a fit is a fair trade for a stronger connection with the ones who are.

    #3: Write your site bio before your personal bio

    Before you write about yourself, write a short site bio that answers why someone should read your blog, what they’ll gain, and what kind of posts to expect. 

    Mention any signature series or top posts so new visitors know where to start reading. Then briefly explain your background, whether that’s years of experience, media features, or honest “still learning” transparency.

    Take Hailee Catalano’s site bio as an example:

    Hailee Catalano site bio example.

    Credits: Hailee Catalano.

    She started with a brief background, degree, then dove deep into what she’s doing differently than others (value). 

    In her case, her mission is to provide recipes that readers can follow to make delicious food right in their own kitchen, instead of chasing it in 5-star restaurants.

    #4: Write your personal bio and origin story

    Treat this part like an interview, connecting personal facts to your blog’s mission rather than listing unrelated trivia. 

    If you’re writing a short bio, keep it to a few sentences: who you are, what you do, and one credibility marker. 

    A longer biography or personal essay about yourself should open with a specific moment or turning point in your life. This forms a strong hook that you can use to engage the audience from the get-go.

    Share the formative experience that shaped your expertise, along with details that show why you’re qualified to write about your topic. 

    A career pivot or years of self-taught practice all count as credibility, even without formal degrees. 

    Real pages rarely open with a job title. Michelle Knight’s leads with her brother’s death as the moment that changed her direction. It opens up with one concrete scene, and connects that scene forward to what the person does now.

    Michelle Knight personal bio example.

    Credits: Brandmerry.

    Sprinkle in relatable touches like your city or hobbies to add personality to the story, but keep them in support of the narrative rather than the whole point of it.

    #5: Add your blog’s history and a call to action

    Round out your personal story with a short note on when and why your blog started and where it’s headed next. 

    Then close with a clear call to action: a newsletter sign-up, links to your top posts, social profiles like Instagram or Pinterest, or a service page. 

    Place that call to action in more than one spot on the page, since most readers skim instead of reading start to finish.

    Melyssa Griffin’s page puts this into practice directly. One CTA woven into the text near the top, then a second, visual CTA at the very bottom, because she knows most people skim rather than read start to finish. 

    Melyssa Griffin CTA example on a personal blog page.

    Credits: Melyssa Griffin.

    Other bloggers tie the ask even closer to the story itself, closing with something like “I was once where you are, here’s how I got out →” rather than a generic subscribe button.

    How should you structure and format your about-yourself content?

    Structuring an about-yourself page properly means giving readers a predictable flow: a quick intro, your story, blog history, and a closing call to action. This is to help people find what they need without too much digging.

    Formatting a blog post matters just as much as the words themselves, since a wall of text about your life is just as easy to abandon as a boring bio. 

    The two sections below cover a page order you can copy directly, plus simple guidance on photos.

    Recommended page structure

    About page structure explained - Contentpen.ai.

    A clear structure keeps readers oriented from the opening line to the closing call to action, and it works whether you’re building a full about-me page or writing one personal blog post.

    SectionWhat it covers
    Quick introWho you are and the value of your content, stated in a sentence or two
    Your storyPersonal background, credibility, and experience tied to your niche
    Blog or business historyWhen and why you started, plus where things are headed
    Conclusion and CTAA short wrap-up and a clear next step for the reader

    Please note that this structure should serve as a starting point for you. It is not a hard-and-fast rule, so you can modify it according to your site type, niche, and audience.

    Choosing photos that support your story

    Photos should support your written story, not distract from it, so stick to two or three images at most for a blog post about yourself.

    Use one clear headshot and one or two shots relevant to your niche, a workspace photo for a business blog, or a trail photo for an outdoor one. This is a pairing recommended in artist-focused advice on writing an about-me page. 

    Keep every image cohesive with your blog’s overall look instead of dropping in random personal snapshots.

    Let’s take an example of Katy Galbraith’s photo, where she is at work in her ceramics studio:

    Katy Galbraith's example on how to use photos on personal blog pages.

    Credits: Katy Galbraith.

    This photo does two things at once: it puts a face to the name, and it shows the craft in progress. So a first-time visitor gets “who” and “what you do” in a single image without any lengthy explainers needed.

    How do you keep your story authentic and evolving?

    Keeping your story authentic over time means treating your about-yourself content as a page you revisit, not a task you finish once. 

    As your blog grows, your focus can shift from one niche to another. Or, your life can change, following a career pivot, a big move, or an extended break.

    Your page should reflect those changes in your life instead of freezing you as the person you were when you started. 

    Some bloggers even publish an entire post dedicated to reintroducing themselves after some time away.

    Attorney Matthew J. Booth’s return post doesn’t dress up the gap. He names the reason plainly, then pivots into what’s different now: a shift toward more conversational writing on the topics he actually wants to cover.

    Mathhew J. Booth's reintroduction post after a long break from blogging.

    Credits: BoothLaw.

    Being open about pivots, hiatuses, or setbacks tends to build more trust than a polished, conflict-free version of events. 

    Explaining why you stepped back, what changed, and where you’re headed next gives long-time readers a reason to stay invested. A short yearly check of your about page keeps it honest and current.

    How Contentpen helps you write about yourself faster

    Turning this framework into a finished page is often the hardest part, which is where Contentpen fits in. 

    It is an AI blog creation platform built around a five-step workflow: planning, writing, optimizing, refining, and publishing, all done automatically for you. 

    The tool takes a personal story from a rough brief to a structured, publish-ready draft in minutes, saving ample time and resources for you.

    From outline to publish-ready content that fills them

    check

    Structured

    check

    Consistent

    check

    SEO-aligned

    check

    Fast

    Generate Outlines FREE
    AI SEO Interface

    So, instead of staring at a blank page, you outline your value, audience, and origin story, then let the platform draft headings and paragraphs that reflect your own voice.

    The optimization tools help polish SEO so a personal story is easily discoverable online, while built-in image creation and one-click publishing to platforms like WordPress keep the process moving.

    Because it covers the full workflow, the platform works just as well for a single about-me page as it does for an ongoing personal blog series.

    You can also bulk generate content if you want to keep up with your posting schedule or set Contentpen on Autopilot mode for true hands-off content automation.

    Summing it up

    A blog about yourself earns readers when it leads with value, names its audience, and turns personal details into a story tied to a clear purpose. 

    The steps covered here turn a blank page into one with a job to do. Structure and a couple of well-chosen photos make that story easy to follow, and revisiting the page as your blog grows keeps it honest.

    The best time to draft your own version is now, not after you’ve found the perfect words. Write a rough draft today, publish it, and treat it as a first version you’ll improve later. 

    You can use tools like Contentpen to speed up that first draft, so you spend your time refining your voice instead of staring at a blank screen.

    Write content that’s built to rank, not just read

    Create search-optimized blogs aligned with SEO and GEO signals, so your content performs well across search and AI-driven discovery.

    Try SEO Blogging FREE
    AI SEO Interface

    Frequently asked questions

    How do you start an essay about yourself?

    Open with a specific moment or detail instead of a generic line, then connect that moment to why you’re writing the piece. A vivid scene pulls readers in faster than a summary of facts ever could.

    How do you write a short bio about yourself?

    Keep it to two to four sentences covering who you are, what you do, one credibility point, and one personal touch. Match the tone to the platform: casual for social media, more polished for a website.

    How do you write a professional bio for yourself?

    Lead with your current role or expertise, follow with a key achievement, then close with one personal line. Use third person for formal bios and first person for a personal website or blog. Use free tools like the AI bio generator for your help in ideation and drafting the content.

    What is the difference between a bio and an autobiography?

    A bio is a brief summary of who you are, while an autobiography is a longer, detailed account of your life or a specific period. Most blogs only need a bio, not a full autobiography.

    How do you make a blog about yourself without sounding boastful?

    Frame your achievements around what they mean for the reader, not just personal pride. Balance confidence with honesty about what you’re still learning or working through.

  • How to write a real estate blog: Your friendly beginner’s guide

    How to write a real estate blog: Your friendly beginner’s guide

    Learning how to write a real estate blog is the best business investment you can make in 2026. Blogs are great for SEO and online visibility, which may directly result in more clients and conversions.

    Writing a real estate blog today comes down to picking a niche, choosing a platform to publish, building a realistic posting schedule, and writing SEO-optimized posts using automated tools.

    This guide walks through each of those steps in simple terms. It also shows you how a tool like Contentpen can help you draft, optimize, and publish posts without losing your personal voice. 

    So, let’s start with the basics.

    Key takeaways

    • Pick one real estate blog niche and post on a steady schedule rather than in occasional bursts.
    • Write listing descriptions and agent bios that sell a feeling, not just a floor plan.
    • Lean on proven formats like FAQs, checklists, and neighborhood guides instead of guessing what to write.
    • Promote every post through search optimization, social sharing, and email so that your content doesn’t go to waste.
    • Treat AI tools as a co-writer that speeds up drafts while your local knowledge and stories do the closing.

    What is a real estate blog and why does it matter?

    A real estate blog is a content section on your website where you regularly publish articles about buying, selling, and living in different types of properties.

    It works like a digital storefront, where every new post is a fresh chance to appear in search when someone looks up home prices, moving tips, or a specific neighborhood. Over time, that steady output builds search visibility that paid ads alone can’t buy.

    When you answer the same questions your clients ask every week, readers start to see you as the go-to expert long before they call. That trust often leads to a closing, even before you’ve met the client in real life.

    How to start a real estate blog step by step

    Getting a real estate blog off the ground is mostly a series of small, practical decisions made in the right order. None of these steps require technical skill or a big budget, just a bit of your time.

    Step 1: Pick your real estate blog niche

    Real estate blog niche options - Contentpen.ai.

    Choosing a focus makes your blog easier to remember than trying to cover every real estate topic at once. Popular niches include:

    • Home buying guides, such as “10 steps for first-time homebuyers”
    • Investment strategies, such as “rental property ROI explained”
    • Green and energy-efficient homes, such as “the benefits of solar-powered houses”
    • Local market trend reports for your city

    A niche is a starting identity, not a permanent limit, so you can always branch into other topics later.

    Step 2: Choose your blogging platform and domain

    Your blogging platform should offer reliable hosting, built-in security, and templates built for real estate so you’re not stuck fighting with code or to display your content properly.

    The actual workflow you should follow to set up your real estate blog is: 

    1. Go to a hosting provider: Visit a web hosting provider like Bluehost or GoDaddy.
    2. Pick a plan: Choose a “Managed WordPress” or “WordPress Hosting” plan.
    3. Register your domain: During checkout, the host will ask you to choose a domain name (e.g., YourNameRealEstate.com). Keep it short, easy to spell, and tied to your niche or personal brand.
    4. Install WordPress: Click the “Install WordPress” button in your host’s dashboard.
    5. Log in to your blog: Secure your login credentials to access your actual blogging dashboard (usually ‘https://www.yourdomain.com’).

    We recommend choosing a self-hosted service like WordPress.org because it provides you total control and ownership over your website.

    Once your blogging platform is finalized, look for mobile-friendly designs for your pages. Your site needs to be mobile-responsive, since 51% of web traffic now comes from mobile users and Google also considers this an important ranking signal.

    Free themes are fine to start, but paid themes from Elegant Themes or Theme Forest can help you get that aesthetic look for your blog.

    An example could be Everest Home Loans. A simple, classy website in the real estate industry with the name immediately telling the focus of the business to the audience.

    Step 3: Set up your real estate website for success

    Writing content that turns readers into leads comes down to nailing four specific sections on your website: 

    • The listing descriptions (if applicable)
    • The agent bio
    • Your blogs
    • Other on-page content (service and landing pages)

    For building credibility, it is important to spend time defining who the real estate agent is, past achievements, and what makes them qualified and trusted enough in the industry.

    Write proper About Us and Contact Us sections, along with listing descriptions that invite the most high-intent traffic to your site. Then move to writing service pages that clear your offerings to the reader.

    Once all of this content is done, you move to defining your blog section.

    Generally, your first blogs should be introductory pieces, telling the world about who you are, why you’ve started this blog, and what they can expect in the future.

    Then, meet their expectations by providing them the value they were promised in the previous posts. 

    This pattern helps you first establish yourself in the industry so that your later content is easily referenced by AI systems and Google search bots.

    Step 4: Build a simple content calendar

    Real estate content calendar example.

    A content calendar solves the “what do I post today” problem for you. It gives you a proper strategy to post and scale with time without getting into any sort of roadblocks.

    Start with one or two posts a month if you’re new, scaling up to one blog a week. Keep the pace manageable and rotate between seasonal tips, neighborhood spotlights, and market updates. 

    A sample quarter might look like a January post on design trends, a February post on prepping for spring sellers, and a March neighborhood guide.

    Once you start gaining traction online, you can go ahead and increase the blogging output, but don’t push it too much. We still need to prioritize quality over quantity.

    Remember, consistency beats volume every time as search engines and readers both reward steady activity. 

    This is also where a platform like Contentpen helps. Its built-in content calendar lets you plan and schedule posts around upcoming listings and market shifts so you’re never scrambling for a post.

    Plan once.
    Publish consistently.

    check

    Scheduled

    check

    Organized

    check

    Predictable

    check

    Scalable

    Schedule Your Content
    AI SEO Interface

    How to write real estate content that actually sells

    A blog post can rank well and still do nothing for your business if it reads like a generic explainer instead of something written by a real agent in a real market. The posts that convert readers into calls share a few habits that have nothing to do with how long or keyword-heavy they are.

    #1: Write to a decision, not a topic

    Every strong real estate post answers a question the reader is asking right before they make a move.

    For example, “Home prices in [your city]” is a very lucrative topic. You can talk about how the prices have been fluctuating in the past and when the best time is to invest.

    Another decision-based topic example could be “Should you wait until spring to sell a house in [your city]?” This version of your topic can pull in someone closer to acting, because it mirrors the exact conversation they’re already having in their head. 

    Before you draft a post, ask what decision the reader is trying to make and build the whole piece around helping them make it.

    #2: Back up opinions with specifics from your own market

    Generic real estate advice is easy to find anywhere, so the posts that build trust are the ones that include a detail only a working local agent would know.

    For instance, you can add data like: 

    • Streets seeing multiple offers right now
    • A specific school redistricting affecting nearby land prices
    • How long homes in a particular neighborhood have actually been sitting idle

    You don’t need a research team for this. A few lines pulled from your own recent listings and client conversations will outperform a post stitched together from national, generic statistics.

    #3: Guide the reader to a next step, don’t just inform them

    Every post should leave the reader with something to do next, whether that’s booking a call, downloading a checklist, or getting a home evaluation. 

    The trick is placing that ask where it actually fits the reader’s mindset. 

    Someone halfway through a post about staging isn’t ready to book a listing appointment yet, but they might want a free staging checklist. 

    On the other hand, someone finishing a post about your local market update is often warm enough for a direct “see what your home could sell for” prompt. 

    Always match the ask to how far along the reader is, not just where the post happens to end. This will help you convert the most visitors with ease.

    #4: Let the format do some of the persuading

    Readers skim before they commit. Therefore, a post broken into short sections with clear subheadings, bolded takeaways, and the occasional table or checklist will hold attention longer than a wall of paragraphs.

    This isn’t just a readability preference either, since search engines and AI-driven search tools tend to favor content that’s easy to scan and lift specific answers from.

    Once you’re writing content that speaks to real decisions instead of generic topics, the next challenge is knowing what to actually write about each week without running out of ideas.

    Real estate blog topics and post ideas for beginners

    Real estate blog post formats - Contentpen.ai.

    Real estate blog topics for beginners work best when they answer questions your clients already ask you face to face. 

    Instead of guessing what might interest strangers online, look into your own inbox and phone calls for recurring questions about closing costs, timing a sale, or what to expect at closing.

    A handful of formats consistently perform well and take little planning to produce:

    • Answering common questions clients raise every week, like closing costs or whether to sell before buying a new home.
    • Market snapshots that explain average prices and days on market in plain, jargon-free language.
    • Checklists such as “5 mistakes first-time buyers make” or a printable moving day checklist.
    • Anonymized client success stories that make your process feel real and relatable to new readers.

    If you work in a specific, highly lucrative neighborhood or for a specific group of people, make them into a blog topic.

    For example, “New York mortgage broker for Indian community.” 

    This title works best as it provides clear details about whom it addresses in the neighborhood, which drives higher-intent traffic to your blog.

    What are the 3-3-3 and 7% rules in real estate blogging?

    The 3-3-3 rule and 7% rule in real estate  used for blog topics.

    The 3-3-3 rule in real estate is a home-buying guideline. It suggests a budget of roughly 3 times your annual income, 3 months of expenses saved for a cushion, and a minimum down payment around 3% while purchasing.

    The 7% rule is a rougher benchmark some investors use to estimate a healthy annual return on a rental property before it’s considered a strong long-term hold. 

    Both terms show up often in search because buyers and investors want quick, plain-language answers before they commit to a number.

    RuleWhat it estimatesBlog angle
    3-3-3 ruleBudget, savings cushion, and down payment for buyers“Can you actually afford this home” explainer post
    7% ruleRough annual return benchmark for rental investors“Is this rental property worth it” market analysis post

    Because people want to learn more about these terms, they make excellent explainer posts that answer a question directly and build your authority on investment topics.

    How can you write posts faster with AI?

    AI-assisted content workflow for real estate businesses.

    AI tools speed up real estate blog writing by handling the research and drafting so you spend your time adding local knowledge instead of staring at an empty screen. 

    Tools like ChatGPT, Jasper, and Grammarly are useful for brainstorming ten topic ideas for your niche, outlining a post, and polishing the first draft, respectively.

    However, you still have to bounce around 3 different tools to accomplish a single task of writing a well-polished, SEO and GEO-optimized blog post.

    Therefore, a better approach is to use a tool like Contentpen. It not only handles your ideation, outlining, and drafting processes, but also polishes them up and publishes the content on your behalf.

    From outline to publish-ready content that fills them

    check

    Structured

    check

    Consistent

    check

    SEO-aligned

    check

    Fast

    Generate Outlines FREE
    AI SEO Interface

    The AI blog writer is made to gain higher ranks on SERPs and win citations in Claude, Perplexity, and Google AI Overviews with powerful keyword research and answer-first formatting.

    All said and done, you have to keep this golden rule in mind: An AI draft gets you roughly 70% of the way, but your local statistics, personal stories, and market opinions should make up the other 30% of the post. This makes your content worth reading and sharing by users.

    Final thoughts

    Writing a real estate blog starts with setting up the website, building trust with initial awareness posts, and targeting specific decision-based topics in the industry. 

    If you publish quality content regularly addressing users’ queries, you gain authority on the topics, favoring more visitors to your platform who are ready to convert.

    Start small this week, choose one niche, and use a tool like Contentpen to write a blog post while keeping your own voice front and center. See the results you get and then repeat the process for more gains in the future.

    Frequently asked questions

    How do you get 1000 views per day on a blog?

    High daily traffic usually comes from consistent, keyword-focused posting combined with active promotion across social media and email. Most blogs that reach that level have a handful of evergreen posts, plus regular new content that keeps bringing readers back over time.

    How often should a real estate agent post on their blog?

    One to two posts a month is a sustainable baseline for most agents, and you can scale up to one post a week if you have the time and topics to support it. Consistency matters far more than frequency, so keeping a realistic posting schedule is a must.

    How long should a real estate blog post be?

    In-depth guides typically run 1,000 to 1,500 words, while quick tips or FAQ-style posts work well at 500 to 800 words. Match the length to the topic to maximize audience engagement and conversions.

    Can I use AI to write my entire real estate blog post?

    AI works best as a drafting and outlining assistant rather than the final author of your post. Add your own local data, personal stories, and a human editing pass before publishing, since readers can usually tell when a post has no real perspective behind it.

    What should every real estate blog post include?

    Every post should include clear visuals like photos or a short video, a direct call to action telling readers what to do next, and social sharing buttons so readers can pass it along. Keep formatting scannable with short paragraphs and subheadings.

  • How to write a blog post for SEO: A step-by-step guide

    How to write a blog post for SEO: A step-by-step guide

    You spent hours on that last blog post, hit publish, and heard nothing back. No traffic bump, no ranking, no clicks from Google. That kind of silence almost always comes from skipping research and not knowing how to write a blog post for SEO.

    Writing a blog post requires keyword research, building an outline, drafting the content, structuring it, then publishing it with proper meta title, description, and links.

    If you consistently perform this process, you’ll be able to rank better in SERPs and get cited by AI answer engines.

    This guide walks through exactly how to write a blog post for SEO, covering all the steps necessary. You’ll also see where a platform like Contentpen can speed up the process without cutting corners on quality.

    Keep reading to build a system you can repeat for every post.

    Key takeaways

    • Start with keyword research and search intent before writing anything, since the wrong target keyword or intent means nobody finds your post.
    • Build a complete outline first, covering headings, links, and FAQs, so drafting becomes fast and organized.
    • Structure content with clear H2 and H3 headings that help both readers and AI systems scan and extract answers.
    • Optimize your title, meta description, and internal links strategically, since these details drive clicks even after you rank.
    • Always edit, proofread, and read your draft aloud before hitting publish.

    What does it mean to write a blog post for SEO?

    Writing a blog post for SEO means shaping content so it clearly answers a searcher’s question while giving Google and AI tools the signals they need to rank and cite it. 

    What writing for SEO means.

    It’s no longer about repeating a keyword as many times as possible. Search engines now reward posts that match intent precisely, read naturally, and demonstrate real expertise rather than generic filler.

    This matters more now because your content needs to work in two places at once. It has to rank in traditional Google results, and it needs a clear, well-organized structure that lets AI answer engines like ChatGPT and Google’s AI Overviews pull direct quotes from it.

    What counts as SEO-optimized content?

    SEO-optimized content isn’t a separate style of writing. It’s regular, useful writing that also happens to check a few technical boxes: 

    • A clear target keyword
    • A heading structure that mirrors how people actually search
    • Metadata (meta title and description) that accurately describes the page
    • Internal links that connect the specific page to the rest of your site

    If you don’t tick these boxes, you won’t get discovered online, doesn’t matter how well you write content. But if you only chase these boxes, you’ll end up with content that no human wants to read.

    The goal is to create content that works for both humans and robots, something that we highlighted in depth in our On-page SEO guide.

    How do you research keywords and search intent before writing?

    Keyword research means finding the exact phrases people type into Google when looking to learn, buy, or compare two things.

    Researching keywords also means understanding the intent behind the search and trying to address it directly in your content.

    Why does search intent matter so much?

    Most searches actually fall into four intent categories, and knowing which one you’re writing for helps you attract the right type of audience that converts quickly.

    Intent typeWhat the searcher wantsExample queriesBest content format
    InformationalLearn or understand somethingHow to write a travel blog,” “What is SEOGuides, tutorials, how-to articles
    NavigationalReach a specific site or pageContentpen loginHomepages, login pages, feature pages
    CommercialCompare options before a purchaseBest AI blog writers in 2026Comparisons, reviews, use-case breakdowns
    TransactionalComplete an actionTry Contentpen freeProduct pages, pricing pages, sign-up flows

    Checking the current top-ranking pages for your keyword before you create your blog outline confirms which format Google already favors. Try to replicate that to earn the conversions you need for your business.

    How to look for keywords

    Start with Google’s autocomplete suggestions and the “People Also Ask” boxes, both of which reflect real searches happening right now for your target query.

    Google search for the keyword 'bbcnews.'

    Dedicated tools such as Google Keyword Planner, Ahrefs, and Semrush’s Keyword Magic Tool go further, generating thousands of related terms from one seed keyword.

    Other than those tools, you can also use Contentpen’s built-in keyword research tool to get all the required keywords for the content pillars, without ever leaving the platform.

    Automated keyword research

    Work on keywords worth writing for

    Get search terms with real ranking potential, not just high volume.

    Try Keyword Research for FREE
    AI SEO Interface

    Once you have all the best options, weigh each one against search intent, keyword difficulty, and search volume.

    Why long-tail keywords work best for beginners

    Long-tail keywords are longer, more specific search phrases, like “how to write a blog post for beginners” instead of just “blog post.” They carry less competition than broad, one- or two-word terms, which makes them far easier to rank for. 

    Search demand curve showing that long tail keywords get less search volume but more conversions.

    Long-tail keywords also attract visitors who know exactly what they want, so the traffic you do earn tends to convert better.

    How do you write a blog post for SEO?

    Structuring a blog post for SEO means organizing it around one target keyword, clear headings, and the supporting elements search engines and readers both expect. 

    #1: Study your competitors

    Before you outline anything, spend time studying the top 3-5 articles already ranking for your keyword. Note their structure, the questions they answer well, and the gaps they leave open.

    Then, your job is to close those gaps by providing more value where your competitors fall short, adding current data, or clearer examples to explain a topic.

    #2: Build an SEO-optimized outline

    A solid outline keeps drafting fast and focused instead of a blank-page guessing game. Before typing your introduction, map out the core pieces your post needs.

    • Title and one primary keyword, plus a search intent label so you know how to frame the writing.
    • H2 and H3 headings, internal and external link spots, image placeholders, and your FAQ section.

    Also, make sure to include your notes while writing so that you know what exactly a draft needs after you finish writing it. 

    For example, requesting quotes from a supervisor, senior team lead, or an industry expert. Leave that space open for now and carry on with the rest of the steps.

    #3: Write titles and headings that work for readers and Google

    A strong title includes your keyword early and still makes someone want to click, using formulas like “How to [result], plus [specific detail].” 

    Take a look at this example below for the blog titled “How to start digital marketing as a beginner.”

    How to start digital marketing blog used as an example of how to name blogs properly.

    Keep it under 60 characters so Google doesn’t cut it off in search results. 

    Every H2 and H3 after that should tell readers exactly what the section covers. AI systems rely on those same headings to find and extract answers.

    You can place your query-based, long-tail keywords as H2 as well, for example “Can I turn off AI Overviews on Mac?”

    Where you place the keyword across the page matters as much as the outline itself. A quick checklist worth running through before you draft:

    • Title tag and H1: Put the primary keyword near the start so readers and search engines see the topic immediately.
    • Introduction: Work the primary keyword into the first hundred words naturally.
    • Subheadings: Variations like “how to write an SEO-friendly blog post” or “how to write a good blog for SEO” in an H2 or H3 help search engines understand the structure.
    • URL slug: Short and descriptive, with the main keyword included, such as /how-to-write-a-fitness-blog.
    Metadata information for an article inside Contentpen.
    • Meta description: Include the main keyword and a phrase that reflects the click-through benefit, without overpromising what the page delivers.
    • Image alt text: Short, accurate descriptions, not keyword-stuffed captions.
    • Body content: Let the keyword and its variations appear where they fit naturally instead of forcing an exact phrase into every paragraph.

    This same list doubles as a blog post SEO checklist you can run it through for every draft before it goes live.

    #4: Write SEO-friendly content that people actually want to read

    Writing SEO-friendly content means answering the question behind your keyword and using plain language to explain a concept

    You can dive into technicalities if the topic allows for it, but try to remain as conversational as possible.

    Place your primary keyword naturally within the first 100 words, then let it reappear a few more times only where it genuinely fits. 

    Beyond that, focus entirely on being useful, adding real anecdotes, examples, specific numbers, and details a competitor’s post skipped.

    Google’s own guidance is that its systems are built to reward original, helpful content written for people first. 

    That means you should write original content, not just a reworded version of whatever already ranks.

    You should also weave in your expertise on the subject so that Google and AI engines recognize you as the authority. Over time, you will be rewarded with more traffic and visibility.

    For sensitive topics like health, finance, law, and other YMYL topics, this bar gets stricter. So make sure what you are writing is accurate, up-to-date, and honest.

    #5: Follow readability best practices

    Readability best practices - Contentpen.ai.

    Readable content wins on both fronts, human attention and machine parsing. 

    Favor active voice over passive, since active sentences read more directly. Use transition words like “because” or “for example” to guide readers through your logic.

    Vary how you start each sentence so the writing doesn’t feel robotic or repetitive.

    Try to break up the text every 200-300 words with images, videos, or any other interactive elements.

    You can also add visual CTAs to not only promote your business but also give the readers a rest before they start processing the rest of your blog post.

    #6: Add images and media to boost engagement

    Text-heavy posts lose readers fast, so break them up with visuals. Industry data suggests blog posts with images can draw 94% more views than text-only posts. Why? Because visuals give the eye a place to rest while scanning a text-heavy piece of content.

    Add descriptive alt text for accessibility, embed a short video where it clarifies a complex step, and consider a table of contents for anything running long.

    To create on-brand images, you can utilize Contentpen’s built-in AI image generator. The tool creates in-article and featured images as infographics, portraits, abstracts, and 9 other styles according to your brand colors, tone, and logo.

    #7: Edit and proofread before you hit publish

    Never publish straight after finishing a draft. Step away for at least a few minutes, then read the whole piece out loud, since that technique catches awkward phrasing silent reading misses. 

    Run it through a grammar tool like Grammarly to correct grammatical and punctuation issues. Then double-check your keyword placements and internal and external links in the article before moving forward.

    Once the draft is ready, publish to your CMS or utilize Contentpen’s one-click publishing to automate the copy-paste process. The tool will ensure all the formatting, image media, and links, etc., are intact to save time in making your posts live.

    How can AI tools like Contentpen speed up writing SEO blog posts?

    Contentpen for AI and SEO optimized content - Contentpen.ai.

    AI tools speed up SEO blog writing by handling research, outlining, and drafting in one connected workflow.

    Contentpen, for example, builds keyword research around real search intent, then turns that research into a structured outline before generating a full draft with headings and paragraphs in place.

    That combination means a writer can move from a blank topic idea to a publish-ready draft without much hassle.

    Write better blogs in less time, without sacrificing quality.

    Let AI handle structure, clarity, and flow while you stay in control of the message.

    Try AI blog writing
    AI SEO Interface

    Besides this, Contentpen helps users plan their content calendar and post directly to their preferred CMS platform.

    One newer option worth mentioning here is the AI autopilot feature, which allows for true blogging automation.

    You select a posting frequency, topics for blogs, and a destination to post content. Then, the tool automates keyword research, SERP analysis, drafting, and publishing on its own.

    If you’d rather stay in the loop, you can set it to pause for your review before content is generated for a topic, or for the final edits before it publishes to your CMS.

    What happens after you publish?

    Publishing isn’t the end of it. A new post needs to get in front of readers and earn links before search engines fully trust it for the query you’re targeting.

    It also needs regular maintenance after that to hold its position in the SERPs and AI Overviews.

    On the promotion side, a mix of distribution channels usually works better than relying on one. 

    Share to social platforms where your audience already spends time, feature the post in an email newsletter, and drop it into relevant niche communities or Slack groups where it adds value.

    Keep a consistent publishing schedule so your audience knows when to expect content.

    Since rankings shift due to algorithm updates and competitors publishing newer content, it’s often a good idea to update an existing post rather than write a new one from scratch. 

    That means on the maintenance side, refreshing outdated stats, adding sections that competitors still haven’t added, and tightening internal links is the way to go.

    That said, if you are having trouble keeping the content updated manually, try Contentpen’s SEO opportunities to regain rankings and AI citations with the least effort.

    Just click a button, and the tool will automatically apply fixes in your content to push it to success.

    Turn existing content into growth opportunities

    check

    Identify pages losing traffic or CTR

    check

    Find quick wins to improve clicks and rankings

    Find Content Opportunities
    AI SEO Interface

    Final thoughts

    Writing a blog post for SEO isn’t a mystery skill. It’s a repeatable sequence: Research the keyword and intent, build an outline, draft for the reader first, then optimize the title, links, and metadata before publishing.

    For the next steps, start with one post and run it through this full process end to end. You can try a modified version of this process to better suit it to your needs.

    However, if you want to accelerate content creation for your blogs, then a dedicated platform like Contentpen is your best bet. It frees up your time to work on content strategies rather than repetitive, mundane tasks.

    Frequently asked questions

    What does an SEO blog writing example actually look like? 

    Take a post titled “How to fact-check AI-generated content in 7 steps.” It targets a specific keyword, answers a clear question, uses a numbered structure, and links to related posts on the site. That combination is what makes it work as an SEO content writing example worth modeling.

    Can ChatGPT write SEO content? 

    ChatGPT can draft raw content, but it needs human review, brand voice adjustments, and proper heading structure before it’s genuinely SEO-ready. Dedicated tools like Contentpen build that SEO and GEO structure into the draft automatically, saving that manual cleanup step.

    Will blog posts help with SEO? 

    Yes, consistent, well-researched blog posts build topical authority and bring in organic traffic over time. A single post rarely moves the needle alone, but a library of interconnected, high-quality posts compounds steadily.

    How long should an SEO blog post be?

    There’s no fixed number, though a 2025 Backlinko ranking factors study found first-page articles average around 1,400 words. Treat that as a rough figure, not a target, and write only as long as it takes to fully answer the query.

    How often should you publish SEO blog posts? 

    Consistency matters more than raw frequency, so pick a publishing cadence you can sustain long-term. Pair new posts with periodic refreshes of older content to keep both accurate and competitive in search results.

    Do I need backlinks for a new blog post to rank? 

    Backlinks help, but they aren’t mandatory, especially for niche, long-tail keywords with a clear intent match. Strong on-page structure and genuine depth can rank a post even before it earns external links.

    What’s the difference between SEO and AEO for blog content? 

    SEO focuses on ranking within traditional search engine results pages, while AEO, or answer engine optimization, focuses on getting cited inside AI-generated answers from tools like ChatGPT or Perplexity. Modern blog posts need to satisfy both at once to maximize visibility.

    What does Reddit say about writing blog posts for SEO? 

    Threads on r/SEO and r/blogging tend to repeat the same few points. Write for a specific, narrow query rather than a broad topic, don’t publish without checking what’s already ranking, and don’t expect results before a few months of consistent publishing.

  • How to write a fitness blog: A step-by-step guide

    How to write a fitness blog: A step-by-step guide

    Starting a fitness blog feels overwhelming when you don’t know which step comes first: the niche, the platform, or the content itself. Even if the steps are figured out, you may not know how to write a fitness blog from scratch, which is a problem that a lot of people suffer from.

    In today’s post, we’ll learn how to write a fitness blog in 6 easy steps. Whether you’re a personal trainer, a content marketer, or a small gym owner, you’ll walk away with a repeatable process instead of a vague to-do list. 

    Along the way, we’ll point out where tools like Contentpen can speed up the planning and drafting process. 

    So, let’s get into the details, shall we?

    Key takeaways

    • Pick a specific fitness niche before you write your first post, since a focused topic builds a loyal readership faster than covering everything, all at once.
    • Set up a simple, reliable blogging platform with SSL, clean permalinks, and an SEO plugin from day one.
    • Write clear, well-structured posts with headings, actionable steps, and credible sources so readers trust your advice.
    • Optimize every post for search engines with keyword research, meta descriptions, and alt text as you publish, not after.
    • Use AI tools like Contentpen to speed up outlining, drafting, and keyword research so you can publish consistently.

    What is a fitness blog?

    A fitness blog is where you can share your diet, training programs, equipment reviews, and much more with your audience. It is a marketing channel that you own, allowing you to write whatever you want, however you want, if it doesn’t breach search engine policies

    Why should you have a fitness blog?

    As a personal trainer, gym enthusiast, and coach, you should definitely have your own fitness blog. Here’s why:

    • It’s a long-term marketing strategy: Blogs are ideal for long-term marketing of courses, books, or selling affiliate links because your content sits on the Internet forever. It keeps gaining visitors over time if written and updated regularly.
    • It’s free ad estate: Nobody likes display advertisements, but they are a quick way to earn some healthy bucks from your blogs, especially if you rank higher in search and AI results.
    • It’s ideal to capture high-paying clients: Most celebrities and high-profile individuals look for pieces of knowledge that provide them with something fresh and unique. If you are the one to do so, chances are you can land some high-paying consultations.
    • It’s the best way to reach out and help people: How many people do you teach per day? Maybe a couple hundred in your area, if we’re stretching it. With blogging, you will be able to help everyone, worldwide, thanks to the power of the Internet.

    Blogs give you the ideal platform to establish yourself as an authority in your industry. If you keep publishing high-quality, consistent content, over time your blogs rank in search engines and even in AI Overviews, which further improves your chances of landing clients.

    How do you choose a fitness blog niche and topics?

    Pick a focused niche for your fitness blog.

    Choosing a focused niche is the first step of starting to write a fitness blog. This step helps you narrow down your target audience and gives your readers a reason to remember you.

    If you are trying to write about strength training, yoga, nutrition, and gear reviews all at once, you can end up producing content that feels thin and forgettable.

    For starters, pick a general idea that you want your blog to be focused on. For example, ‘Home workouts for people without gym access’ or ‘Gym equipment and gear reviews.’

    Then, you can narrow the niche further by combining a topic with an audience, which tends to perform better because it speaks to a specific reader’s exact situation.

    • Yoga for complete beginners, covering basic poses, breathing, and simple routines for people who’ve never stepped on a mat.
    • Plant-based diets for athletes, focused on protein sources, recipes, and recovery meals for people training hard on a vegan diet.
    • Running adventure content that mixes training plans, race stories, and injury prevention tips for hobby runners.
    • HIIT-focused blogs built around quick, intense workout routines paired with real success stories from readers.
    • Postpartum fitness guidance aimed at new mothers who need safe, gradual paths back to exercise.

    When you’re deciding on your niche, weigh your own experience and interest against what your audience actually searches for. Because whatever you write must be authentic so that you build trust with your audience.

    Best fitness blog topics to start with

    Fitness blog niche ideas.

    A handful of content pillars can carry your first few months of posts without you running out of ideas. 

    Workout tips and techniques, nutrition advice, product reviews, personal stories, and motivational content each give you a steady stream of angles to write from. 

    These pillars work because they map to the real questions readers type into search engines when they’re stuck on a fitness goal.

    You can also specialize by activity, such as yoga, HIIT, or running, or by audience segment, such as beginners, seniors, or postpartum readers. 

    Picking two or three pillars and rotating between them keeps your content calendar full while still feeling focused rather than scattered.

    How do you start writing a fitness blog step by step?

    Starting a fitness blog step by step means setting up a platform, choosing a name, and then writing your first post using a repeatable structure you can reuse for future articles. 

    #1: Set up your platform, domain, and blog name

    Set up your platform for fitness blogging.

    Similar to our blog ‘How to write a travel blog’, the first thing you do is choose your blogging platform.

    Today, there are multiple options to choose from:

    • WordPress
    • Wix
    • Webflow
    • Squarespace
    • Blogger

    When comparing platforms, prioritize reliable hosting, strong security, mobile-friendly templates, and room to add photos or video later. 

    If you go with self-hosted WordPress, you’ll need separate hosting from a provider like Bluehost or SiteGround, plus a registered domain name and an SSL certificate for the secure “https” prefix.

    Your blog’s name should reflect your niche, stay easy to spell, and match your domain closely. 

    Names like FitLife Journey or The Fit Chef show how a name can hint at the content inside without overexplaining it. 

    Once your domain is live, set your permalinks to the “post name” structure for clean URLs, and install a basic SEO plugin, like Yoast SEO, plus a security plugin and a spam blocker, like Akismet, before you publish anything.

    #2: Find your unique voice to communicate online

    Blogging requires you to have a voice so fresh and unique that people are attracted to what you have to offer.

    To make this simple, picture how you talk to your clients in real-time. Your advice varies from person to person, doesn’t it? 

    For example, a 60-year-old grandma with knee pain will be recommended a different set of exercises and tips as compared to a 24-year-old young man trying to compete in their first triathlon.

    Now, when you write your fitness blog, you need to channel that same energy, words, definitions, or examples that you use to motivate your students in your blog.

    This will help you find your voice online, allowing you to stand out from others and gain more followers with ease.

    #3: Write your first blog post using a simple template

    A repeatable post template removes the guesswork every time you sit down to write.

    A typical fitness blog should look something like this:

    • Write down your blog post title (should include your primary keyword), preferably between 140-160 characters with spaces.
    • Add a key takeaway section at the top to encourage AI-first formatting and improve content citability.
    • Start with a hook in the introduction that can contain your personal story, a lift gone wrong, or any example. Keep it light, around 100-150 words
    • Break the body into 3-5 subheadings, answering questions people might have for the topic.
    • Cite credible sources and data where needed, and include internal links pointing to your other posts to improve time on site.
    • Close with a short summary and a call to action (CTA), such as downloading the workout guide, following on Instagram, etc.

    Aim for at least 1,000 words per post, since longer, thorough content tends to perform better in search results and gives readers more reason to stay on the page. 

    Break up text-dense sections with images, a short video, or a bulleted list, so the post stays skimmable. Do this every 200-300 words.

    You can check out this “how-to write a fitness blog template” generated from Contentpen to help you understand the details better.

    How do you write a workout plan or program for readers or clients?

    Workout plan template to be included in your fitness blog.

    A workout plan lays out the exercises, sets, reps, and rest periods a reader needs to follow a routine safely and see results over time, and reporting these details clearly matters. 

    Whether you’re writing for blog readers or a specific coaching client, the structure stays similar, though a client program usually adds personal goals and progression notes based on that person’s fitness level.

    FieldWhat to include
    GoalThe specific outcome, such as building strength, losing fat, or improving mobility
    Exercise listEach movement in order, with a brief form cue for beginners
    Sets and repsThe exact volume, such as three sets of 12 reps
    Rest periodsTime between sets, typically 30 to 90 seconds depending on intensity
    Progression notesHow to increase difficulty over the following weeks

    Using a table or numbered list like this makes your workout content far easier to follow than a paragraph of instructions. Always add modifications for different skill levels, since a beginner and an advanced reader following the same post need different starting points.

    How do you optimize and promote a fitness blog for growth?

    Optimizing and promoting a fitness blog means combining basic SEO work with active outreach across social media, email, and other blogs so real readers actually find your content. 

    Publishing alone rarely builds an audience, since search engines and readers both need signals that your blog is active, trustworthy, and worth returning to.

    SEO basics every fitness blogger should know

    Search engine optimization, often shortened to SEO, is the practice of shaping your content so search engines can understand and rank it for relevant queries. 

    For fitness blogs specifically, that starts with keyword research to find out what your audience actually types into Google, followed by naturally working those terms into your titles, headers, and body text.

    • Write a clear meta description for every post, since this short snippet directly affects whether someone clicks your result over a competitor’s.
    • Add descriptive alt text to every image, which helps both accessibility and search visibility since search engines can’t see images directly.
    • Keep your site mobile-friendly and fast-loading, since slow pages lose visitors and rank lower in search results.
    • Aim to publish on a consistent schedule so users know when to expect your content and follow you.

    Contentpen’s keyword research and answer-first structuring can speed this process up considerably. 

    Automated keyword research

    Work on keywords worth writing for

    Get search terms with real ranking potential, not just high volume.

    Try Keyword Research for FREE
    AI SEO Interface

    The AI blog writer helps you build an SEO- and GEO-ready draft around real search intent within minutes. Automated content creation saves you time to add the stories, examples, and details that only you’d know, making writing fitness blogs an efficient process.

    Promotion channels that drive traffic

    Blog promotion across socials.

    Promotion is the ongoing work of getting your content in front of new readers after you hit publish. 

    Social platforms like Instagram, Facebook, and Pinterest work especially well for fitness content because they’re highly visual and engaging.

    Emails also deserve a place in your promotion mix, since a subscriber list gives you a direct line to readers that doesn’t depend on any platform’s algorithm. 

    Pair all this with regular analytics tracking through Google Analytics to see which blog posts perform best and which need a workaround. Then, use smart SEO opportunities from Contentpen to update your content directly with a click, without leaving the interface.

    Turn existing content into growth opportunities

    check

    Identify pages losing traffic or CTR

    check

    Find quick wins to improve clicks and rankings

    Find Content Opportunities
    AI SEO Interface

    Lastly, don’t skip community engagement, since replying to comments and running the occasional poll or Q&A turns casual visitors into loyal readers.

    Can you make money from a fitness blog, and what challenges should you expect?

    Yes, fitness blogs can generate real income, most commonly through a combination of affiliate marketing, display ads, and paid offerings like courses or coaching rather than a one-off revenue source. 

    Building income from your fitness blog will take time. Eventually, after 6-12 months of consistent work, when your blog starts getting steady organic traffic and reach, other content creators may also want to collaborate with you, opening yet another earning opportunity.

    Ways to monetize a fitness blog

    Affiliate marketing lets you earn a commission by linking to fitness gear, supplements, or apps through programs like Amazon Associates.

    Display advertising through networks like Google AdSense adds a passive income layer once your traffic grows, while subscriptions, online courses, and one-on-one coaching let you sell your expertise directly.

    Other ways to earn from your blog include:

    • Sponsored content, where a fitness brand pays for a review or a branded challenge featured on your blog.
    • Digital products like eBooks or workout guides that you create once and sell repeatedly.
    • Crowdfunding or reader donations from a loyal audience who values your ongoing content.

    Whichever methods you choose, always disclose affiliate links clearly, since FTC guidelines require this whenever you might earn a commission from a reader’s purchase.

    Common challenges and how to overcome them

    Building credibility without a formal certification is probably the biggest hurdle new fitness bloggers face. 

    Standing out in a crowded market and keeping content fresh as trends shift add further pressure. Therefore, citing credible sources and being upfront about your experience level goes a long way toward earning trust.

    Finding a fitness mentor or gym mentor through a local gym, a certification program, or an online coaching community can also fill in knowledge gaps and keep you accountable as you grow. 

    Many established bloggers still consult registered dietitians or certified trainers before publishing anything technical, and that habit is worth adopting early.

    Wrapping up

    Learning how to write a fitness blog really comes down to four habits: Picking a focused niche, publishing consistently, writing content people can actually act on, and promoting it once it’s live. 

    None of these steps require a certification or a big budget, just a clear plan and the discipline to follow it post after post.

    Start small. Write one solid post this week using the template above, then build your content calendar from there. 

    Tools like Contentpen can take some of the heavy lifting out of outlining, drafting, and optimizing each post. 

    Write content that’s built to rank, not just read

    Create search-optimized blogs aligned with SEO and GEO signals, so your content performs well across search and AI-driven discovery.

    Try SEO Blogging FREE
    AI SEO Interface

    So, you can spend more time on the parts only you can bring, such as your voice, your experience, and your genuine interest in helping others.

    Frequently Asked Questions

    What is the 3-3-3 rule for fitness?

    The 3-3-3 rule generally refers to doing three exercises, for three sets each, three times a week, a simple structure often used for beginner routines. It’s a popular beginner-friendly blog topic because it’s easy to explain and follow.

    How do I find a fitness mentor or personal training mentor?

    Look for mentors at local gyms, through certification programs, or within online coaching communities on Facebook. Networking through fitness blogs and social media also connects you with experienced trainers willing to share guidance and fitness-related knowledge.

    How often should I publish new fitness blog content?

    A consistent weekly schedule works better than sporadic posting, since it signals activity to both readers and search engines. Quality still matters more than frequency, so don’t sacrifice depth just to hit a deadline.

    What’s the easiest way to keep fitness blog content organized and consistent?

    Use a content calendar to plan topics weeks in advance or consider an AI tool like Contentpen to plan, draft, and schedule posts from one workspace. This keeps your publishing rhythm steady without constant manual effort.

  • How to write a travel blog: A beginner’s step-by-step guide

    How to write a travel blog: A beginner’s step-by-step guide

    Wondering how to write a travel blog when you have never published a single post before? Let’s learn that today so that it doesn’t halt your first steps. 

    The short answer is that you pick a simple platform, write about a trip you have already taken, and publish before it feels perfect. Most beginners get stuck because travel blogging advice online contradicts itself. 

    One site tells you to buy expensive camera gear, another insists you niche down immediately, and a third says you need a flawless website before writing a word. That noise creates analysis paralysis instead of actual writing.

    This guide cuts through all of that and shows you how to write a travel blog step by step. Starting with what you genuinely need before you publish, how to structure a post, and how AI tools such as Contentpen can speed up your research and drafting. 

    Let’s start with the groundwork.

    Key takeaways

    • Starting your blogging journey early beats waiting for a perfect setup, since search engines need months to trust new content anyway.
    • Self-hosted WordPress remains the most flexible platform for long-term growth and future monetization.
    • Strong posts pair personal storytelling with practical, structured value like costs, logistics, and itineraries.
    • Search and AI engines both reward clear structure, real experience, and answer-first writing.
    • Tools like Contentpen can speed up research, drafting, and formatting so you spend more time on the story.

    What do you need before you start a travel blog?

    Prerequisites to start a travel blog.

    Knowing how to write a travel blog starts with three basics: 

    • A rough focus for your content
    • A website platform that will not box you in later
    • A willingness to publish before everything feels ready. 

    You do not need a business plan, a bag full of camera gear, or a professionally designed logo to get going.

    A notebook of trip ideas, your mobile phone camera, and a working hosting account cover the essentials for week one. Your niche, your voice, and even your visual style tend to sharpen naturally once you have a few months of published posts behind you.

    Why picking a niche makes writing easier

    A niche gives every future post a clear filter, so you are not staring at a blank page wondering what to cover next. 

    A family travel blog naturally leads toward posts about kid-friendly hotels and packing lists, while a single-country guide points you toward regional itineraries and visa logistics. 

    Budget backpacking and higher-end travel are two more common lanes, and each shapes tone and topic choices almost automatically. 

    Most bloggers do not lock in a niche on day one anyway. It tends to surface after several months of publishing broadly and noticing which posts readers respond to most.

    How to create a travel blog for free (or cheap)

    Free vs. WordPress hosted travel blogs.

    Creating a travel blog for free usually means a platform like Blogger or Medium, but these options limit your ownership and block most real monetization down the road. 

    Self-hosted WordPress costs $4 a month for hosting (annual plan, as of writing this blog), and it gives you full control over design, plugins, and future income streams. 

    Setting it up takes roughly 10 to 15 minutes:

    1. Buy a hosting plan from a reliable provider, such as Bluehost, which also provides you with a free domain (your blog name).
    2. Use the one-click WordPress installer inside your account dashboard.
    3. Pick a free theme to start with. You can pick paid ones later through Elegant Themes or any other provider you like.
    4. Switch your permalinks to the post name format for clean, readable URLs. Such as our travel blog examples post with the link ‘https://Contentpen.ai/blog/travel-blog-examples’.

    Why is naming your travel blog an important step?

    Whichever route you choose, the domain name you register matters more than the platform itself, since that is what builds authority as your blog matures.

    Try to pick something your content can’t grow out of. For instance, if we choose a travel blog name “Exploring Asia”, your readers might naturally feel awry once you start exploring continents other than Asia.

    Similarly, doing something like “Wandering [X]”, “Nomadic [Y]” is also not a good idea since a lot of people have already done it, and honestly, the names have started to feel repetitive. The last thing you want is to get confused with another travelling blogger.

    So choose something personal, unique, easy-to-share, and classy. Most traveloggers start their blogs with their names, which is fine as well. Others, such as Never Ending Footsteps, choose a generic but timeless name that they can use perfectly to represent their future travels.

    How do you structure a travel blog post that people actually read?

    How to write a blog post - Contentpen.ai.

    A travel blog post that people actually read follows a repeatable structure.

    #1: Start with a story or a hook, not a summary

    Open with a specific moment, like the exact instant you realized you had boarded the wrong train, instead of a vague line about how amazing travel is. 

    Lost with Purpose travel blog example.

    Let’s take a look at how Lost With Purpose, another famous travel blogger, started to write their post for their Syria journey. They started with their personal experience to immediately hook the reader into reading the rest of the post.

    Readers and AI search tools both respond better to specifics than to general enthusiasm. Try to answer the reader’s core question within the first few sentences too before getting into more details.

    #2: Build the body around practical value

    Once you have hooked readers, give them what they came for: Itineraries, cost breakdowns, or step-by-step transportation instructions organized under clear subheadings. 

    Write these details while you are actually traveling, using notes or photos captured in the moment, since logistics fade fast from memory. 

    A draft written on the train home is almost always more accurate than one pieced together weeks later.

    #3: Add images, videos, and links with purpose

    Original photos taken specifically for the post do more for reader trust than any stock image ever will. Once again we’ll mention that you don’t need a fancy gadget setup to achieve this; your 5-year-old iPhone is enough if you know your photography basics enough.

    Next, add internal links pointing to related posts on your own site, plus a few external links to authoritative sources, such as an official tourism board page.

    As a travel blogger, you should also look to register with brands for their affiliate programs to earn a bit of extra cash cushioning your travels.

    If you have footage, even a short embedded video gives skimmers a reason to stay on the page longer. You can redirect your blog traffic to your YouTube, TikTok, or other video platforms through these embeds.

    #4: Format for easy reading

    Formatting a blog post is the best way to encourage readers to spend more time on your site, and search engines take notice of that. Your content eventually gets recommended, which means more visitors to sell your digital products to, earn through affiliate links, or display ads.

    Try to break up text every two or three sentences with a subheading, video, or photo. Highlighting key phrases helps skimmers catch the main point of a paragraph without reading every word. 

    You can also create short bullet lists when stating multiple items, for example, things to pack for a 3-day getaway trip to Bali. Such small elements help your site more than you realize.

    #5: Close with a clear takeaway or next step

    End by restating the answer to the question your post opened with, in a sentence or two. Then point readers toward a related post, or invite a specific question in the comments, so the visit does not end the moment they finish reading.

    You can also leave with any other CTA (Call-to-action) you want, for instance, asking the readers to follow your Instagram, or any channel you want to grow.

    How can AI tools speed up writing your travel blog?

    AI-assisted blog workflow - Contentpen.ai.

    AI tools change how you write a travel blog by handling repetitive early stages, like keyword research and outlining. They allow you more time to spend on storytelling, drama, and examples only you can add, making the entire process of writing a travel blog highly efficient.

    Take Contentpen, for instance. It is an all-in-one AI blogging platform that is built around exactly this workflow for creators who want to publish consistently without burning out their creative fuel.

    Automate SEO writing tasks

    Instead of guessing what to cover or staring at a blank document, you move from a rough topic to a structured, search-ready draft in far less time. You can edit the details as you wish in the editor, along with tuning your SEO and GEO score with the tool.

    Take a look at this example generated from Contentpen for the topic “How I balanced studying and travelling abroad.”

    Balanced studying and travelling abroad blog example generated with Contentpen.

    Believe it or not, this is all AI. Yes!

    AI blog writers have become crazy accurate during the past few years, and Contentpen is the frontrunner. Not just because it’s our product, but because it does generate amazing results for its users.

    We could point you to our testimonials from different niches, including travel, real estate, tech, retail, and others. But the best way to know is to give the tool a go. Try the 7-day free trial now for yourself and see the difference between manual and AI-assisted blogging.

    Sure, you may need to do some edits yourself, but the time these tools save is significant.

    Polish, add visuals, and publish without extra tools

    Beyond drafting, Contentpen also includes the built-in ‘Ask AI’ editor to help you change tone, shorten, expand, or rewrite a particular paragraph entirely.

    Smart AI image generation helps you create your travel destination pictures in whatever style you want, polish existing details, or use as an inspiration to draw something unique.

    A built-in content calendar helps you plan posts around upcoming trips, with one-click WordPress publishing that removes the copy-paste step entirely. 

    In short, quality content does not have to take hours once tools like Contentpen handle research, drafting, and formatting in a single workspace.

    Can travel bloggers make money?

    Travel blogger monetization growth.

    Yes, they do. Travel bloggers can make money, mainly through affiliate commissions, brand partnerships, and sponsored content. However, it typically takes months or years of steady publishing before income becomes meaningful. 

    Growth depends less on a single viral post and more on consistent output, genuinely useful content, and patience while search engines learn to trust your site.

    Brand partnerships and affiliate programs for travel bloggers

    Affiliate marketing is the most common starting point for new travel bloggers, and it works like this:

    • You earn a small commission when a reader books a hotel, rents a car, or buys travel gear through your tracked link.
    • It is realistic, but usually a slow build rather than a quick income stream, so only recommend products you have genuinely used yourself.
    • Adding affiliate links early, even with modest traffic, means you are ready to earn once traffic grows.

    If finding affiliate programs seems like a hassle, you can join specific digital partnership platforms like Travelpayouts to make this process a bit easier.

    Once you have an approved Travelpayouts account, try to join travel-associated affiliate programs, such as:

    • Booking.com
    • GetYourGuide
    • Busbud
    • RentalCars.com
    • Viator
    • Trainline

    The idea is to recommend the hotel you check-in, the restaurant you ate in, and the products/services you used during your travels. If readers tried to take the same itinerary as you and weren’t satisfied, they’ll lose trust, and you’ll lose repeat business. Simple as that.

    Being a consistent poster and building authority over time

    New websites sit in a kind of probationary period, sometimes called a sandbox, where search engines watch a site for months before ranking it meaningfully. 

    Most blogs see very little traffic for 6 to 12 months regardless of writing quality, so domain authority simply needs time to build up. 

    The idea here is to keep going and posting content on a consistent schedule. Do what you love doing, even if your options look bleak. 

    There will be a light at the end of the tunnel if you don’t give up. Sure, this does sound a bit cliché, but data from Productive Blogging shows that most bloggers don’t see more than $100/month on average from their blogs in the first three years!

    Auditing posts that are leaking money

    Besides the patience required to grow a travel blog, you also need your analytical hat and revisit your older posts that don’t perform on Google or AI engines.

    Look for all performance figures in Google Analytics or inside Contentpen analytics to stay in the same writing workflow without interruptions.

    Tie the numbers down to your goals. For instance, if we want more organic traffic and time on page, we might rehash a post with better secondary keyword coverage and internal linking with our recent, most engaging posts.

    Read more: How to do keyword research for SEO (step-by-step guide).

    Contentpen’s SEO opportunities dashboard works closely with analytics and uses built-in AI to analyze and provide you with suggestions to uplift blog performance. You can apply these fixes with a click, saving a lot of effort in the process.

    Turn existing content into growth opportunities

    check

    Identify pages losing traffic or CTR

    check

    Find quick wins to improve clicks and rankings

    Find Content Opportunities
    AI SEO Interface

    Chasing new content is required, but not always the answer behind a travel blog that isn’t earning well. Sometimes, small adjustments to even the meta title, description, or alt text of images could alter different results with existing content.

    Writing with the E-E-A-T framework in mind

    Last, but not least, you need to write with the E-E-A-T framework in mind.

    E-E-A-T stands for Experience, Expertise, Authoritativeness, and Trustworthiness, a framework Google uses to judge content quality. 

    In plain terms, it means writing from real, firsthand travel experience rather than recycled advice you skimmed elsewhere. 

    Posts structured with clear answers and honest detail tend to perform much better in traditional search results. Such content is also increasingly referenced by AI search tools like ChatGPT and Gemini, driving more users to your platform.

    The takeaway

    Learning how to write a travel blog is not about finding one perfect platform or waiting until your photography looks professional. 

    It comes down to publishing consistently, structuring posts so they deliver real value, and letting your own voice do the differentiating work that generic content never can. 

    Start with whatever trip you have already taken, pick a simple platform like self-hosted WordPress, and give each post the structure readers and search engines both respond to well. 

    If you want to move faster from idea to published post, a tool like Contentpen can handle the research, outlining, and formatting side of things for your convenience. Publish the first post today, then adjust everything else as you learn what works.

    Frequently asked questions

    How do I start a travel blog for free?

    Starting for free usually means using platforms like Medium, but they limit ownership. A better low-cost route is self-hosted WordPress, which runs around $4 a month for hosting and gives you full control over content, design, and future income streams.

    How do you write a travel blog for beginners with no experience?

    Start with a trip you have already taken and write it the way you would tell a friend, focusing on specific moments rather than general impressions. If you are nervous about committing to your own site, try guest posting on a smaller, established travel blog first. It builds a portfolio and confidence without the pressure of managing a website.

    How can I create a family travel blog or one for friends and family?

    A family travel blog does not need to be public or monetized, so a simple platform works fine, even a private WordPress site or a shared photo page with captions. Organize posts by trip or year, focus on stories and photos over technical setup, and keep the tone personal.

    How do I get paid for travel writing beyond my own blog?

    Pitch freelance articles to travel publications and websites once you have a few strong writing samples ready to share. Brand partnerships and sponsored content become realistic after you have built an audience online.